This area is where you can manage your campaigns. You can plan wide-scale campaigns such as discounts, free products, etc.
Tabs:
Product Pricing: Helps you create campaigns that affect the price of products. You can also define an additional fee or discount for products.
Cart Discount: Helps you create cart discount campaigns. With these campaigns, you can define discount coupons valid during checkout. From the Settings section, you can also combine different discounts.
Checkout Fee: Helps you add an extra fee or discount on the checkout screen. For example, you can apply a discount on shipping costs or add a special fee.
Exclusions: Helps you define which products will not be included in campaigns or unaffected by campaign coupons.
Product Collections: Helps you create your own product groups suitable for your campaign. Example: You can create a product group that will receive a 10% discount and easily set up a campaign by selecting this group.
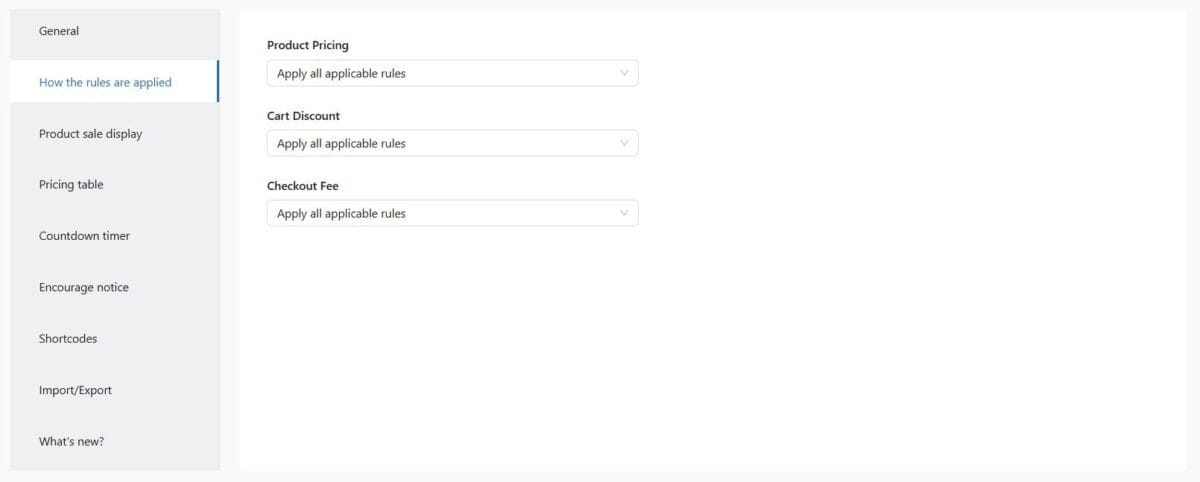
Settings: Helps you define various settings on how your created campaigns and exclusions will apply to products or product types.
Tip To save changes made in this area, click the “Save” button located on the right.
6.1 – Product Pricing
Helps you create campaigns that affect the price of products. You can also define an additional fee or discount for products.
In the left menu, click on the “Discount Rules” option.
On the panel that appears, the “Product Pricing” tab will automatically be selected.
To create Product Pricing, click the “Add Your First Rule” button. If you already have a campaign, click the “Add Rule” button.
The panel will display “Your own campaign” and other template campaigns. You can use a suitable template or create a brand-new campaign specific to your needs.
Your own campaign: Allows you to create a campaign specific to your needs.
Sale50% All Products: Lets you apply 50% discount on all products.
Sale 10$ All Products: A simple campaign applying a fixed discount. Sets a fixed discount amount for all products.
Buy 3 get 1 free item: In this campaign, when customers buy 3 items, they receive 1 of the same product for free.
Sale 30% from the third item: In this campaign, when customers buy 3 or more items, a 30% discount is applied.
Black Friday Event: This template can be used for Black Friday sales, offering various discounts.
Buy 1 get 50% discount off the second one: In this campaign, when a customer buys 1 item, the second of the same product is 50% off. For example, buy 1 t-shirt, get the second at 50% off.
Buy X get Y with discount: Allows customers to buy a specific product (X) and get another product (Y) at a discounted price.
Sale 50% off 3 items in package: For a limited time, when 3 selected products are bought together, a 50% discount is applied.
Sale 30% on third item: In this campaign, when customers buy 3 or more items, a 30% discount is applied.
Select ‘Your own campaign’ for a new campaign. Click the ‘Add Campaign’ button on the panel and start creating your own campaign.
In the “Name” section, define the name of your campaign.
In the “Rule Type” section, select the type of campaign you want to create. For product discounts, there are 7 types of campaigns you can use:
Simple Adjustment: Allows you to apply a fixed or percentage-based discount on a specific product.
Bulk Pricing: Automatically reduces the unit price when a certain quantity of the product is purchased (e.g., 10+ purchases = 10% discount).
Product Bundle: Offers a special discounted price when multiple products are purchased together.
Buy One Get One (Same Product): When one product is purchased, one additional unit of the same product is given for free.
Buy X Get Y: When a specified number of product X is purchased, a product Y (same or different) is given for free.
Tiered Pricing: As the purchased quantity increases, the unit price decreases step by step.
Product Fee: Applies a discounted or fixed extra fee for additional product(s) purchased together with a specific product.
Depending on the campaign type you selected, make the necessary adjustments and click the “Save” button at the top right.
Tip At the top right of each created campaign, you will find an “Enable / Disable” button, which allows you to activate or deactivate the campaign.
6.1.1 – Simple Adjustment
Simple Adjustment allows you to create basic and uncomplicated discount campaigns for product discounts. Then, you can select affected product categories, product names, variations, tags, price ranges, or specific products for this campaign.
Click on the “Discount Rules” option from the left admin menu.
In the panel that appears, the “Product Pricing” tab will be automatically selected.
To create a product discount, click the “Add Your First Rule” button. If you already have an existing campaign, click “Add Rule“.
For a new campaign, choose the “Your own campaign” template.
Click the “Add Campaign” button in the panel and start setting up your campaign.
In the “Name” field, enter the name of your campaign (e.g., October Premium Watch Campaign).
Select “Simple Adjustment” as the “Rule Type“.
Fill in the fields under the “Pricing” tab:
Pricing Types: In Simple Adjustment, there are 3 pricing methods:
Fixed Discount: Subtracts a fixed amount from the product price (e.g., $50 off).
Percentage Discount: Applies a percentage discount on the product price (e.g., 20% off).
Fixed Price: The product is sold at a fixed price regardless of its original price (e.g., always $100).
Using formula: By selecting this option, you can define the “Discount Amount” with a pricing formula. Example: Quantity: {n}*2, pricing formula: {n}*10 → Buy 2 items, get $10 off. Buy 4 items, get $20 off, etc. ({n} refers to the quantity purchased for a single product. “10” is the discount value.)
Apply discount to only first matching product: This option allows the discount to be applied only to the first matched product in the cart. 💡 Note: If you don’t need to deal with settings such as “apply to first matching product”, you can leave these fields blank.
Under Buy Products (Which products will get discount?), assign products for the discount rule:
Click on the “add one” button.
Filtering Method: The campaign selects products by filtering. If you choose “Any”, the campaign applies to products that meet any of the selected conditions. If you choose “All”, the campaign applies only to products that meet all of the specified conditions.
Product Selection: From the dropdown menu, you can select a product, category, or product variation. If you choose “In list”, the selected product(s) will be added to the campaign. If you choose “Not in list ”, the selected product(s) will be excluded from the campaign.
View Selected Products: See all products included in the campaign in one list.
Under the “Settings” tab, adjust the fields according to your campaign. Settings allow you to enable or disable options such as:
Show offer description product page (only when conditions are met)
Show tooltip on cart item price
Enable schedule
Usage limits
The “Conditions” tab lets you define under what conditions the Simple Adjustment will apply. The rule can trigger when any or all of the defined conditions are met.
After completing the necessary settings, click the “Save” button at the top right.
The table below gives an illustration of how the final product prices looks like under the different types of Pricing methods when the value “10” is set as example.
Pricing Types
Value
Product Price
Adjusted Price
Fixed discount
10
$20
$20 − $10 = $10
Percentage discount
10
$20
$20 − $2 = $18
Flat price
10
$20
$10
Sample Scenario: October Campaign
Let us assume you are planning a special discount campaign in October. In this campaign:
Campaign Name: October Premium Watch Campaign
Product: Premium Watch (Black)
Duration: Throughout October
Discount Type: Percentage Discount
Discount Rate: 50%
Description: During the campaign period, a 50% discount will be applied to Premium Watch (Black) products.
With this example, you can directly reduce the price of a specific product by 50% and activate the campaign only on selected products.
6.1.2 – Bulk Pricing
Bulk Pricing allows you to create bulk pricing campaigns (based on product quantity ranges or specific amounts). Additionally, you can target product categories, product names, variations, tags, price ranges, and specific products to apply this campaign.
Click on the “Discount Rules” option from the left admin menu.
In the panel that appears, the “Product Pricing” tab will be automatically selected.
To create a product discount, click the “Add Your First Rule” button. If you already have an existing campaign, click “Add Rule“.
For a new campaign, choose the “Your own campaign” template.
Click the “Add Campaign” button in the panel and start setting up your campaign.
In the “Name” field, enter the name of your campaign (e.g., October Premium Watch Campaign).
Select “Bulk Pricing” as the “Rule Type“.
Fill in the fields under the “Pricing” tab:
Pricing Ranges: Define the ranges of quantities and the discount to apply. You can also use the import/export icons to reuse or back up your ranges.
Select Count quantity by. This field allows you to choose how the campaign will be applied to different product quantities.
All together: Takes into account the total quantity of all products in the basket, regardless of product type. A bulk discount is applied based on the total quantity. Example: 5 items of Product A, 3 items of Product B → total of 8 items → discount is triggered.
Item quantity in each cart line: The discount is calculated separately for each product line based on the quantity in that line. Example: 5 units of Product A and 3 units of Product B → each product receives a discount based on its quantity.
Each single product/variable products: Product variations (e.g. size, colour) are treated as separate products. Discounts are applied according to the quantity of each variation. Example: 3 ‘Small’, 4 ‘Medium’ → each receives a separate discount according to its own quantity.
Pricing Types: There are three different pricing methods in the ‘Bulk Pricing’ discount rule:
Fixed Discount: A specific amount is deducted from the product’s selling price (e.g. $50 discount).
Percentage Discount: A discount is applied at a specified percentage rate on the product price (e.g. 20% discount).
Flat Price: The product is sold at a fixed price regardless of its normal price (e.g. the product is always sold for $100).
Pricing Value: This option determines the discount amount to be applied. It is applied per product.
The Apply discount to only first matching product option allows you applying the rule only to the first matching product in the cart. 💡 Note: If you don’t need to deal with settings such as “apply to first matching product”, you can leave these fields blank.
Buy Products (Which products will get discount?): Select which product(s) the discount will apply to or exclude. To do this:
Click on the “add one” button.
Filtering Method: The campaign selects products by filtering. If you choose “Any”, the campaign applies to products that meet any of the selected conditions. If you choose “All”, the campaign applies only to products that meet all of the specified conditions.
Product Selection: From the dropdown menu, you can select a product, category, or product variation. If you choose “In list”, the selected product(s) will be added to the campaign. If you choose “Not in list ”, the selected product(s) will be excluded from the campaign.
View Selected Products: See all products included in the campaign in one list.
Under the “Settings” tab, adjust the fields according to your campaign. Settings allow you to enable or disable options such as:
Show offer description product page (only when conditions are met)
Show tooltip on cart item price
Enable schedule
Usage limits
The “Conditions” tab lets you define under what conditions the Bulk Pricing will apply. The rule can trigger when any or all of the defined conditions are met.
After completing the necessary settings, click the “Save” button at the top right.
Example Scenario: October Campaign
Let’s assume you are planning a special discount campaign for the month of October. In this campaign:
Campaign Name: Welcome October
Duration: Throughout Octoberber
Product: Premium Watch (Black)
Discount Type: When a customer buys 1–2 units of the product, apply a fixed discount of $50; when buying 3–6 units, apply a 25% discount.
Using this example, the product’s ‘Discounted Amount’ will change as follows.
Quantity
Product Price
Discount Type
Discount Amount
Discounted Price (Unit)
1 – 2
$850
Fixed Discount
-$50
$800
3 – 6
$850
Percentage Discount
-$212,50
$637,50
6.1.3 – Product Bundle
A Product Bundle refers to a discount campaign where customers receive a discount when purchasing a specific combination or package of products together.
Click on the “Discount Rules” option from the left admin menu.
In the panel that appears, the “Product Pricing” tab will be automatically selected.
To create a product discount, click the “Add Your First Rule” button. If you already have an existing campaign, click “Add Rule“.
For a new campaign, choose the “Your own campaign” template.
Click the “Add Campaign” button in the panel and start setting up your campaign.
In the “Name” field, enter the name of your campaign (e.g., Special Campaign).
Select “Product Bundle” as the “Rule Type“.
Fill in the fields under the “Pricing” tab:
Quantity: Determines the number of products that must be purchased for the campaign to be valid.
Pricing Types: In a basic campaign, there are 3 different pricing methods:
Fixed Discount: Applies a fixed discount amount to each product in the bundle.
Percentage Discount: Applies a percentage discount to each product in the bundle.
Flat Price: Applies a fixed price to each product in the bundle.
Pricing Value: Defines the discount amount to be applied per product or for the entire bundle during the campaign.
Maximum Value: Sets the maximum discount that can be applied to a product, even if the calculated discount amount is higher.
Using Formula: Allows the use of formulas to calculate discounts and pricing. With this option, bundle discounts can be defined using advanced formulas. Thus, prices can be calculated based on specific conditions, enabling flexible discount strategies. Example: Quantity Formula: {n}2, Price Formula: {n}10 → Buy 2 products, get a $10 discount. Quantity Formula: {n}*4, Price Formula: {n}*20 → Buy 4 products, get a $20 discount, etc. 💡 Note: If you don’t need to work with formulas, you can leave these fields empty.
Affected Items: This option specifies which product(s) the discount campaign will apply to. There are three different options here:
Single Item: The discount applies only to the selected single product. For example, you can set a special 10% discount for a specific laptop model.
Whole Bundle: The discount applies to all selected products together (as a package). In other words, the discount is valid only if the customer buys all products in the package. For example, a 15% discount on the “Laptop + Bag + Mouse” package.
Filter: The discount applies to selected products according to certain rules (product category, product variation, brand, etc.). Within the filter, you can choose options such as “Lowest Price,” “Highest Price,” or “Bundle” to specify which product(s) the discount will apply to.
Apply discount to only first matching product: This option means that even if multiple products in the cart meet the discount criteria, the discount will only apply to the first matching product. 💡 Note: If you don’t need to work with settings like “first matching product,” you can leave these fields empty.
Buy Products(Which products will get discount?): This section allows you to add the products the campaign will apply to. For example: product category, product tag, product attribute, etc. To do this:
Click on the “add one” button.
Filtering Method: The campaign selects products by filtering. If you choose “Any”, the campaign applies to products that meet any of the selected conditions. If you choose “All”, the campaign applies only to products that meet all of the specified conditions.
Product Selection: From the dropdown menu, you can select a product, category, or product variation. If you choose “In list”, the selected product(s) will be added to the campaign. If you choose “Not in list ”, the selected product(s) will be excluded from the campaign.
View Selected Products: See all products included in the campaign in one list.
Under the “Settings” section, adjust the fields according to your campaign. Settings allow you to enable or disable the following options:
Show offer description in product page
Show tooltip on cart item price
Enable schedule
Usage limits
The “Conditions” tab allows you to define under which conditions the rule will apply. The rule can be triggered when all or any of the defined conditions are met.
After making the necessary adjustments, click the “Save” button located at the top right.
Example Scenario: Special Campaign
Let’s assume you want to plan a special discount campaign to both increase sales and reduce stock for a product with high stock quantity. In this campaign:
Campaign Name: Special Campaign
Product: Premium Watch (Black)
Duration: Unlimited
Discount Type: Buy 3 units of “Premium Watch (Black)” and get each one for only $50 discount.
Using this example, the product’s ‘Discounted Amount’ will change as follows.
Quantity
Standard Price (Per Unit)
Total Standard Price
Campaign Status
Discounted Price (Total)
1
$850
$850
No campaign
850
2
$850
$1700
No campaign
$1700
3
$850
$2550
There is a promotion (buy 3, get $50 off each)
$2400
6.1.4 – BOGO (Same Product)
The Buy 1 Get 1 Free campaign is a promotion that encourages customers to shop more by offering a free or discounted product when a specific product, product category, or product tag is purchased. It is an effective method to boost sales, clear out stock, or reward loyal customers.
The two most common Buy 1 Get 1 Free campaigns are:
Buy X items, get 1 item at a discount Example: Buy 3 items, get 1 item with a 50% discount.
Buy one, get one free Example: Buy 1 item, get 1 item for free.
Click on the “Discount Rules” option from the left admin menu.
In the panel that appears, the “Product Pricing” tab will be automatically selected.
To create a product discount, click the “Add Your First Rule” button. If you already have an existing campaign, click “Add Rule“.
For a new campaign, choose the “Your own campaign” template.
Click the “Add Campaign” button in the panel and start setting up your campaign.
In the “Name” field, enter the name of your campaign (e.g., Buy 2 Get 1 at 50% Off (Same Product)).
Select “BOGO (Same Product)” as the “Rule Type“.
Fill in the fields under the “Pricing” tab:
Buy and Get: This is the area where you define how many items your customer needs to buy and what they will get in return (Free/Discount).
Free: Create campaigns like “Buy 3 items, get 1 free” and define how many items your customer gets for free after a certain purchase. The “Is Repeat?” option allows you to decide whether the rule will repeat or not.
Discount: Create campaigns like “Buy 3 items, get 1 at 50% off” and define how many items your customer gets at a discount and the discount percentage after a certain purchase.
Pricing Types: In a simple campaign, there are 3 different discounting methods:
Fixed Discount: A specific amount is deducted from the product’s sale price (e.g., $50 discount).
Percentage Discount: A discount is applied as a percentage of the product price (e.g., 20% discount).
Fixed Price: The product is sold at a fixed price regardless of its normal price (e.g., the product is sold for $100).
Apply discount to only first matching product: This option allows the campaign to be applied only to the first matching product in the cart. 💡 Note: If you don’t need to deal with settings like “first matching product,” you can leave these fields empty.
Buy Products(Which products will get discount?): Select which product(s) the discount will be applied to or excluded from. For this:
Click on the text “add one.”
Filtering Method: The campaign is selected by filtering products. If you select “Any,” any of the selected products will be included in the campaign. If you select “All,” the campaign will only be valid for products that meet all the conditions.
Product Selection: From the dropdown menu, you can select a product, category, or product variation. If you choose “In List,” the selected product(s) will be added to the campaign. If you choose “Not in List” the product(s) will be removed from the campaign.
View Selected Products: You can view all the products you have included in the campaign collectively from here.
Customise the fields under the ‘Settings’ heading to suit your campaign. Settings allow you to enable or disable the following options:
Show offer description in product page
Show tooltip on cart item price
Enable schedule
Usage limits
You can specify the conditions under which the BOGO campaign applies via the ‘Conditions’ tab. The campaign can be activated when all or any of these conditions are met.
After making the necessary adjustments, click the “Save” button located at the top right.
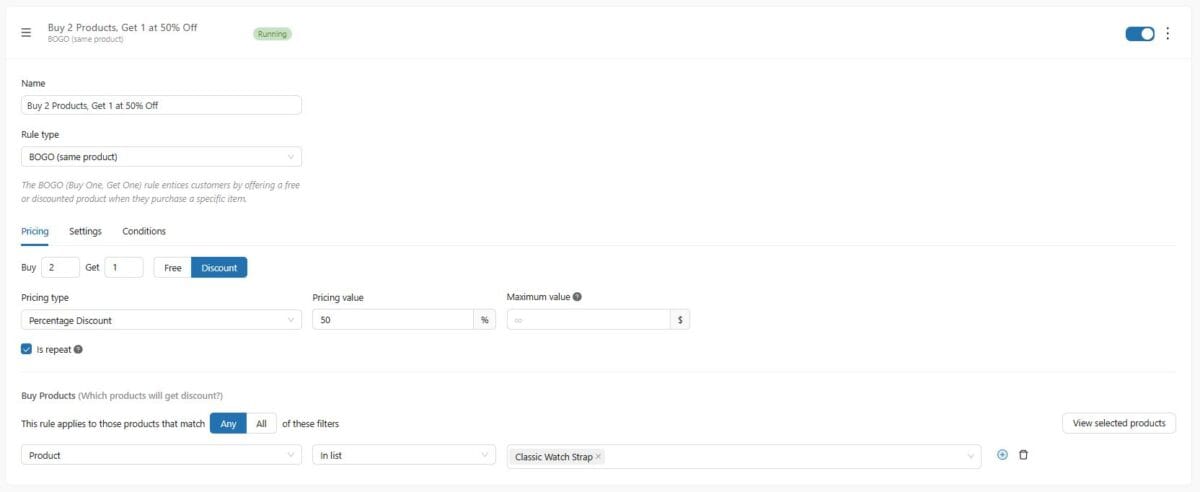
Example Scenario 1: Buy 2 Products, Get 1 at 50% Off
Suppose you have a high stock of a certain product and want to increase sales while also reducing stock. In this campaign:
Campaign Name: Buy 2 Get 1 at 50% Off (Same Product)
Product: Classic Watch Strap
Duration: Unlimited
Discount Type: Buy 2 of the “Classic Watch Strap,” get 1 more of the same product at 50% off.
Using this example, the product’s ‘Discounted Amount’ will change as follows.
Quantity
Normal Total Price
Promotion Status
Discounted Total Price
1
$55
No campaign
$55
2
$110
No campaign
$110
3
$165
3rd item 50% off
$137,5
6
$330
One item at 50% off for every three items purchased (applies twice)
$275
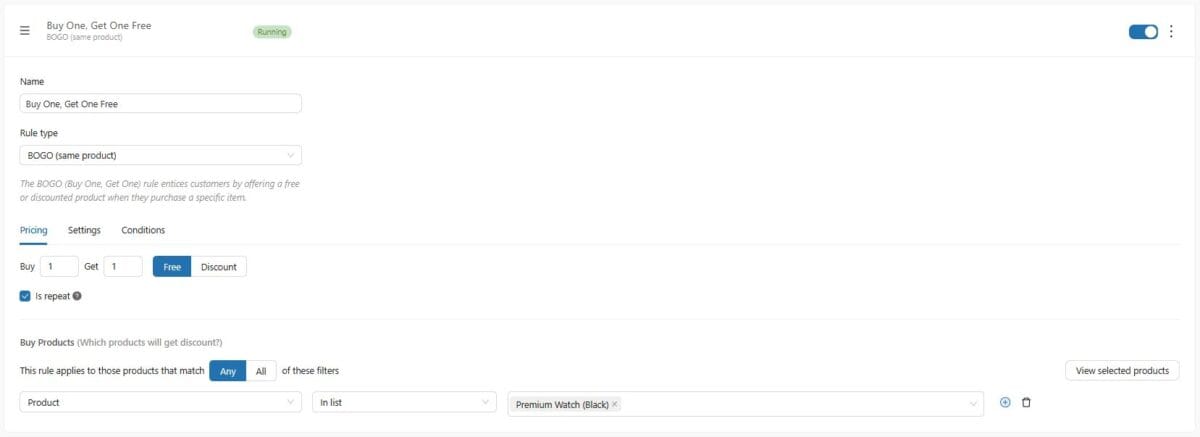
Example Scenario 2: Buy 1 Product Get 1 Free
Suppose you have a high stock of a certain product and want to increase sales while also reducing stock. In this campaign:
Campaign Name: Buy 1 Get 1 Free (Same Product)
Product: Premium Watch (Black)
Duration: Unlimited
Discount Type: Buy 1 of the “Premium Watch (Black)” product, get 1 more of the same product for free.
6.1.5 – Buy X Get Y
The Buy X Get Y campaign allows you to create a gift-focused campaign. That means when a customer purchases any product included in this campaign, they can receive a free or discounted product. Additionally, you can choose which products will be affected by this campaign, including product categories, product names, variations, tags, price ranges, or specific items.
Click on the “Discount Rules” option from the left admin menu.
In the panel that appears, the “Product Pricing” tab will be automatically selected.
To create a product discount, click the “Add Your First Rule” button. If you already have an existing campaign, click “Add Rule“.
For a new campaign, choose the “Your own campaign” template.
Click the “Add Campaign” button in the panel and start setting up your campaign.
In the “Name” field, enter the name of your campaign (e.g., Buy 1 Laptop, Get 1 Watch Free).
Select “Buy X Get Y” as the “Rule Type“.
Fill in the fields under the “Pricing” tab:
Count quantity by: Choose how the campaign should apply across different product quantities. This section also allows you to decide if the rule should repeat or not with the Repeat option
All together: The discount applies based on the total quantity in the cart, regardless of product type. Example: Buy 5 of Product A + 3 of Product B → total 8 items → discount applied.
Item quantity in each cart line: The discount applies separately to each product line item. Example: Buy 5 of Product A + 3 of Product B → discount applied individually to each product line.
Each single product/variable products: The discount applies based on product variations (e.g., size, color). Example: Buy 3 of “Small” + 4 of “Medium” → discount calculated separately per variation.
Buy Products (X Products): Select which products are included in the campaign:
Click on “add one” text.
Filtering Method: Choose how products will be filtered. If you select Any, any product meeting the conditions will qualify. If you select All, only products that meet all conditions will qualify.
Product Selection: From the dropdown menu, select product, category, or variation. If you choose In List, products will be added. If you choose Not in List, products will be removed.
View Selected Products: Here you can view all the products included in the campaign.
Get Products (Which products will get discounts?): Define which product(s) will receive the discount.
Item get Type: Select the type of discount for the Y product:
Free → The selected product is completely free. Example: “Buy 1 Laptop, Get 1 Mouse free.”
Discount → The selected product receives a discount. Example: “Buy 1 Laptop, Get 1 Mouse 50% off.”
In this section, only for Buy X Get Y, you have 3 additional options:
Default: Free/discounted products are chosen sequentially from the list. Example: In the “Accessories” category, buy 2 items and get 1 free album, belt, or hat. Note: If you set a product as Default, customers can select which free product they want.
Cheapest: The cheapest product in the Y Products list will be free/discounted.
Most Expensive: The most expensive product in the Y Products list will be free/discounted. Example: You are creating a rule that allows customers who purchase 2 products from the “Accessories” category to get 50% off the most expensive item among the selected album, beanie, belt, or hat products.
Under the “Settings” tab, configure the campaign options as needed. This includes enabling or disabling:
Show offer description in product page
Show tooltip on cart item price
Enable Schedule
Usage limits
Under the “Conditions” tab, define when the rule should apply. The rule can trigger if all or any of the defined conditions are met.
After completing the setup, click the “Save” button at the top right.
Tip The Buy X Get Y campaign allows customers to manually change the free gift product in the cart page. Customers can select or swap free gifts according to seller-defined rules. You can also configure the quantity of each item if needed.
Note This rule only works when products match the “Any” filter. If “All” is selected, the rule may not work correctly.
After the campaign is set up, customers can choose from the options presented on the cart page. For this:
A “Change” button will appear next to the free product on the cart page.
When this button is clicked, a pop-up will open showing all the free gift products you can select.
After making a selection, simply click the “Save” button. This way, their preferences are confirmed, and they can purchase their free gifts.
Example Scenario: Buy 1 Laptop, Get 1 Watch Free
Let’s assume you are planning a special discount campaign for certain products. In this campaign:
Campaign Name: Buy 1 Laptop, Get 1 Watch Free
Product to Purchase: ASF Laptop
Products Your Customers Can Choose From:
ASF Premium Watch
Premium Watch (Black)
Duration: Unlimited
Discount Type: Customers who buy 1 ASF Laptop can get any listed watch product for free under the campaign.
6.1.6 – Tiered Pricing
Tiered Pricing is a strategy where the price of a product or service changes depending on the purchased quantity or usage level. The more the customer buys or uses, the lower the unit price becomes. However, discounts are not continuous; they are applied through specific tiers (steps).
From the left management menu, click on the “Discount Rules” option.
In the panel that appears, the “Product Pricing” tab will be automatically selected.
To create product discounts, click the “Add Your First Rule” button. If you already have an existing campaign, click the “Add Rule” button.
For a new campaign, select the “Your own campaign”.
Click the “Add Campaign” button on the panel and start creating your campaign.
In the “Name” field, define the name of your campaign (e.g., Tiered Pricing Campaign).
Select “Tiered Pricing” as the Rule Type.
Fill in the fields under the Pricing heading.
Price Ranges: Allows you to import/export your pricing settings.
Count quantity by: Select how the rule will be applied based on product quantity.
All together: Takes the total quantity of all products in the cart into account. Applies a discount based on the total amount. Example: Buy 5 units of Product A + 3 units of Product B = total 8 units → discount applied.
Item quantity in each cart line: The discount is calculated separately for the quantity in each product line. Example: Buy 5 units of Product A and 3 units of Product B → discount applied separately for each product.
Each single product/variable products: Evaluates product variations (e.g., size, color) separately. The discount is applied based on the quantity of each variation. Example: Buy 3 “Small” + 4 “Medium” → discount applied separately for each.
Pricing Types: There are 3 types of pricing methods:
Fixed Discount: A fixed amount is deducted from the product’s sales price (e.g., $50 discount).
Percentage Discount: A percentage discount is applied on the product price (e.g., 20% discount).
Flat Price: The product is sold at a fixed price regardless of its normal price (e.g., product price is always $100).
Pricing Value: Defines the discount amount to be applied.
Apply discount to only first matching product: This option ensures the campaign is applied only to the first matching product in the cart. 💡 Note: If you don’t need to configure options like “first matching product,” you can leave these fields empty.
Buy Products (Which products will get discount?): Select which product(s) the discount will be applied to or excluded from. For this:
Click the “add one” text.
Filtering Method: The campaign is selected by filtering products. If you choose “Any,” the campaign applies to any of the selected products. If you choose “All,” it applies only if all selected products are in the cart.
Product Selection: Select product, category, or product variation from the dropdown menu. If you choose “In List,” the selected product(s) will be added to the campaign. If you choose “Not in List,” they will be excluded.
View Selected Products: You can see all products you have added to the campaign here.
The “Settings” tab allows you to configure campaign settings accordingly. The settings let you enable or disable options such as:
Show offer description in product page
Show tooltip on cart item price
Enable schedule
Usage limits
The “Conditions” tab allows you to define under which conditions the campaign will be applied. The rule can activate when either all or any of the defined conditions are met.
After completing the necessary settings, click the “Save” button located in the upper right corner.
Examples:
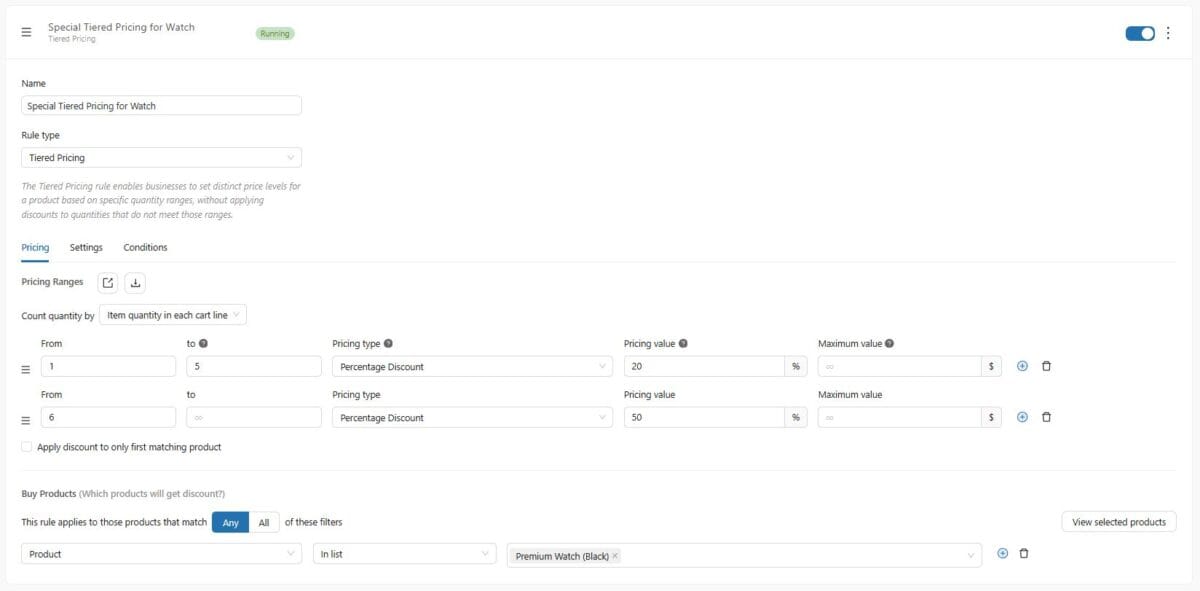
Example 1: Buy 1–5 units → 20% discount, buy 6 or more units → 50% discount. Rule applies only to the first matching product in the cart.
Example 2: Buy 1–5 units → 20% discount, buy 6 or more units → 50% discount. Rule applies to all products, but only if the cart total exceeds $100.
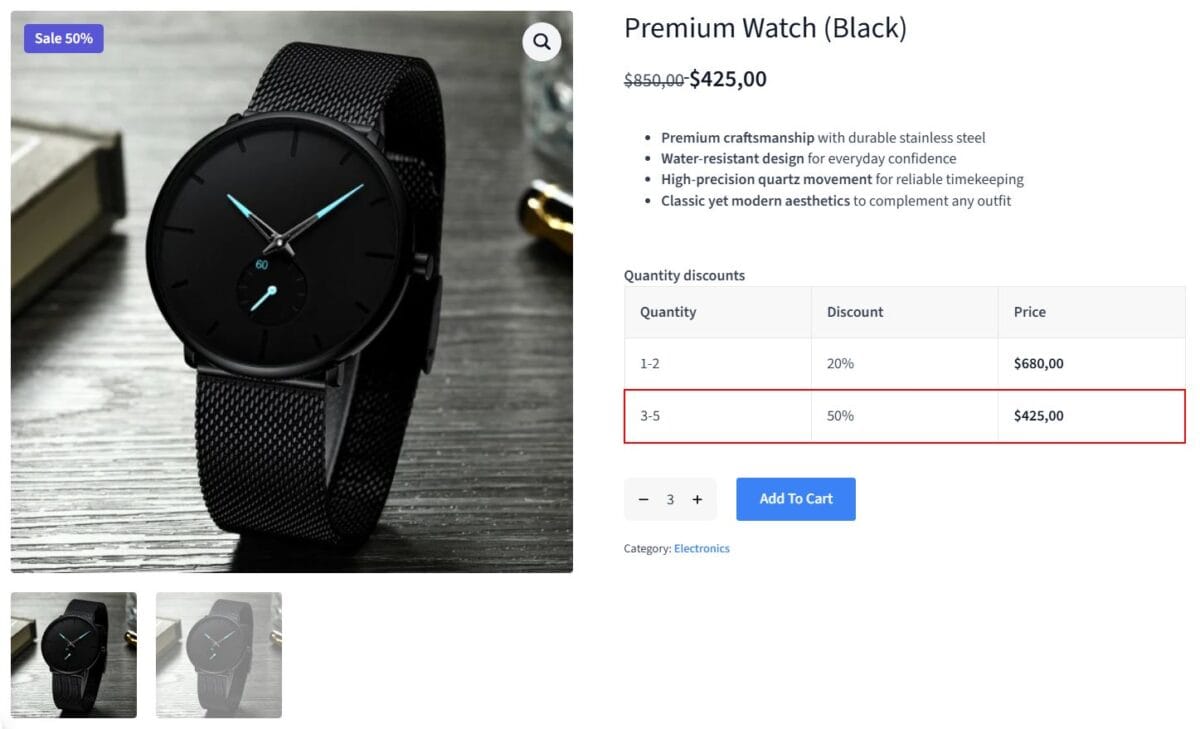
Example Scenario: Special Tiered Pricing for Watch
Let’s assume you are planning a special discount campaign for a specific product. In this campaign:
Campaign Name: Special Tiered Pricing for Watch
Product: Premium Watch (Black)
Duration: Unlimited
Discount Type: 1 – 5 units → 20% discount, 6 – 10 units → 50% discount.
Condition: The rule applies to all products, but only if the cart subtotal exceeds $100.
By using this example, the product’s “Discounted Price” will change as follows.
Quantity
Product Price
Discount Type
Discount Amount
Discounted Price (Unit)
1-5
$850
Percentage Discount (20%)
-$170
$680
6 – 10
$850
Percentage Discount (50%)
$425
$425
6.1.7 – Product Fee
Product Fee offers flexible ways to add additional charges to your store’s products. For example, you can create campaigns for processing fees or other specific charges that suit your business needs. After that, you can choose which product categories, product names, variations, tags, price ranges, or specific products will be affected by this campaign.
From the left management menu, click on the “Discount Rules” option.
In the panel that appears, the “Product Pricing” tab will be automatically selected.
To create product discounts, click the “Add Your First Rule” button. If you already have an existing campaign, click the “Add Rule” button.
For a new campaign, select the “Your own campaign”.
Click the “Add Campaign” button on the panel and start creating your campaign.
In the “Name” field, define the name of your campaign (e.g., 5% Additional Fee for Bank Transfer).
Select “Product Fee” as the Rule Type.
Fill in the fields under the Pricing heading.
Pricing Type: This tab shows you 2 options to set up and configure pricing.
Fixed Fee: Adds a fixed amount to the applicable product/cart.
Percentage Fee: Adds a percentage of the product’s price.
Apply Discount to Only First Matching Product: If you check this box, the rule will only apply to the first product added to the cart.
Buy Products (Which products will get discount?): Select which product(s) the discount will be applied to or excluded from. For this:
Click the “add one” text.
Filtering Method: The campaign is selected by filtering products. If you choose “Any,” the campaign applies to any of the selected products. If you choose “All,” it applies only if all selected products are in the cart.
Product Selection: Select product, category, or product variation from the dropdown menu. If you choose “In List,” the selected product(s) will be added to the campaign. If you choose “Not in List,” they will be excluded.
View Selected Products: You can see all products you have added to the campaign here.
The “Settings” tab allows you to configure options to enable or disable certain settings. Settings give you the option to:
Show the offer description on the product page,
Show tooltip on cart item price,
Enable Schedule,
Usage limits.
The “Conditions” tab allows you to define under which conditions the campaign will apply. The campaign will be activated when all or any of the defined conditions are met.
After completing the necessary settings, click the “Save” button located in the upper right corner.
Example Scenario: 5% Additional Fee for Bank Transfer
Let’s assume you are planning a special discount campaign for certain products. In this campaign:
Campaign Name: 5% Additional Fee for Bank Transfer
Product: ASF Laptop
Duration: Unlimited
Discount Type and Condition: You can create a rule that applies a 5% additional fee when a customer purchases the “ASF Laptop” product and selects “Bank Transfer” as the payment method.
6.2 – Cart Discount
Cart Discount allows you to create pricing campaigns that will only be valid on the Cart page. Additionally, it enables you to display a tooltip, set scheduling, and define usage limits for the cart discount.
In the left menu, click on the “Discount Rules” option.
On the panel that appears, the “Cart Discount” tab will automatically be selected.
To create Product Pricing, click the “Add Your First Rule” button. If you already have a campaign, click the “Add Rule” button.
The panel will display “Your own campaign” and other template campaigns. You can use a suitable template or create a brand-new campaign specific to your needs.
Your Own Campaign: Allows you to create your own custom campaign.
Discount 50%Campaign: This campaign gives customers a 50% discount based on the total cart amount. You can edit this template to suit your store.
Discount 10$ Campaign: This campaign gives customers a $10 discount based on the total cart amount. You can edit this template to suit your store.
Black Friday Campaign: A template you can use for Black Friday, allowing you to create various discounts.
Discount 10$ on the total when spending 100$: This campaign gives customers a $10 discount when they spend $100 in the cart. Example: If a customer has products worth $100 in the cart, a $10 discount will be applied, and the total will be $90. You can edit this template to create a campaign suitable for your store.
To create a new campaign, select the “Your Own Campaign” template. Then, click the Add “Campaign” button in the panel to create your custom campaign.
In the Name field, define the name of your campaign.
The “Discount” tab allows you to set discount types and configure pricing rules.
Discount Type: There are three types of discounts:
Fixed Discount: Applies a fixed discount amount.
Percentage Discount: Applies a percentage-based discount. Example: You set a 20% discount for a T-shirt. If the T-shirt costs $200, and the cart also includes $200 worth of books, the total discount will be $120 (20% of $600).
Fixed Discount Per Individual Cart Item: Applies a fixed discount to each item in the cart. Example: You set the discount amount to $30. If the cart includes 1 T-shirt and 2 books, the total discount will be $90 ($30 for the T-shirt + $60 for the books).
Show tooltip on cart discount: Prevents showing a message like “This product is discounted” in the cart.
Enable Schedule: Allows you to set a start and end date for the campaign. If unchecked, the campaign runs indefinitely.
Usage Limits: Limits how many times the campaign can be used. If left empty, there is no restriction.
The “Conditions” tab allows you to define under which conditions the cart discount campaign will apply. You can set whether all or any of the conditions need to be met for the campaign to activate.
Depending on the campaign type you have selected, make the necessary adjustments and click the ‘Save’ button in the top right corner.
Tip On the right side of your campaign, there is an On/Off button. With this button, you can easily enable or disable the campaign.
Tip For cart discounts to work, you need to enable coupon usage in advance. To do this:
In your admin panel, go to WooCommerce > Settings > Enable Coupons.
Check the option Enable the use of coupon codes.
Example Scenario: Spring Special Campaign
Let’s assume you want to create a special discount campaign for certain products. In this campaign:
Campaign Name: Spring Special Campaign
Product: All Products
Duration: Unlimited
Discount Type: For every product a customer adds to the cart, apply a “Fixed Discount Per Item in Cart.” For each product in the cart, a $100 discount should be applied.
6.3 – Checkout Fee
Checkout Fee allows you to define extra charges at the checkout stage. In addition, it supports showing a tooltip for this fee, as well as scheduling and usage limits.
In the left menu, click on the “Discount Rules” option.
On the panel that appears, the “Checkout Fee” tab will automatically be selected.
To create Product Pricing, click the “Add Your First Rule” button. If you already have a campaign, click the “Add Rule” button.
The panel will display “Your own campaign” and other template campaigns. You can use a suitable template or create a brand-new campaign specific to your needs.
Your Own Campaign: Allows you to create your own custom campaign.
Free shipping fee: This campaign offers free shipping to customers when specific order conditions are met. You can edit this template to suit your store.
Reduce 50% shipping fee for order below 100$: This campaign offers a 50% discount on the shipping fee if the order total is below a certain threshold. You can edit this template to suit your store.
Add 10$ fee to order: This campaign adds a $10 fee to the order under certain conditions. You can edit this template to suit your store.
To create a new campaign, select the “Your Own Campaign” template. Then, click the “Add Campaign” button in the panel to start creating your campaign.
In the “Name” field, define the name of your campaign.
In the “Rule Type” field, select the type of campaign you want to create. For Checkout Fee, there are 3 campaign types available:
Reduce Shipping Fee: This campaign allows you to reduce the shipping cost.
Add Custom Fee: This campaign allows you to define additional fees.
Add CustomFee Based on Shipping Fee: This campaign allows you to add a fee based on the shipping cost. For example, instead of applying a fixed shipping fee, you can apply a percentage-based extra fee depending on the cost.
Based on the campaign type you selected, complete the necessary settings and click the “Save” “button located at the top right.
Tip On the right side of your campaign, there is an On/Off button. With this button, you can easily enable or disable the campaign.
6.3.1 – Reduce Shipping Fee
This campaign allows you to reduce the shipping fee.
In the left management menu, click the “Discount Rules” option.
In the panel that appears, click on the “Checkout Fee” tab.
To create a shipping discount campaign, click the “Add Your First Rule” button. If you already have an existing campaign, click the “Add Rule” button.
For a new campaign, select the “Your Own Campaign”.
Click the “Add Campaign” button on the panel to start creating your own campaign.
In the “Name” section, define the name of your campaign (e.g., Reduce Shipping Fee Campaign).
Select “Reduce Shipping Fee” as the Rule Type.
The “Discount” tab allows you to see the discount types and configure your pricing settings.
Discount Type: There are 2 discount types available.
Fixed Discount: Applies a fixed discount amount to the shipping fee (excluding tax). The shipping fee displayed at checkout will be shown as “New Discounted Amount + Shipping Tax” (e.g., 20%). Example: If your (tax excluded) shipping fee is $100 and you want to apply a $50 discount, the new shipping fee will be shown as “$50 + $10 (Shipping Tax) = $60.”
Percentage Discount: Applies a percentage discount to the shipping fee (excluding tax). The shipping fee displayed at checkout will be shown as “New Discounted Amount + Shipping Tax” (e.g., 20%). Example: If your (tax excluded) shipping fee is $100 and you want to apply a 30% discount, the new shipping fee will be shown as “$70 + $14 (Shipping Tax) = $84.”
Show tooltip on checkout fee: Displays a message to the customer on the checkout page such as “A special discount has been applied to this order.” If left unchecked, the discount is applied, but the customer will not see a message.
Enable schedule: Allows you to define the start and end date of the campaign. If not checked, the campaign will run indefinitely.
Usage limits: Limits how many times the campaign can be used. If left empty, there is no limit to campaign usage.
Apply to shipping: Applies the discount only to the shipping fee. Product prices are not affected; only the shipping portion is discounted. Since the discount is related to shipping, this box must be checked.
The “Conditions” tab allows you to define under which conditions the campaign will be applied. The campaign will activate if either all or any of the defined conditions are met.
Once all settings are configured, click the “Save” button at the top right.
Example Scenario: 30% Discount on Your Shipping
Let’s say you want to plan a special discount campaign on your shipping. In this campaign:
Campaign Name: 30% Discount on Your Shipping
Product: All Products
Duration: Unlimited
Discount Type: 30% discount on shipping fees.
Shipping Fee (Excluding Tax): $100
Shipping Tax Rate: Standard (20%)
New Shipping Fee: $70 + $14 (Shipping Tax) = $84
6.3.2 – Add Custom Fee
This campaign allows you to define custom fees.
In the left admin menu, click on the “Discount Rules” option.
In the panel that appears, click on the “Checkout Fee” tab.
To create product discounts, click the “Add Your First Rule” button. If you already have an existing campaign, click the “Add Rule” button.
For a new campaign, select the “Your own campaign”.
Click the “Add campaign” button on the panel and start creating your own campaign.
In the “Name” field, enter the name of your campaign (e.g., Custom Fee Campaign).
Select “Add Custom Fee” as the Rule Type.
The “Custom Fee” tab allows you to see the fee types and make the necessary adjustments.
Fee Type: There are 2 types of fees available.
Fixed Fee: Adds a fixed extra fee to the cart.
Percentage Fee: Applies an additional fee based on a percentage of the cart total.
Show tooltip on checkout fee: Displays a message on the checkout page such as “A special fee has been applied to this order.” If unchecked, the fee is applied but the customer will not see any information message.
Enable schedule: Allows you to set the start and end date of the campaign. If not checked, the campaign will run indefinitely.
Usage limits: Restricts how many times the campaign can be used. If left blank, there will be no limit.
The “Conditions” section allows you to specify under which conditions the campaign will apply. The campaign can be triggered when all or any of the defined conditions are met.
After making the necessary adjustments, click the “Save” button at the top right.
Example Scenario: Additional Fee for Cash on Delivery $10
Campaign Name: Additional Fee for Cash on Delivery $10
Product: All Products
Duration: Unlimited
Fee Type: You can create a rule that applies an additional $10 fee when a customer purchases a product and selects “Cash on Delivery” as the payment method. For this:
Select “Add Custom Fee” as the Rule Type.
In the “Custom Fee” section, choose “Fixed Fee” as the Fee Type and enter the amount “8.33” (the price should be entered excluding tax. The cart will display the tax-included price).
From the “Conditions” section, select “Payment method” and choose “Cash on Delivery”. Then click the “Save” button at the top right.
In this scenario, when “Cash on Delivery” is selected, an additional fee of $10 will be applied.
6.3.3 – Add Custom Fee based on Shipping Fee
This campaign allows you to add an extra fee based on the shipping cost. In other words, instead of the fixed shipping cost you set for your store, either a fixed extra fee or a percentage-based extra fee can be applied in this campaign.
From the left admin menu, click on the “Discount Rules” option.
In the panel that appears, click the “Checkout Fee” tab.
To create a new campaign, click on the “Add Your First Rule” button. If you already have an existing campaign, click the “Add Rule” button.
For a new campaign, select the “Your Own Campaign”.
Click the “Add Campaign” button in the panel and start creating your own campaign.
Under “Name”, enter the name of your campaign (e.g., Custom Fee).
For Fee Type, select “Add Custom Fee based on Shipping Fee“.
In the “Custom Fee” tab, you will see the fee types and make the necessary adjustments.
Fee Type: There are 2 types of fees available:
Fixed Fee: Always adds a fixed amount to the shipping cost.
Percentage Fee: Adds an extra fee as a percentage of the shipping cost.
Show tooltip on checkout fee: Clearly informs the customer on the checkout page that an extra fee has been applied to the shipping cost.
Enable schedule: Allows you to set a start and end date for the campaign. If left unchecked, the campaign will run indefinitely.
Usage limits: Limits how many times the campaign can be used. If left blank, there will be no limit.
Apply to shipping: Defines whether the added fee will be reflected as part of the shipping cost or as a separate fee item. If you want the fee to be included in the shipping cost, make sure to check this box.
The “Conditions” tab allows you to define under which conditions the campaign will apply.
After making the necessary adjustments, click the “Save” button in the upper right corner.
Example Scenario: $10 Extra Fee for Cash on Delivery
Campaign Name: $10 Extra Fee for Cash on Delivery
Product: All Products
Duration: Unlimited
Fee Type: You can create a rule where, when a customer purchases a product and selects “Cash on Delivery” as the payment method, an extra fee of $10 is applied.
Note Discount Rules allow you to enable tax calculations for extra fees added at checkout. This means that the tax rate applied to customers in your store will also be included in the shipping fee.
6.4 – Exclusions
This section allows you to define the products and coupons you want to exclude from your campaigns.
In the left-hand admin menu, click on “Discount Rules”.
In the panel that appears, click on the “Exclusions” tab.
To create “Exclusions“, click the “Add Your First Rule” button.. If you already have an existing campaign, click on the “Add Rule” button.
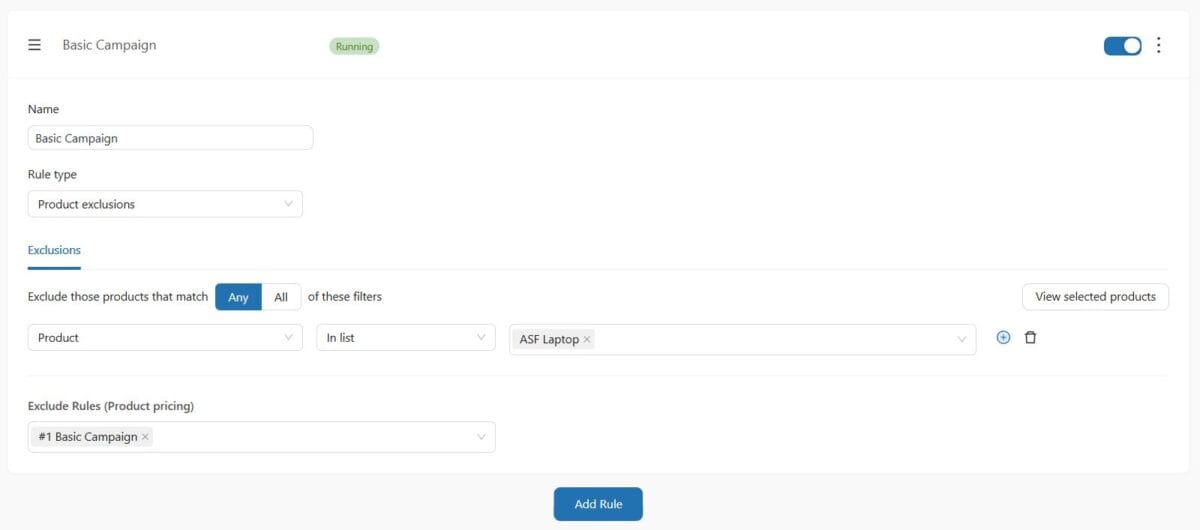
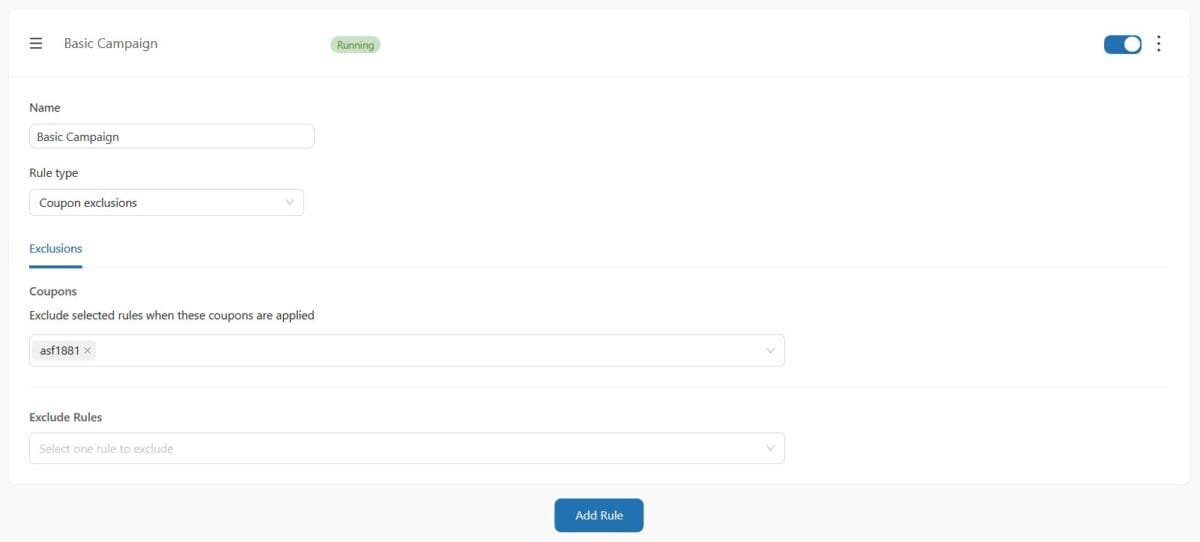
In the “Name” field, enter the name of your campaign (e.g., Basic Campaign).
Select the “Rule Type“. For exclusions, there are two types of rules:
Product exclusions
Coupon exclusions
After making the necessary adjustments depending on the campaign type, click the “Save” button at the top right.
6.4.1 – Product Exclusions
This allows you to determine which products will not be affected by Product Discounts.
6.4.2 – Coupon Exclusions
This allows you to determine which campaigns cannot be applied when customers use coupon codes.
6.5 – Product Collections
The product collection feature allows you to create your own product group flexibly, tailored to your campaigns. This way, you can easily apply discounts to groups of products.
6.5.1 – Creating a Product Collection
In the left-hand admin menu, click on “Discount Rules”.
In the panel that appears, click on the “Product Collections” tab.
To create product discounts, click on the “Add Your First Collection” button. If you already have an existing collection, click on the “Add Collection” button.
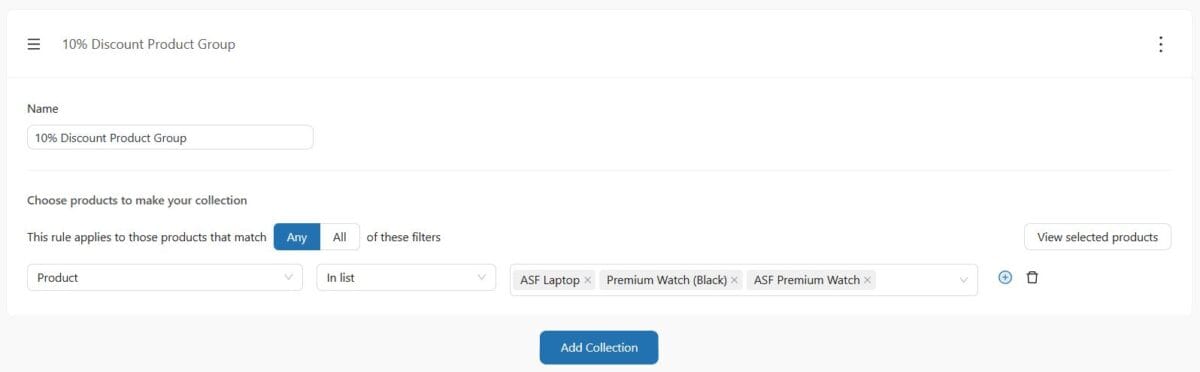
In the “Name” field, enter the name of your rule (e.g., 10% Discount Product Group). It is recommended to name it specific to the rule you will use.
Choose products to make your collection: Choose which product(s) the discount will apply to or exclude. To do this:
Click on the “add one” text.
Filtering Method: Select products by filtering. If you choose “Any”, any of the selected products will be included in the rule. If you choose “All”, the rule will only apply to products that meet all conditions.
Product Selection: From the dropdown menu, you can choose products, categories, or variations. If you select “In list”, the selected product(s) will be added to the rule. If you select “Not in list”, the product(s) will be removed from the rule.
View Selected Products: You can view the products included in the rule collectively here.
After making the necessary adjustments, click the “Save” button at the top right.
6.5.2 – Using a Product Collection in a Discount Rule
Example: You can create a group of products that will receive a 10% discount and easily select and use this product group in your discount rule.
In the left-hand admin menu, click on “Discount Rules”.
In the panel that appears, start creating the type of rule you want. For example, under the Product Pricing tab, choose the “Simple Adjustment”.
In the panel, go to the “Buy Products (Which products will get discount?)” section.
Click on the “add one” text.
Filtering Method: Select products by filtering. If you choose “Any”, any of the selected products will be included in the rule. If you choose “All”, the rule will only apply to products that meet all conditions.
Product Selection: From the dropdown menu, select the “Product Collections” option. Then select the “Product Collection” you created under the “In list” option.
View Selected Products: You can view the products you included in the rule collectively here.
After making the necessary adjustments, click the “Save” button at the top right.
6.6 – Settings
This section allows you to define the general settings related to discount rules, how discounts will be applied, and how they will appear on your products. If you are not sure what you are doing, you should not use these settings.
6.6.1 – General
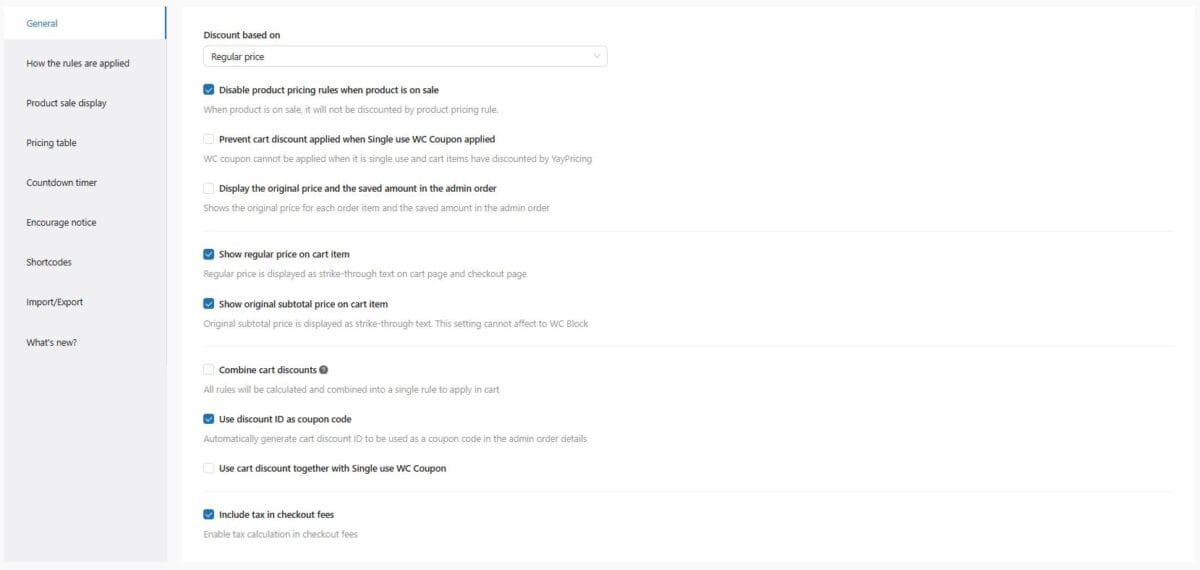
Discount based on: Allows you to apply the discount on either the product’s regular price or sale price.
Disable product pricing rules when product is on sale: When checked, “Product Discounts” rules will not be applied to products already on sale.
Prevent cart discount applied when Single use WC Coupon applied: Ensures that cart discounts do not apply if the customer uses a single-use coupon.
Display the original price and the saved amount in the admin order: Shows the original price for each order item and the saved amount in the admin order.
Show regular price on cart: When checked, the product’s regular price will be shown as strikethrough in the cart and checkout page.
Show original subtotal price on cart item: When checked, the original subtotal of the items will be shown as strikethrough in the cart and checkout page.
Combine cart discounts: When checked, all discount rules will be merged and applied as a single rule in the cart.
Use discount ID as coupon code: When checked, the discount ID can be used as a coupon code in the order details by the admin.
Use cart discount together with Single use WC Coupon: When checked, cart discounts can be used together with single-use coupons.
Include tax in checkout fees: When checked, taxes will not be shown separately in the checkout fees; they will be included as part of the total.
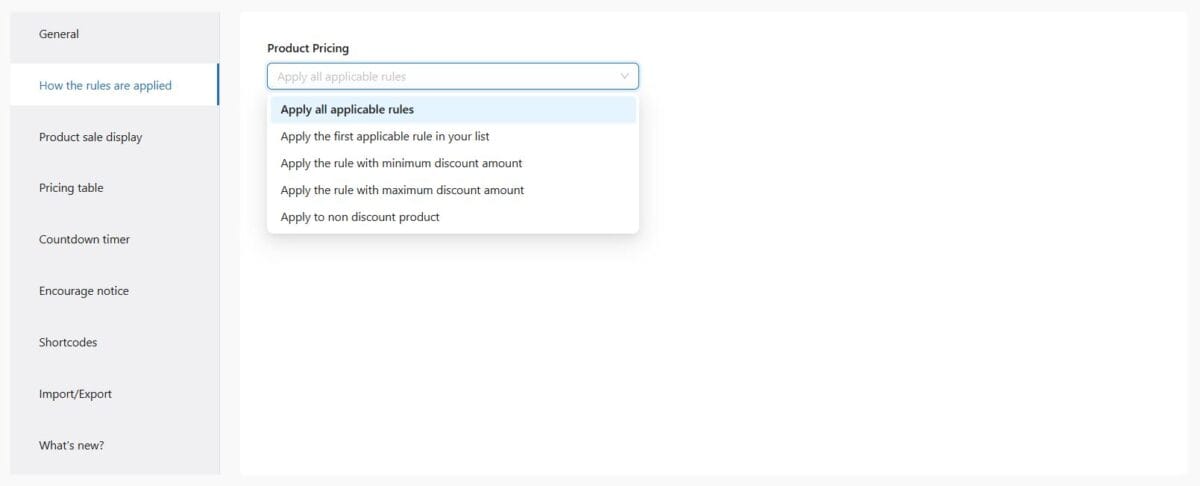
6.6.2 – How The Rules Are Applied
Apply all applicable rules: Campaigns are applied in the order of the list (from top to bottom).
Example: Dress price $200, Book price $150
Campaign 1: $50 discount when buying a dress.
Campaign 2: 20% discount when buying 3 or 4 dresses.
Scenario: When you buy the first dress, Campaign 1 applies with a $50 discount ⇒ Cart subtotal is $150.
When you buy the second dress, Campaign 1 applies again ⇒ Cart subtotal is $300 ($150 x 2 dresses).
When you buy the third dress, both Campaign 1 and Campaign 2 apply ⇒ The price of the dress is now $120. First, the price drops to $150 with Campaign 1, then Campaign 2 applies and the price becomes $120. ⇒ Subtotal = $120 x 3 = $360.
Apply the first applicable rule in your list: The first matching campaign is applied, and subsequent campaigns are ignored.
Apply the rule with minimum discount amount: The campaign that applies the smallest discount amount takes effect.
Example: Shoe price $200
Campaign 1: $50 discount when buying shoes.
Campaign 2: 10% discount when buying shoes.
⇒ Campaign 2 applies (since the lowest discount amount is $20).
Apply the rule with maximum discount amount: The opposite of “Apply the rule with minimum amount.” The campaign with the largest discount is applied.
Apply to non discount product: The campaign is valid only for non-discounted products or products that have not had any discounts applied previously. Example:
Campaign 1: 10% discount when buying a shirt.
Campaign 2: 50% discount when buying pants or a shirt.
⇒ Campaign 2 will only apply to the pants (since the shirt is already discounted).
6.6.3 – Product Sale Display
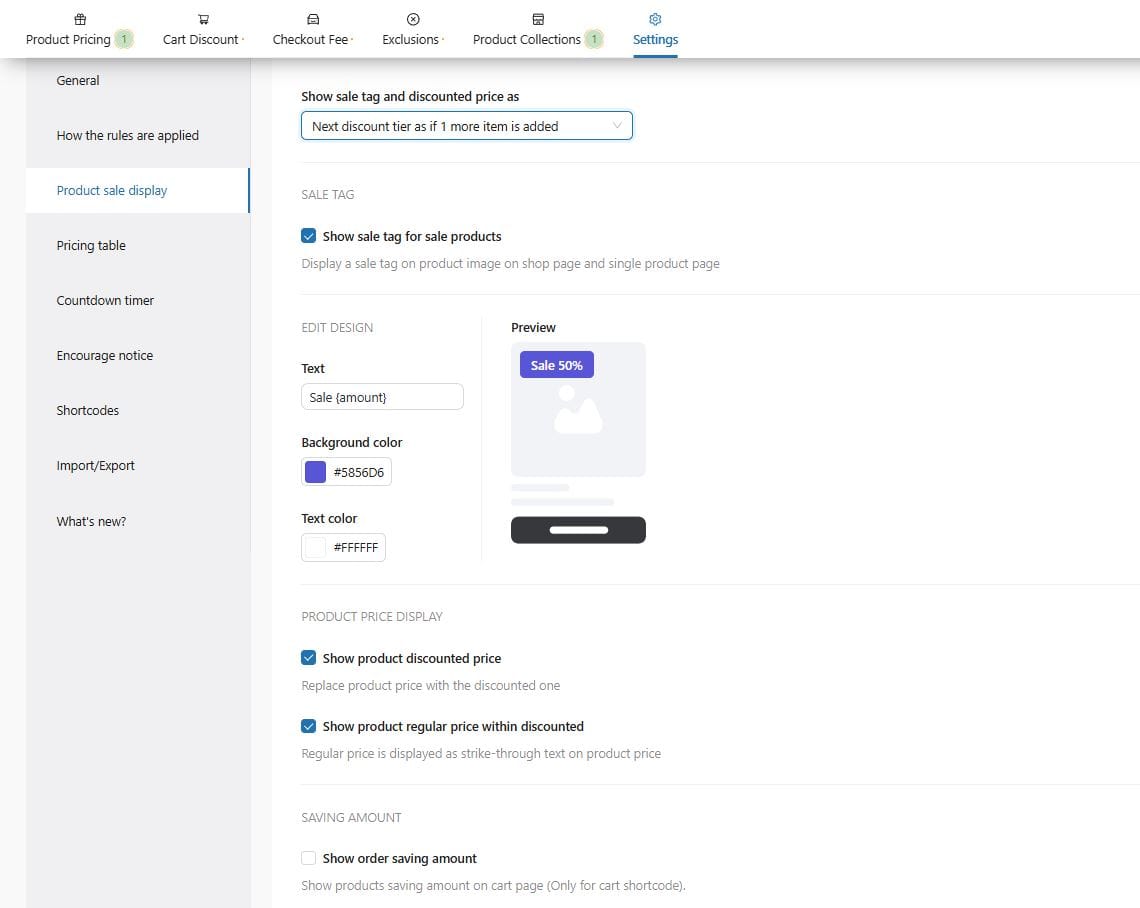
6.6.3.1 – Show Discount Tag and Discounted Price
Options for showing the discount label and price. There are three different options:
Discountable price range
Current discount tier
Next discount tier as if 1 more item is added
Example: Assume a campaign is set up where a 10% discount will be applied to Albums and T-shirts when the cart subtotal exceeds $100.
Discountable price range: The discount label shows the range of discounts that could be applied without the product being added to the cart or campaign conditions being met.
Current discount tier: The discount label shows the valid discount range when the product is added to the cart and the rule conditions are met.
Example: If the cart subtotal is below $100, the discount label is not shown.
When the cart subtotal exceeds $100 and the T-shirt is added, the discount label is displayed.
Next discount tier as if 1 more item is added: The discount label shows the discounted price that will apply if one more item is added to make the campaign valid.
Example: If the cart subtotal is $90 and either a T-shirt or Album is added, the total exceeds $100, and the discount label is displayed.
6.6.3.2 – Sale Tag
Show sale tag for sale products: When checked, a sale badge will be displayed on the product image on both the product page and the shop page.
From the marked area, you can customize how the badge looks. In the “Text” field, you can define the label text. The shortcode “{amount}” pulls the discount amount. You can also set the background color of the badge from the background color field and adjust the text color from the text color field.
6.6.3.3 – Product Price Display
Show product discounted price: When checked, the product price will be replaced with the sale price.
Show product regular price within discounted: When checked, the regular price will appear as strikethrough next to the sale price.
6.6.3.4 – Saving Amount
Show order saving amount: When checked, it displays how much the customer is saving on the cart page.
Note Works only with the Cart shortcode.
6.6.4 – Pricing Table
When a tiered discount is applied to a product, it is visible within the product.
With the pricing table settings, you can:
Choose the table position
Change the table title
Change the quantity title
Change the discount title
Change the price title
Change the border color
6.6.5 – Countdown Timer
This setting allows you to display a countdown timer for product discounts, cart discounts, and cart fees. You can use the variable list to configure the start and end notifications.
6.6.6 –Encourage Notice
This setting allows you to display a motivational notification for product discounts, cart discounts, and cart fees. You can use the variable list to configure the message text.
6.6.7 – Shortcodes
This feature provides a Shortcode Generator interface that allows users to create shortcodes to display product pricing rules, order savings amounts, countdown timers, offer descriptions, and discount labels directly on the site.
6.6.8 – Import/Export
From this section, you can export the campaigns you’ve created in “.json” format, or import existing campaign files if available. If you’re not sure what you’re doing, it’s recommended not to use this section.
6.6.9 – What’s New?
You can track updates and changes related to “Campaigns” in this section. You may choose not to use this area as it’s optional.
Can't find the answers you're looking for? We're here to help.
We Ask for Your Consent for a Better Experience We use cookies to ensure our website functions properly, personalize content and ads, provide social media features, and analyze site traffic. We also share information about your use of the site with our social media, advertising, and analytics partners.
Functional
Always active
Technical storage or access is strictly necessary for a legitimate purpose in order to provide a specific service explicitly requested by the subscriber or user, or to transmit a communication over an electronic communications network.
Tercihler
Teknik depolama veya erişim, abone veya kullanıcı tarafından talep edilmeyen tercihlerin saklanmasının meşru amacı için gereklidir.
Statistics
These cookies help us optimize our website. By allowing us to use these cookies, we can learn which pages our users enjoy browsing the most and which products are the most popular. Some of these cookies are provided by companies located outside the country. If you enable the use of these cookies, your personal data processed through the cookies will be transferred abroad.These cookies help us optimize our website. By allowing us to use these cookies, we can gain insights into which pages our users enjoy visiting the most and which products are the most popular. Some of the providers of these cookies are located abroad. If you enable the use of these cookies, your personal data processed through cookies will be transferred abroad.
Marketing
These cookies are used to help prevent you from seeing irrelevant ads. They are also used to display A Sound Fiction ads based on the products you browse, search for, or purchase when visiting other websites. Some of the providers of these cookies are located outside the country. If you enable the use of these cookies, your personal data processed through the cookies will be transferred abroad.