You can manage all your products from the “Products” menu in the admin panel. From here you can add and edit products, assign categories, match brands, add tags, set attributes, and manage customer reviews.
All Products: List your existing products, search, use filters to find what you need, and edit products. Use the “Add New Product” button here to add a new product.
Add New Product: Add new products to your store.
Categories: Manage, edit, and add product categories for your store.
Brands: Manage, edit, and add brands that you can assign to products.
Tags: Create tags for your products and edit existing tags.
Attributes: Attributes are used to define specific properties of products (color, size, material, etc.). They’re used to create variable products, filter products, and present product features to customers. You can add new attributes here or edit existing ones.
Reviews: From here, you can manage reviews, approve and publish them, mark them as Spam, or delete them. You can also reply to reviews.
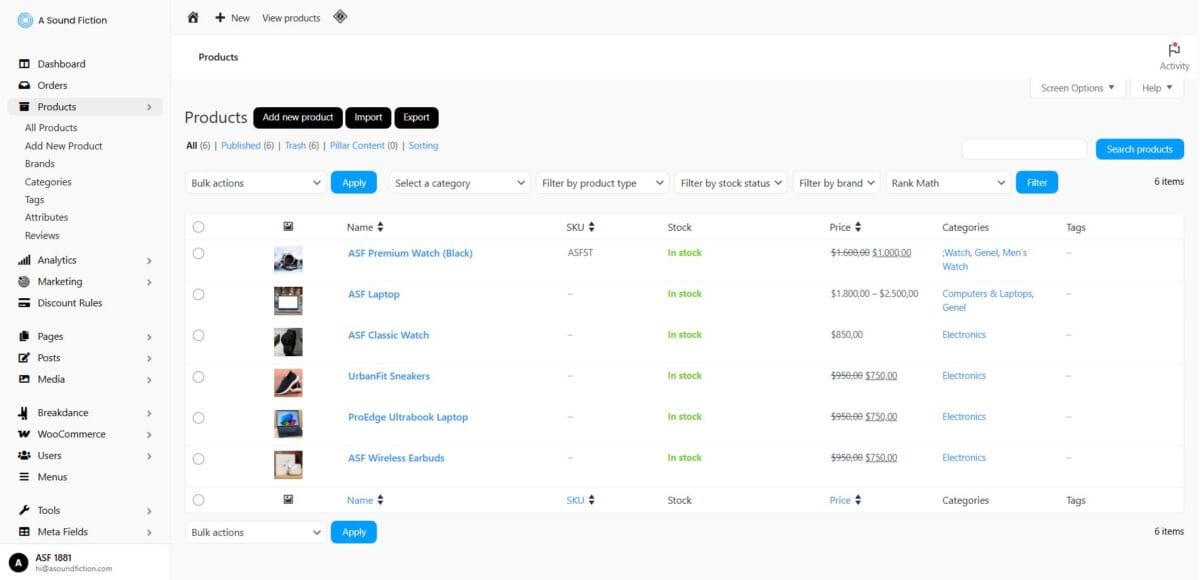
3.1 – All Products
“All Products” allows you to view and manage every product in your store. From here, you can search, filter, edit, delete, perform bulk actions, or click the “Add New Product” button to add a new product.
In the left admin menu, click Products > All Products.
You’ll see a list of all current products.
Information shown in this list:
Image: Shows the product’s thumbnail preview.
Name: Shows the product name and the edit link.
SKU (Stock Keeping Unit): Shows the unique stock code for the product.
Stock: Indicates stock status and current quantity.
Price: Shows the regular and sale price.
Categories: Lists the categories the product belongs to.
Tags: Shows additional keywords associated with the product.
What You Can Do on the List:
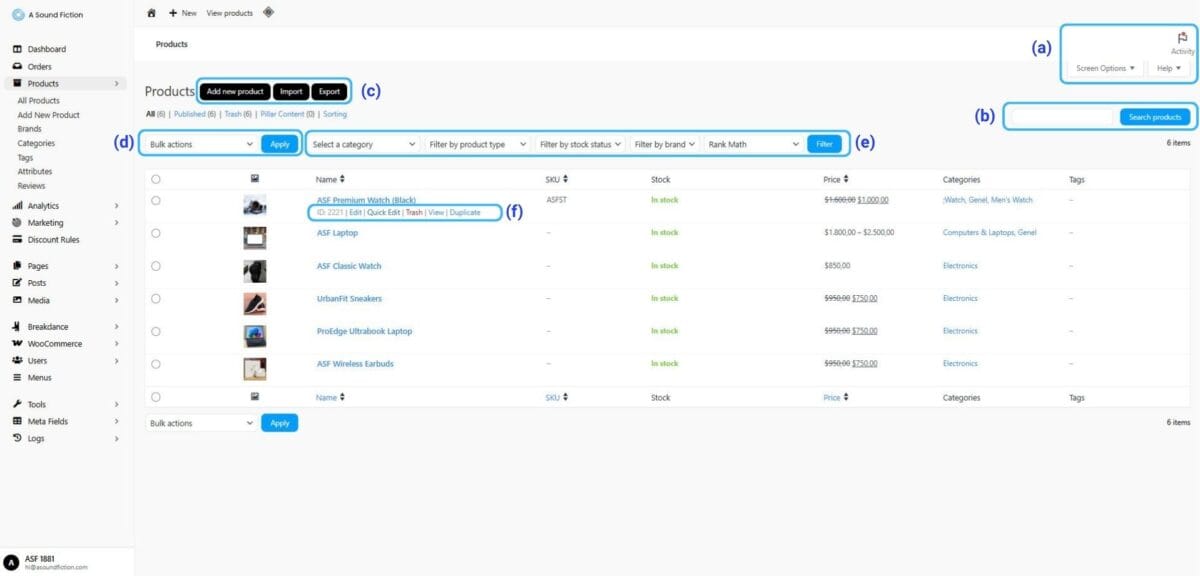
Screen Options, Help and Activity
Search Bar
Product Actions (Add New Product, Import, Export)
Bulk Actions
Filters
Quick Actions
3.1.1 – Screen Options, Help, and Activity
The “Screen Options” section allows you to choose which information is displayed and how it appears in the “All Products” list.
Columns: The options you check appear as columns in the All Products table (e.g., Image, SKU, Stock, Price, Categories, Tags). Unchecked columns won’t be shown. For a cleaner view, it’s recommended not to enable “SEO Details” here.
Pagination: From “Number of items per page”, set how many products are shown at once (e.g., 5 → only 5 product rows per page).
Tip After adjusting your screen options, make sure to click the “Apply” button to save them.
From the “Help” section, you can also submit a support request regarding your website.
The “🏳️Activity” icon opens a notification panel showing what’s happening in your store. Think of it as a “live notification box” for your shop. You can see important updates from new orders to performance reports in one place.
3.1.2 – Search Bar
Type a term related to the product you’re looking for and click “Search Products” to quickly find it.
3.1.3 – Product Actions
Add New Product: Add a new product.
Import: Add products in bulk. This is very useful when you need to upload many products. You can bulk set stock, migrate products from another site, or update products in bulk.
Export: Download your store’s products as a CSV file. Useful for backup, reporting, or transferring data to other systems.
3.1.4 – Bulk Actions
The Bulk Actions section allows you to manage multiple products at once. From here, you can bulk delete or edit the selected products.
3.1.5 – Filtering
Narrow the list by category, product type, ptock status, and brand.
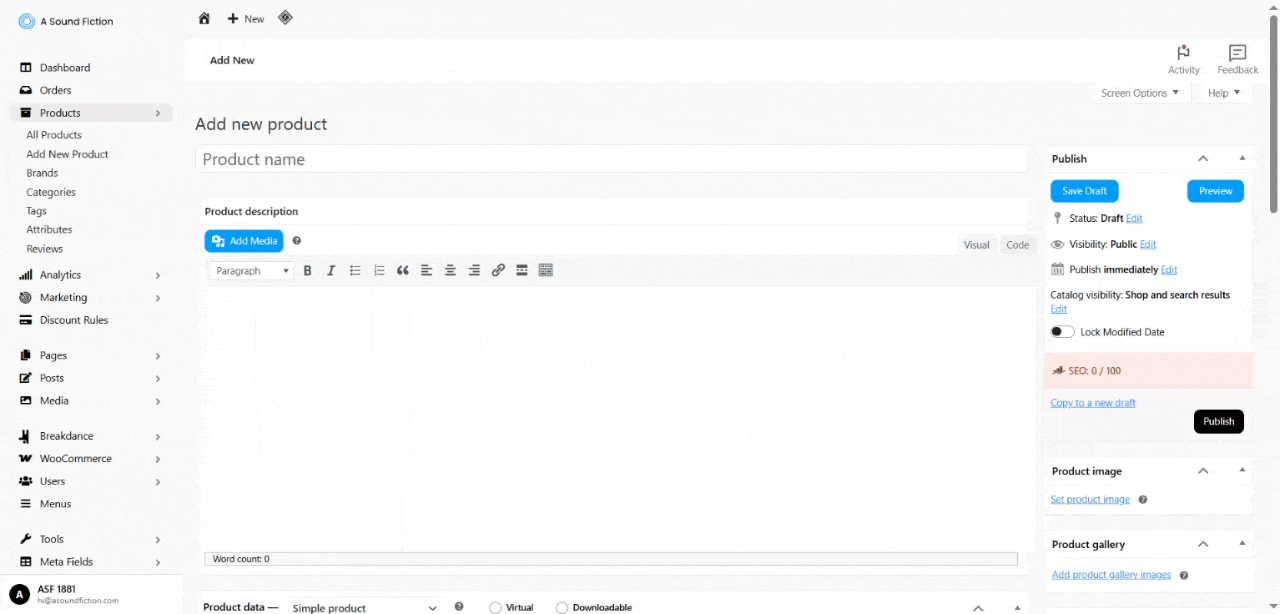
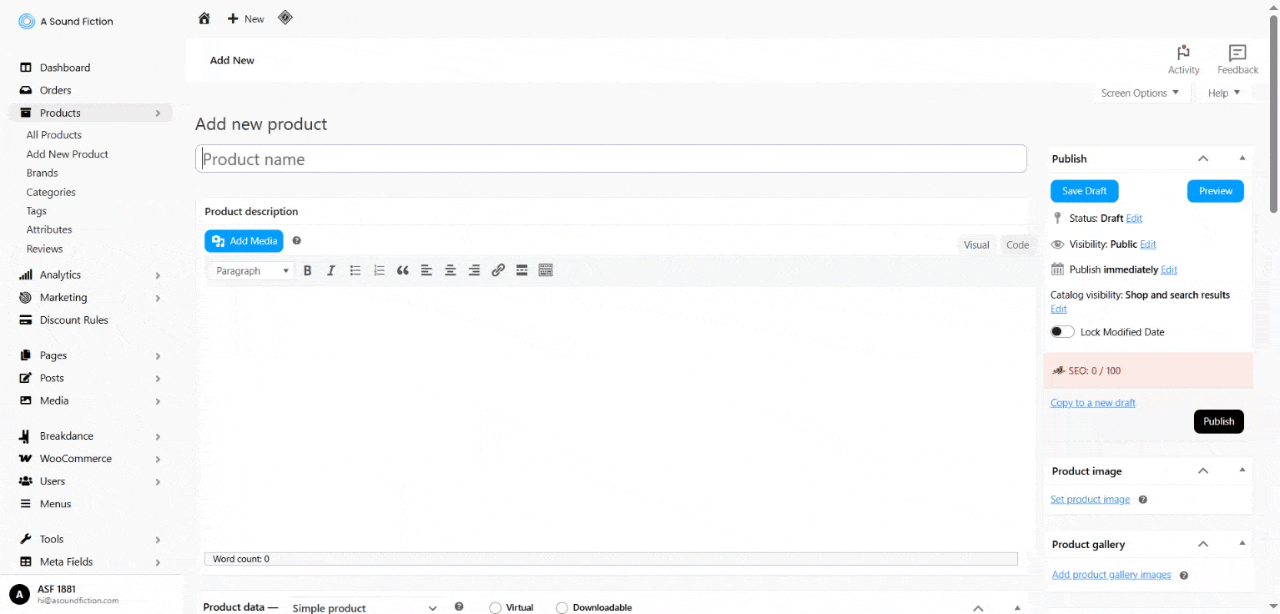
3.2 – Add New Product
The Add New Product section allows you to define all the details of the new products you want to sell in your store. Basic information such as product name, description, price, stock, image, and category can be added here. You can add simple products, as well as variable products (e.g., with color or size options) from this area.
Simple Product: A non-variable product sold with a single price and single stock. Example: a bookcase with one size.
Variable Product: Contains variations based on options like Color, Size, Capacity. Each variation can have its own price, SKU, stock, and image. Example: “Wardrobe – 3 Doors / 4 Doors / 6 Doors”.
3.2.1 – Adding a Simple Product
It is a product type sold with a single price and a single stock, without any variations.
Step 1: Access the Add Product panel
In the left admin menu, click Products > All Products > Add New Product, or directly Products > Add New Product.
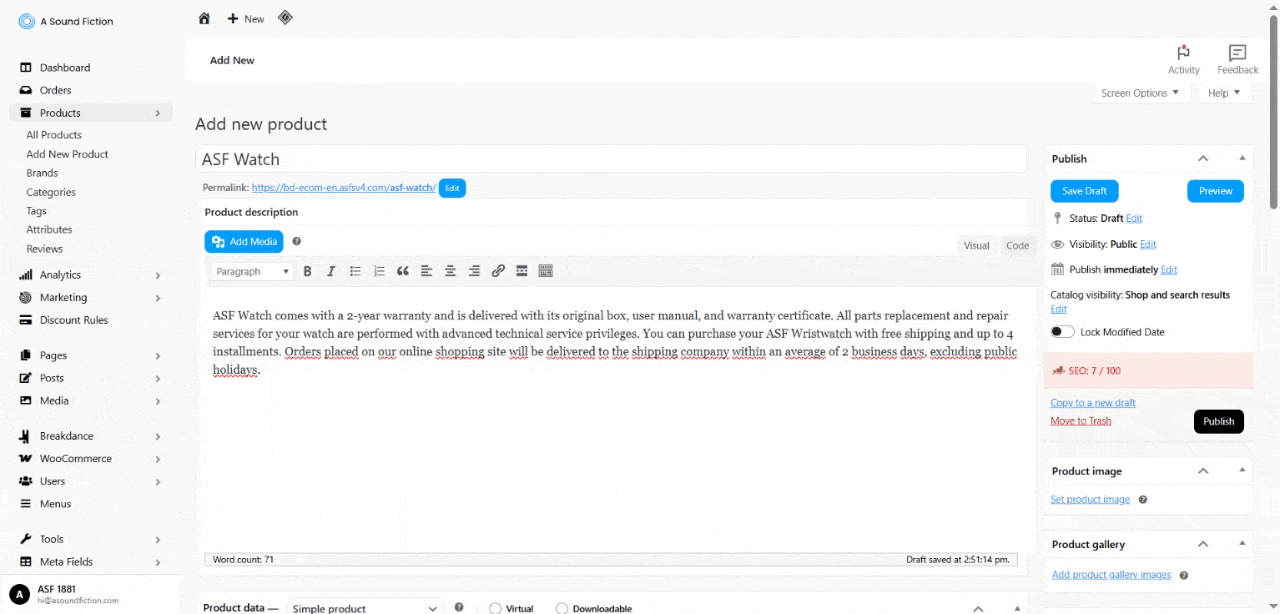
Step 2: Enter Product Name, Description, and Short Description
Under “Add New Product,” enter the product name in the “Product Name” field.
Then, in the “Product Description” field, enter product details such as features and specifications.
In the “Product Short Description” field, add a shorter summary. This text appears below the price on the product page.
Example: entering name, description, and short description for the “ASF Watch” product.
Step 3: Fill out Product Data Sections
Next to Product data, choose Simple product.
Under the “General” heading, you can enter information about your product’s regular price, sale price, tax status, and tax class.
The “Inventory” heading shows whether the product is ready for sale and how many units are available. Under this heading, you can enter the following data:
SKU: The unique identifier for each product. Used to track and distinguish products in stock.
GTIN, UPC, EAN, or ISBN: Barcode numbers that identify products internationally. Leave blank if not applicable.
GTIN: Global Trade Item Number
UPC: Barcode system used in the US
EAN: Widely used European barcode system
ISBN: Identifier for books
Stock management: When enabled, WooCommerce automatically tracks stock for this product. Stock decreases with orders, and the system reacts when it hits zero. Enabling shows additional fields:
Quantity: Current stock quantity (e.g., 1 means only one unit in stock; after it’s sold, stock becomes zero).
Allow backorders? Determines how the store behaves when the stock is reset.
Do not allow→ Product can’t be purchased when out of stock.
Allow, but notify customer → Orders are accepted even if out of stock; the customer is informed (e.g., “This product is out of stock; shipping time may be extended”).
Allow → Product can be purchased without stock limit.
Low stock threshold: Alerts you when stock drops to this value. By default, the Shop-wide value (e.g., 2) applies, but you can set a product-specific threshold.
Stock status: Indicates whether the product is in stock.
Sold individually: When enabled, a customer can add only 1 unit of this product to the cart. Prevents multi-quantity purchases.
“Shipping”; Define physical properties and shipping options so customers get correct shipping costs and your logistics run smoothly.
Weight: Enter in kilograms. Used in shipping calculations and some logistics integrations. Optional.
Dimensions: Physical size of the product. Important for volumetric weight used by carriers. Optional.
Shipping class: Select whether the product belongs to a special shipping class.
No shipping class → default shipping applies.
Custom shipping classes (if defined) → e.g., “Express Shipping,” “Fragile Items,” “Free Shipping.” 👉 See our documentation on creating shipping classes and assigning them to products.
“Linked Products“, Upsell and cross-sell recommendations to increase sales:
Upsells: Suggest higher-quality, more advanced, or higher-priced alternatives. Example: While viewing “Classic Watch,” suggest “Premium Watch (Black).”
Cross-sells: Complementary items shown typically on the cart page to raise AOV. Example: While buying a Watch, suggest a “Classic Watch Strap.”
“Attributes“, Provide additional information that is shown to customers on the product page to better describe the product.
Select existing attributes and click “Save attributes.” Example: Strap Color – Black.
“Advanced“: Where you enable the purchase note, menu order, and reviews.
Purchase note: A message shown in the order confirmation email or order details after purchase. Example: “Thank you! Your order will be delivered within 3 business days.”
Menu order: ChatGPT said:
It allows you to control the order in which your products are listed on the store page. The default value is 0. Smaller numbers (e.g., -1) make the product appear higher in the list, while larger numbers (e.g., 5, 10) place the product lower.
Enable reviews: When checked, customers can leave ratings/reviews. Generally recommended to keep on.
Step 4: Set Product Image and Product Gallery
In the Product Image section, click “Set product image” to assign the main image for the product. This image appears on catalog pages and at the top of the product detail page.
In the Product Gallery section, click “Add product gallery images” to add additional images for the product. You can include photos showing different angles and details of the product.
Tip It’s better to upload images named with their SKUs.
Tip Keep image file sizes low. Recommended max dimensions: 2500 x 2500.
Step 5: Choose Product Categories, Tags, and Brands
This area shows the product’s classification fields: Category, Tag, and Brand selection.
a) Categories
In the Product Categories section, you can select one or more categories for your product.
This allows you to organize your products in a hierarchical structure. Categories help customers find and filter products more easily.
In the “All Categories” tab, all existing categories are listed.
In the “Most Used” tab, frequently used categories are highlighted. The category list is organized hierarchically. Example: Watch > Men’s Watch
+ Add New Category: Create a new category without leaving the product editor.
b) Tags
Product Tags are used to add keywords to products. This is not a mandatory field. The fields included in this section are:
Tag Box: Add tags by separating them with commas.
Add Button: Associates the entered tags with the product.
Choose from the Most Used Tags: Allows you to select from tags that were previously added.
Example tags for a “Men’s Watch”: metal, leather strap, classic, casual.
c) Brands
Brands allow you to classify products by brand. This is not a mandatory field. The fields included in this section are:
All Brands: Lists all defined brands.
Most Used: Highlights the most frequently used brands.
+ Add New Brand: Allows you to add a new brand.
Example: Assign “ASF Watch” to the “ASF Technology” brand.
Step 6: Save Draft and Preview
a) Save Draft
It allows you to save a product or content before publishing it.
When a draft is saved, the product will not appear in the store; it will only be stored in the admin panel.
This feature is very useful if you haven’t finished the product yet but want to continue working on it in the future.
b) Preview
It allows you to check how the product will appear in the store before publishing it.
Even in the draft stage, you can view and test the design and information on the product page without opening it to customers.
Step 7: Publish the Product
After completing all your reviews and checks, click the “Publish” button.
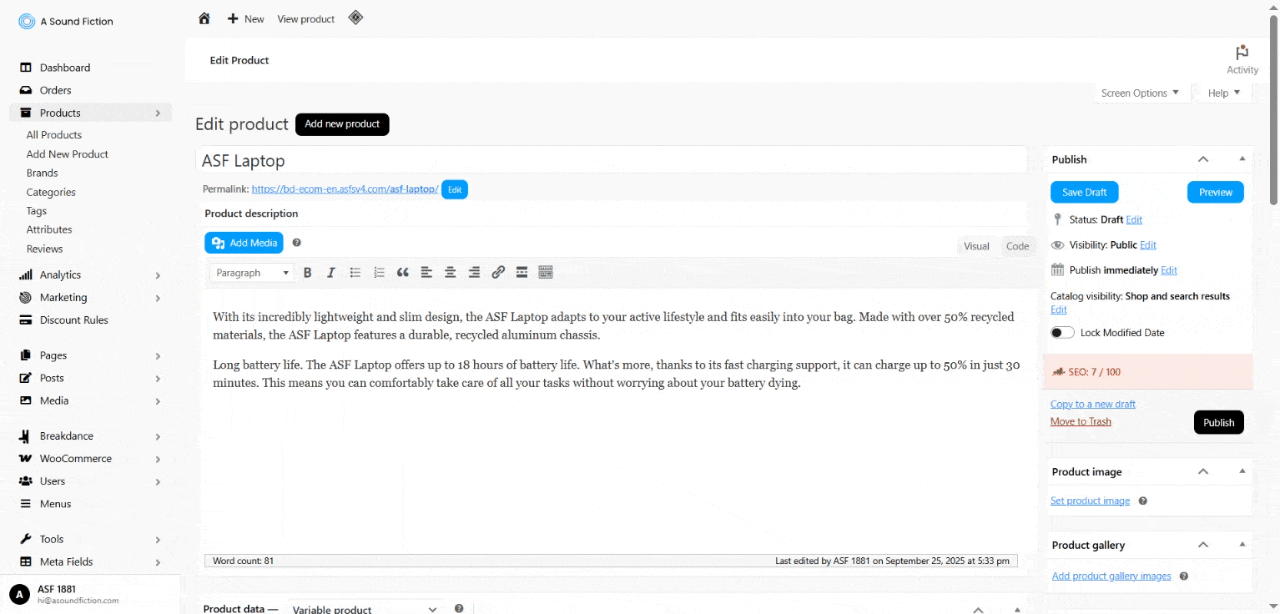
3.2.2 – Adding a Variable Product
Variable Product: Contains variations based on options such as color, size, or dimensions. Each variation can have its own price, SKU, stock, and image information.
Example: “ASF Laptop – 500 GB / 750 GB”
Step 1: Access the Add Product panel
In the left admin menu, click Products > All Products > Add New Product, or directly Products > Add New Product.
Step 2: Enter Product Name, Description, and Short Description
Under “Add New Product,” enter the product name in the “Product Name” field.
Then, in the “Product Description” field, enter product details such as features and specifications.
In the “Product Short Description” field, add a shorter summary. This text appears below the price on the product page.
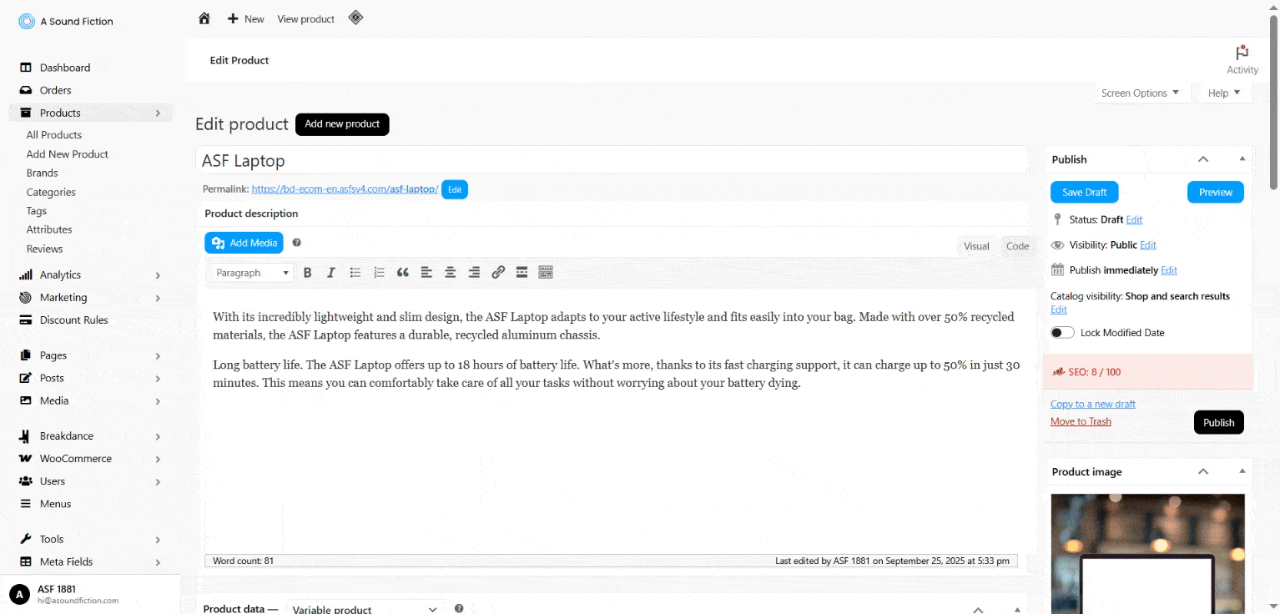
Example: name, product type, description, and short description for “ASF Laptop.”
Step 3: Fill out Product Data sections
To create a variable product, under the “Product Description” field, go to the “Product Data” section and select “Variable Product” as the product type.
Adding “Attributes” is required to create a Variable Product.
a) General
Under the “Product Data” section, in the “General” heading, you can set the “Tax Status” and “Tax Class“.
In the “Tax Status” field, you can choose from the options: “Taxable“, “Shipping Only” (tax applies only to shipping), or “None“.
From “Tax Class“, you can select the appropriate tax class. You can add new tax classes from WooCommerce → Settings → Tax.
b) Inventory
Under the “Inventory” heading, stock management should be done for the variations, not the main product. Here, you should assign an SKU to the main product.
c) Shipping
From the “Shipping” section, you can enter the product’s weight and dimensions, and select a shipping class. The purpose of the shipping class is to create different classes for products with different shipping rates. If all products in your store share the same shipping cost, you do not need to use a shipping class.
d) Linked Products
From the “Linked Products” section, you can encourage customers to make additional purchases by adding related products under “Upsells” and “Cross-sells“. “Upsells” are shown on the product page, while “Cross-sells” are displayed on the cart page.
Example: For “ASF Laptop,” add “Mouse” as a Cross-sell.
e) Attributes
The Attributes tab is where you define the properties of your product. It can be used both for informational purposes (e.g., Material: Wood, Color: White) — in simple products, you can use it this way, and make sure “Visible on the product page” is selected. It also serves as the basis for creating variations (e.g., Size: S, M, L options).
From the Products > Attributes menu, you can select previously defined attributes here.
Click “Add existing” to choose from previously defined attributes and select the ones you want to use.
Then, under the “Value(s)” section, pick the attribute values. Use the “Select All” button to choose all values. Use the “Select None” button to clear all selections. Use the “Add New” button to create a new value.
Make sure “Visible on the product page” and “Used for variations” are checked.
Once finished, click the “Save Attributes” button.
You can also click “Add new” to create an attribute on the fly:
Name: Attribute name (e.g., Internal Storage)
Values: Options for this product (e.g., 500 GB | 750 GB) separated by a vertical bar |.
Visible on the product page: Shows the attribute to customers.
Used for variations: Makes it available for variation definitions.
After filling in the fields here, you can click the “Save Attributes” button and create a new attribute.
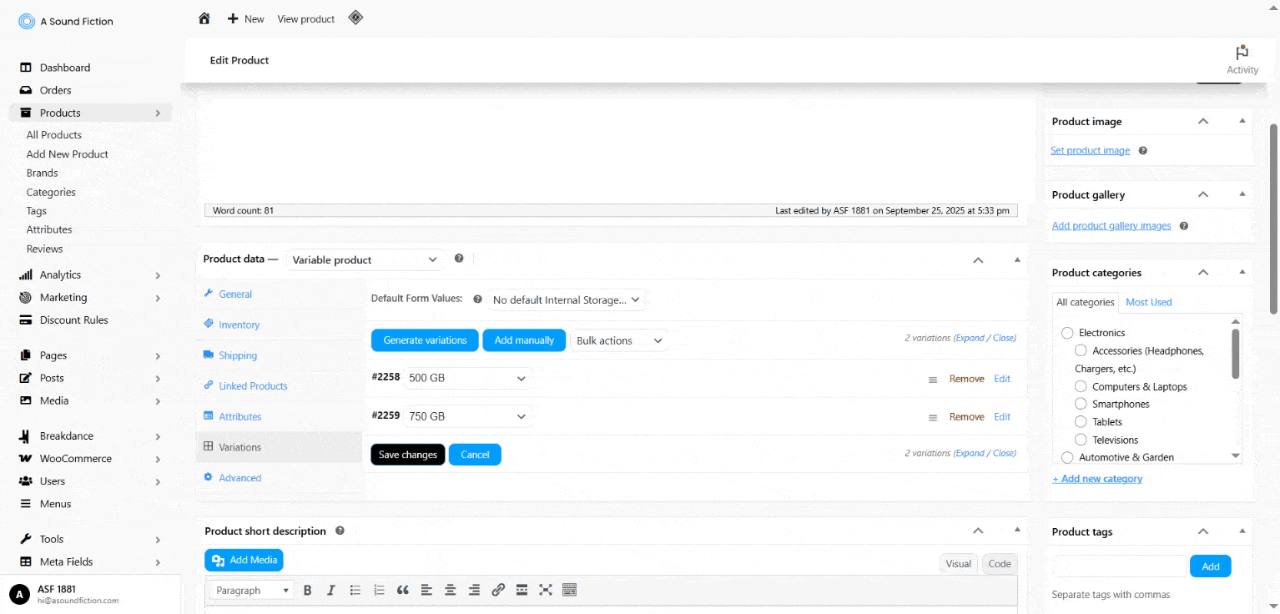
f)Create Variations
The “Variations” tab lets you generate combinations (e.g., Color × Size) from the attributes defined in Attributes, and assign a separate price, stock, SKU, and image to each combination. When you first open the Variations tab, it may be empty; click “Create variations” (top-left) and confirm to auto-generate all combinations. Example: For a T-Shirt product: Color: Red, Blue, Black. Size: S, M, L, XL → A total of 12 different variations are created. (3 colors × 4 sizes).
In our example, “Internal Storage: 500 GB, 750 GB” results in 2 variations.
g) Editing Variations
After creating the variations, click the “Edit” button on the right to modify them. You can enter details such as stock, product image, price, SKU, etc. Once completed, don’t forget to click the “Save changes” button below.
The SKU is the unique stock code of the product or variation. Enter the variation’s SKU.
Just below, in the GTIN, UPC, EAN, or ISBN field, you can enter the product’s barcode number if available.
You can upload a product image specific to a variation. To add a product image for a variation, click the blue image icon in the top left corner. Clicking this will open an image upload window. You can add your product photo from your computer using the “Upload File” section, or select your product photo from existing images in the “Media Library” section.
When you click “Edit,” the following options appear:
Enabled → The variation is visible to customers and can be purchased.
Downloadable → The product is not physical but provided as a digital file (e.g., e-book, software).
Virtual → Products that do not require physical shipping (e.g., service, license key).
Manage stock? → Determines whether stock will be tracked specifically for this variation.
Regular price ($): This is the regular price of the variation. It is a required field; if left empty, the variation cannot be sold.
Sale price ($): This field is used for discounts. With the “Schedule” option, you can set a start and end date for the discount. For example: If you enter $2000 as the regular price and $1800 as the sale price, the product will display as $2000 (crossed out) and $1800 as the active price.
If Manage stock is enabled;
Stock Quantity: The available stock quantity for this variation. For example, 10 units of Black – L size t-shirt. You can set the stock for the product from this field.
Allow backorders?:
Do not allow → When stock is zero, the customer cannot purchase the product.
Allow, but notify customer → Even if stock is depleted, the customer can place an order. The customer is informed about the stock situation.
Allow → Even if stock is depleted, the customer can place an order. The stock quantity goes into negative figures.
Low Stock Threshold: Used to have the system warn you when stock falls below a certain amount. Default: Storewide (e.g., 2)
“Stock Status” when inventory management is off:
In Stock: The product is available for sale. Customers can add it to their cart and purchase it.
Out of Stock: The product is not available for sale. Customers cannot add it to their cart..
On backorder: The product remains available for sale even when out of stock.
You can enter product weight and dimensions in the Weight and Dimensions fields.
Shipping Class: Allows you to set custom shipping conditions for the variation. Default: Same as parent. Tax Class: Allows you to set a custom tax rate for the variation. Default: Same as parent.
Description: In this field, you can add brief information and a description specific to the variant.
The option you select in the “Default form values” field is the one that will be displayed when you enter the product page. Example Scenario: ASF Laptop Attributes: Internal Storage: 500 GB, 750 GB
Default format values: Internal Storage = 500 GB
When the product page opens, the Internal Storage – 500 GB option will be automatically selected. The customer can select another version if they wish.
“Bulk Actions” is the area where you can make changes to all variants in bulk. For example, with bulk actions, you can set a fixed normal price for all variants, and increase or decrease this price.
You can do these operations for all variations you create.
After completing the steps, click the “Save Changes” button.
h) Advanced
Finally, from the “Advanced” tab, you can adjust “Purchase Rating,” “Menu Sorting,” and “Enable Reviews.”
The “Enable Reviews” option allows customers to leave reviews for the product. When you disable this option, the review field below the product disappears, and the product is no longer accessible for reviews.
Purchase Note: The text you enter in this field will appear in the order confirmation email after the customer purchases the product and completes their order.
Menu Order: Determines the order in which the product is listed on the category or store page. For example, here’s a scenario for “ASF Laptop”:
Purchase Note: “Your product has a 2-year warranty. The warranty card and invoice are included in the box.”
Menu Order: -1 (to be listed higher on the category page)
Reviews: Enabled (to see customer reviews)
Step 4: Set Product Image and Product Gallery
In the Product Image section, click “Set product image” to assign the main image for the product. This image appears on catalog pages and at the top of the product detail page.
In the Product Gallery section, click “Add product gallery images” to add additional images for the product. You can include photos showing different angles and details of the product.
Tip It’s better to upload images named with their SKUs.
Tip Keep image file sizes low. Recommended max dimensions: 2500 x 2500.
Step 5: Choose Product Categories, Tags, and Brands
This area shows the product’s classification fields. Here you select Category, Tag, and Brand.
a) Categories
In the Product Categories section, you can select one or more categories for your product.
This allows you to organize your products in a hierarchical structure. Categories help customers find and filter products more easily.
In the “All Categories” tab, all existing categories are listed.
In the “Most Used” tab, frequently used categories are highlighted. The category list is organized hierarchically. Example: Computers & Laptops
+ Add New Category: Create a new category without leaving the product editor.
b) Tags
Product Tags are used to add keywords to products. This is not a mandatory field. The fields included in this section are:
Tag Box: Add tags by separating them with commas.
Add Button: Associates the entered tags with the product.
Choose from the Most Used Tags: Allows you to select from tags that were previously added.
Example: For a “Laptop” product, a tag could be: gaming laptop.
c) Brands
Brands allow you to classify products by brand. This is not a mandatory field. The fields included in this section are:
All Brands: Lists all defined brands.
Most Used: Highlights the most frequently used brands.
+ Add New Brand: Allows you to add a new brand.
Example: Assign “ASF Watch” to the “ASF Technology” brand.
Step 6: Save Draft and Preview
a) Save Draft
Allows you to save the product or content without publishing it yet.
When saved as a draft, the product will not appear in the store; it will only be stored in the admin panel.
This feature is very useful if the product is not yet complete but you want to continue working on it later.
b) Preview
Allows you to check how the product will appear in the store before publishing it.
Even at the draft stage, you can view and test the design and details of the product page without making it visible to customers.
Step 7: Publishing
Status: Shows the current status of the product. You can change it to Draft, Published, or Pending Review using the “Edit” option.
Visibility:
Public → Visible to everyone.
Private → Only administrators can see it.
Password Protected → Only users who enter the password can see it.
Publish on: Allows you to change the product’s publish date. You can publish it immediately or schedule it for a specific date/time in the future.
Catalog Visibility: Defines how the product will appear in the store and search results:
Shop and search results → Default.
Shop only → Will not appear in search results.
Search results only → Will not appear in catalog listings.
Hidden → Not visible to customers.
By clicking the “Publish” button, the product goes live and becomes active. After publishing, this button changes to “Update.” When you make any changes to the product, click the “Update” button.
After publishing, you can revert the product back to Draft by changing it under the “Status” section.
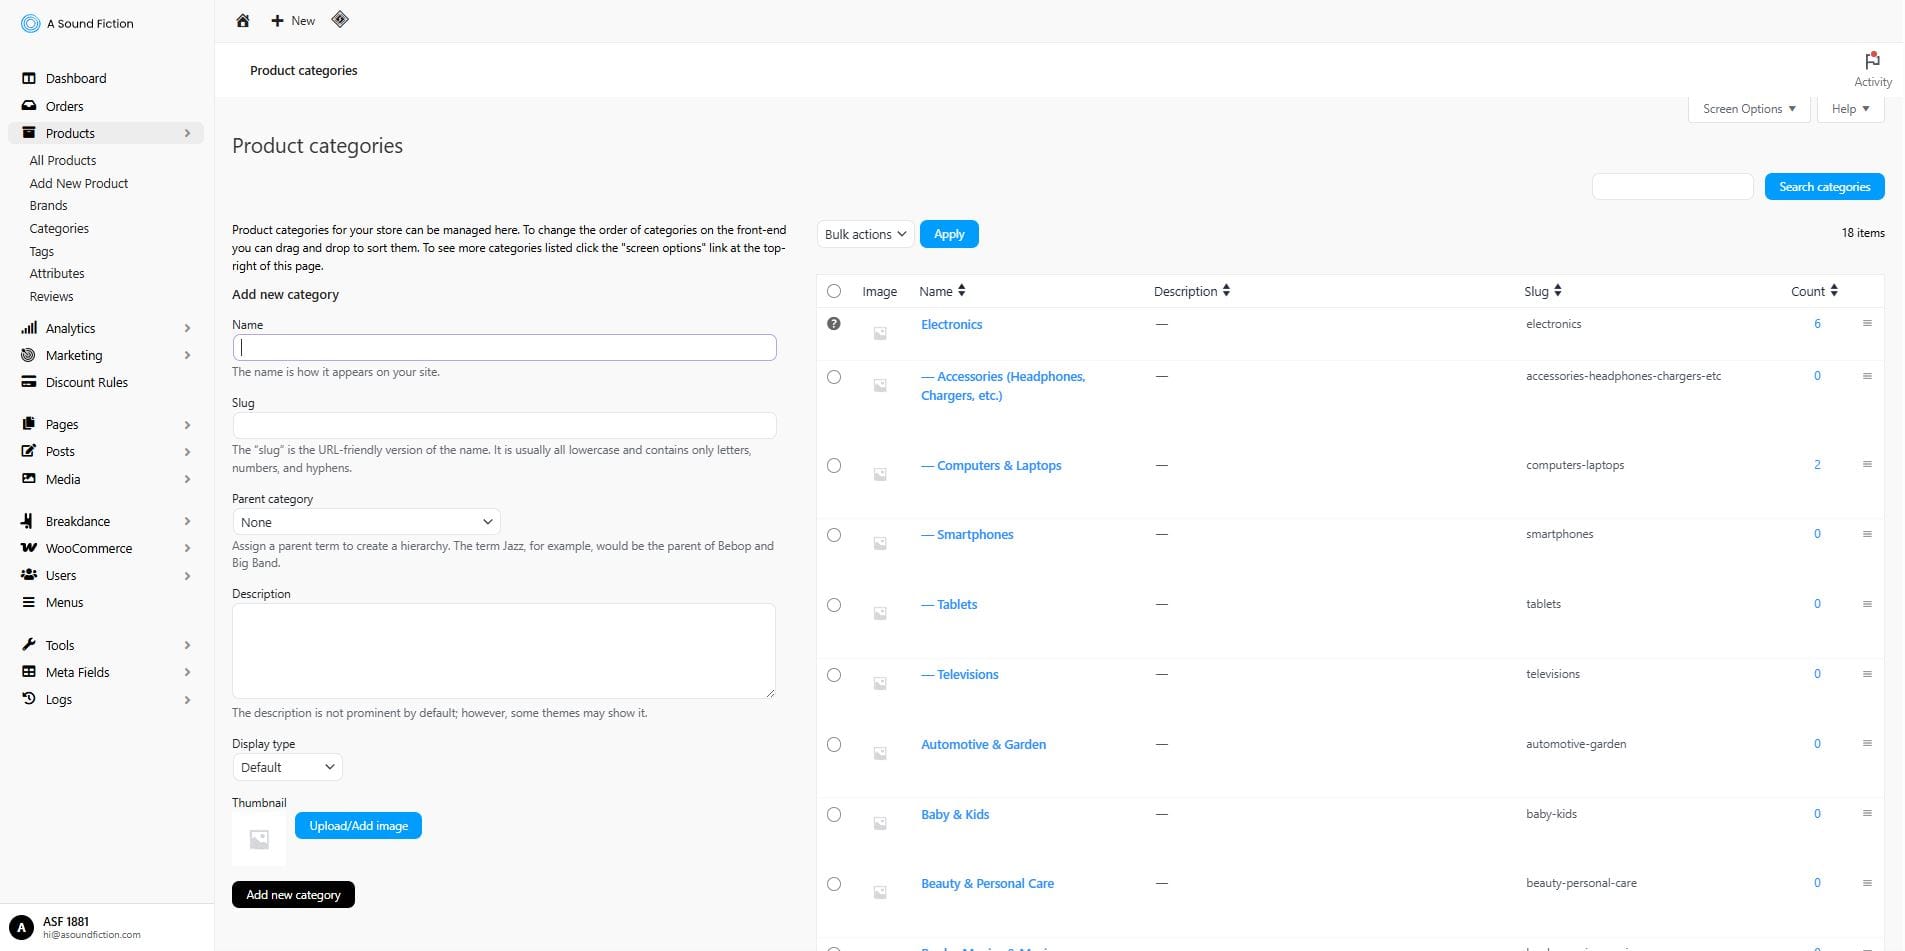
3.3 – Categories
Categories help you organize your products within a hierarchical structure. This way, customers can easily find and filter your products, making their shopping experience faster.
From the left menu, follow Products > Categories to access Categories. Here, you can view the list of existing categories, add a new category, or edit existing categories.
The Categories table contains the following information:
Image: The logo/image of the category.
Name: The name of the category.
Description: Information about the category.
Slug: The short name used in the URL.
Count: The total number of products linked to this category. By clicking on this number, you can view the products within that category.
3.3.1 – Add New Category
To add a new category, follow the steps below:
Click on the Products > Categories menu.
Fill in the fields under the “Add New Category” heading:
Name: Specify the name of the category.
Slug: The short URL-friendly name. If left blank, it will be generated automatically.
Parent Category: Here you can determine the hierarchy. If you want to create a subcategory, select the parent category to which it will belong. Example: Watch > Men’s Watch
Description: Enter information about the category here. This field is optional.
Display Type: Determines what will be shown to the user when the category page is opened. In other words, when a customer visits the relevant category, should they see the products, subcategories, or both?
Default: Applies the system’s default behavior.
Products: Only products are listed on the selected category page. Subcategories are not displayed in this view. Example: When entering the Men’s Watch category, only products are listed directly.
Subcategories: Only subcategories are displayed on the selected category page. Products are not listed at this stage. Example: When entering the Watch category, Men’s Watch, Women’s Watch, Children’s Watch subcategories are shown, but products are not.
Both: Both products and subcategories are displayed on the same page. Example: When entering the Watch category, subcategories (Men’s Watch, Women’s Watch, Children’s Watch) appear above, and products are listed below.
Thumbnail: Click on the “Upload/Add Image” button here to add an image related to the category. This field is optional.
Click the Add New Category button.
3.3.2 – Editing a Category
After creating a category, you may need to make changes to it. For this, you can use the options under the relevant category in the category list:
Edit: You can edit the category name, slug (URL), parent category, description, display type, and thumbnail image. When editing is complete, click the “Update” button to save.
Quick Edit: Allows you to edit only the category name and slug without going to another page. When editing is complete, just click the “Update Category” button.
Delete: Permanently deletes the category.
View: Allows you to view the products assigned to the relevant category.
Make Default: This option sets the category as the default category. The default category cannot be deleted, and products without a category will be automatically assigned to it.
Note Since categories have a hierarchical structure, when a subcategory is selected, the product is automatically listed in the parent category.
3.3.3 – Screen Options, Help and Activity
With the “Screen Options” section located at the top right, you can determine which information will be displayed in the “Categories” list and how the view will appear.
From the Screen Options menu at the top right:
Columns: The options you check here will appear as columns in the “Categories” table (e.g., Image, Description, Slug, etc.). The columns you do not check will not be shown in the list.
Pagination: From the “Number of items per page” field, you can set how many categories will be visible in the list at the same time (e.g., 5 → Only 5 category rows will be listed per page).
Tip After adjusting your screen settings, you must click the “Apply” button to save them.
From the “Help” section, you can create a support request related to your website.
The “🏳️Activity” icon opens a notification panel that shows what is happening in your store. This panel acts like a live notification box for your store. From new orders to performance reports, you can view important updates all in one place here.
3.3.4 – Bulk Actions
This is used to manage multiple categories at the same time.
Select the categories to apply the bulk action.
Choose the Delete option and then click the Apply button to perform the action.
3.3.5 – Category Search
Using the search field at the top, you can quickly find the category you want among hundreds of categories.
Enter the full or partial name of the category in the search box.
Click the “Search Categories” button to quickly find the desired categories.
Results will instantly appear in the list.
3.3.6 – Assigning Category Inside a Product
When adding a new product or editing an existing one, the Categories box can be found on the right panel.
From here, you can assign the product to one or multiple categories.
Multiple category usage is possible. (Example: A coffee table can be added both to the Furniture category and the Living Room subcategory.)
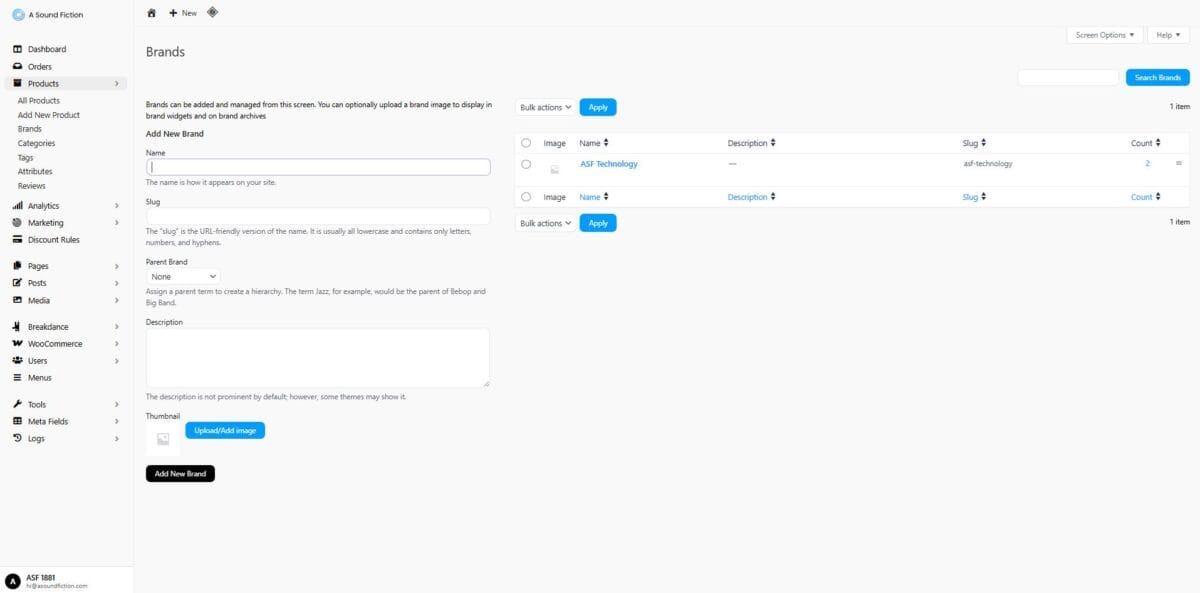
3.4 – Brands
Brands allow you to classify your products by brand, making it easier for customers to filter and find them. Here, you can view the list of existing brands, add new ones, or edit existing ones.
From the left menu, go to Products > Brands to access Brands.
After adding a brand, you will see a table on the right listing all brands. The Brands table includes the following information:
Image: The brand’s logo/image.
Name: The visible name of the brand.
Description: Information about the brand (if entered).
Slug: The short name used in the URL.
Count: The total number of products linked to this brand.
3.4.1 – Add New Brand
To add a new brand, follow these steps:
Click on the Products > Brands menu.
Fill in the fields under the “Add New Brand” heading:
Name: Enter the name of the brand.
Slug: The short link name that will appear in the URL. If left blank, it will be generated automatically.
Parent Brand: Use this option to create a hierarchy. For example, Parent: Metal Music, sub-terms could be Progressive Metal, Heavy Metal, Trash Metal, etc.
Description: Enter a short description about the brand here. This field is optional.
Thumbnail: From here, click the “Upload/Add Image” button to add the brand logo or a relevant image. This field is optional.
Click the Add New Brand button. The new brand will be created and displayed in the list on the right.
3.4.2 – Editing Brand
After creating a brand, you may need to make changes to it. For this, you can use the options located under the relevant brand in the brand list:
Edit: Allows you to edit the brand name, slug (URL), parent brand, description, and thumbnail. Once editing is complete, click the “Update” button to save.
Quick Edit: Lets you edit only the brand name and slug without going to another page. Once editing is complete, click the “Update Brand” button to save.
Delete: Completely deletes the brand.
View: Lets you view the products associated with the brand.
3.4.3 – Screen Options and Help
With the “Screen Options” section located at the top right, you can decide which information will be displayed in the “Brands” list and how the view will appear.
From the Screen Options menu at the top right:
Columns: The options you check here will appear as columns in the “Brands” table (e.g., Image, Description, Slug, etc.). Unchecked columns will not be displayed in the list.
Pagination: From the “Number of items per page” field, you can adjust how many brands are displayed in the list at once (e.g., 5 → Only 5 rows of brands will be listed per page).
Tip After adjusting your screen settings, you must click the “Apply” button to save them.
From the “Help” section, you can create a support request related to your website.
3.4.4 – Bulk Actions
Bulk actions are used to manage multiple brand items at the same time.
Select the brands to which the bulk action will be applied.
Choose the Delete option and then click the Apply button to complete the action.
3.4.5 – Searching Brands
You can quickly access the desired brand among hundreds of brands by using the search field located at the top right.
Enter the full or partial brand name in the search box.
Use the “Search Brands” button to quickly find the desired brands.
Results will be instantly displayed in the list.
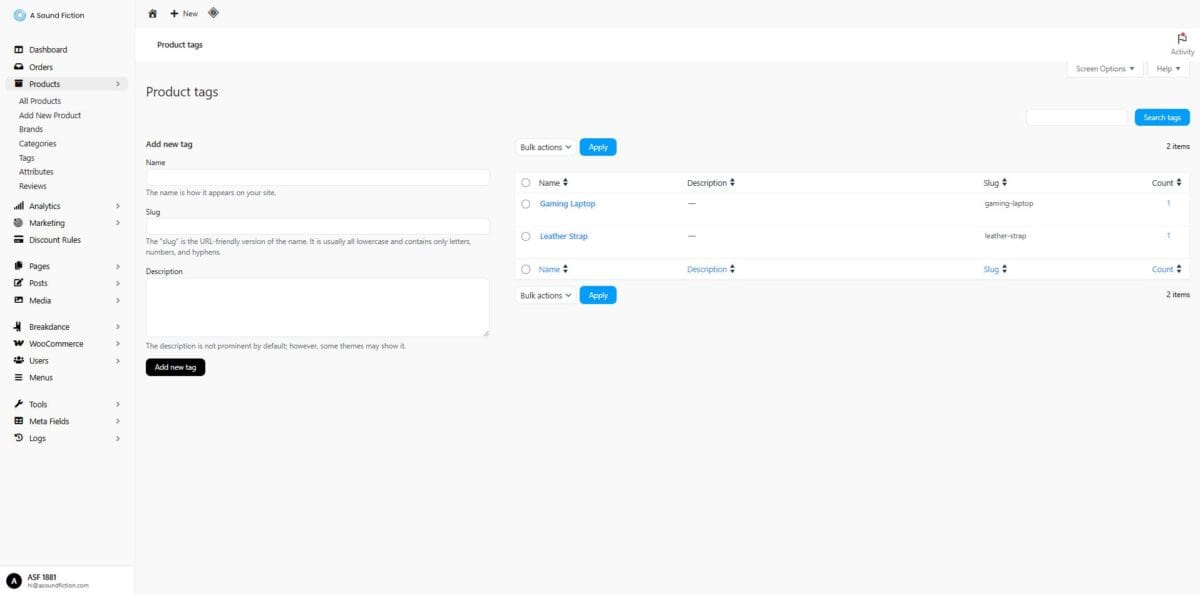
3.5 – Tags
Tags are free keywords that you can add to your products.
They associate products with certain themes, features, or areas of use, providing ease of search and filtering.
They are also important for SEO; when used correctly, they increase the discoverability of your products in search engines.
Example: For a “Sofa” product, tags could be: comfortable, fabric, living room, modern.
From the left menu, follow the path Products > Tags to access “Tags.” Here, you can view the list of existing tags, add new tags, or edit existing ones.
3.5.1 – Add New Tag
To add a new tag, follow these steps:
Click on the Products > Tags menu.
Fill in the fields under the “Add New Tag” heading:
Name: Specify the tag name.
Slug: The short link name that will appear in the URL. If left blank, it will be created automatically.
Description: Enter a description related to the tag in this section. This field is optional.
Click the Add New Tag button. After adding the tag, you can see and edit your existing tags on the right-hand side. In this area, you can view the tag name, description, slug, and the number of products associated with that tag.
3.5.2 – Editing Tag
After creating a tag, you may need to make changes to it. For this, you can use the options under the tag in the tag list:
Edit: Allows you to edit the tag’s name, slug (URL), and description. Once editing is complete, click the “Update” button to save.
Quick Edit: Allows you to edit only the tag name and slug without going to another page. When editing is complete, just click the “Update Tag” button.
Delete: Permanently deletes the tag.
View: Lets you view the products associated with the relevant tag.
3.5.3 – Screen Options, Help, and Activity
With the “Screen Options” section at the top right, you can determine which information will appear in the “Tags” list and how the display will look.
From the Screen Options menu at the top right:
Columns: The options you check here will appear as columns in the “Tags” table (e.g., Description, Slug, etc.). Unchecked columns will not be displayed in the list.
Pagination: From the “Number of items per page” field, you can set how many tags will appear at once in the list (e.g., 5 → Only 5 tag rows will be listed per page).
Tip After adjusting your screen settings, you must click the “Apply” button to save them.
From the “Help” section, you can create a support request regarding your website.
The “🏳️Activity” icon opens a notification panel showing what’s happening in your store. This panel acts as a “live notification box” for your store. From new orders to performance reports, important updates can be viewed here from a single screen.
3.5.4 – Bulk Actions
This is used to manage multiple tags at once.
Select the tags to which the bulk action will be applied.
Choose the Delete option and then click the Apply button to complete the action.
3.5.5 – Search Tags
Using the search field at the top right, you can quickly find the tag you want among hundreds of tags.
Enter the full name or part of the tag name into the search box.
Use the “Search Tags” button to quickly find the tags you want.
Results will be displayed instantly on the list.
3.5.6 – Selecting Tags Within a Product
When adding a new product or editing an existing one, the Tags field can be found on the right panel.
You can select existing tags for the related product or create and add a new tag.
Multiple tags can be assigned to the same product.
Example: For a desk product: living room, modern design.
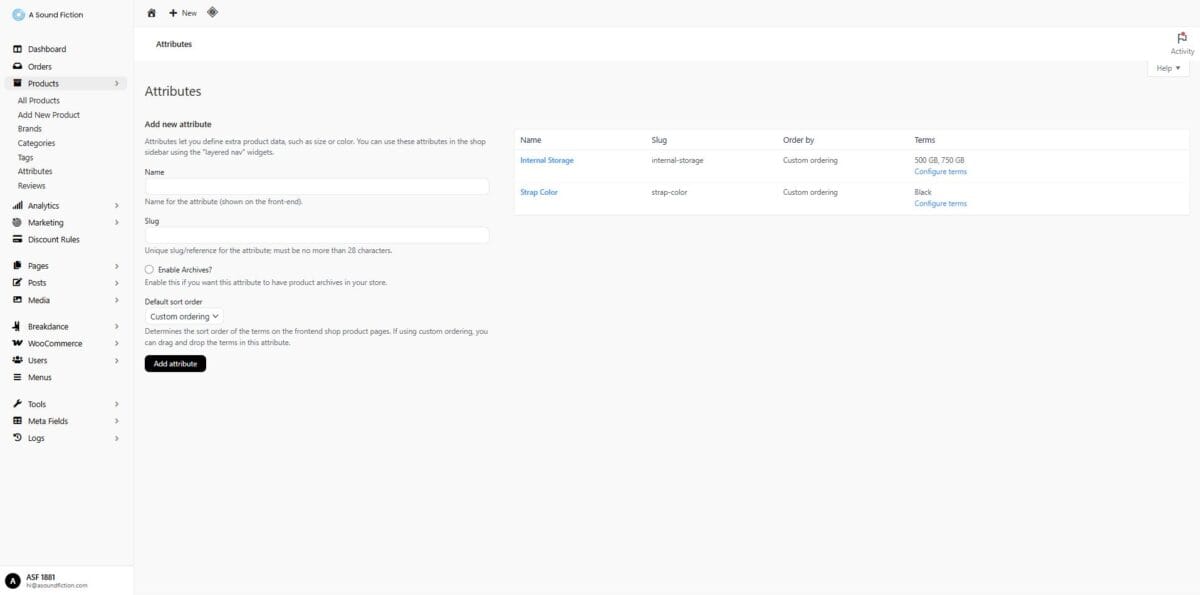
3.6 – Attributes
Attributes are technical or visual features that you can add specifically to your products. Values such as color, size, measurement, or material are defined through this section. They are used to create variable products.
Example: Attributes for a Laptop: Internal Storage (500 GB, 750 GB)
From the left menu, follow the path Products > Attributes to access “Attributes” and reuse these attributes in your desired products.
For Simple Products: You can display attributes as information on the product page. You can select previously created attributes or create new ones. For Variable Products: Attributes are required to create variable products. Example: In a T-shirt product, “Color” and “Size” attributes are used.
3.6.1 – Adding and Configuring a New Attribute
Follow the steps below to add a new attribute:
Click on the Products > Attributes menu.
Under the “Add New Attribute” heading, fill in the fields:
Name: Enter the name of the attribute you want to add.
Slug: The short URL-friendly name. If left blank, it will be generated automatically.
Order by: Determines how attribute values will be sorted on the product page (Custom ordering / Name / Name ( numeric) / Term ID).
Click the Add Attribute button.
After adding attributes, you need to configure the terms of the related attribute. To do this, click on the “Configure Terms” tab next to the attribute. Attribute terms can be assigned to products and variations. Then enter the terms in this area:
Name: Enter the name of the term.
Slug: The short URL-friendly name. If left blank, it will be generated automatically.
Description: Here you can add a description about the term. This field is optional.
Click the “Add New X” button (e.g., Add New Size). This will complete the process of adding the term.
Example Scenario: You are selling T-shirts in your store. These products have different color and size options. To allow your customers to choose color and size on the product page, you need to perform the Add New Attribute process.
Attribute: Color
Terms: Red, Blue, White
3.6.2 – Editing Attributes and Terms
a) Editing Attributes
Once an attribute has been created, you may need to make changes to it. For this, you can use the options under the related attribute in the attribute list:
Edit: You can edit the attribute’s name and slug (URL). Once finished, click the Update button to save.
Delete: Completely deletes the attribute.
b) Editing Terms
Once an attribute has been created, you may need to make changes to the terms belonging to that attribute. You can also add new terms from this area. For this, you can use the options under the related term in the term list:
Edit: You can edit the term’s name, slug (URL), and description. Once finished, click the Update button to save.
Quick Edit: Allows you to edit only the term’s name and slug without navigating to another page. Once finished, click the X Update (e.g., Update Color) button.
Delete: Completely deletes the term.
3.6.3 – Screen Options, Help, and Activity for Terms
“Screen Options” section at the top right, you can determine which information will appear in the terms list and how the display will look.
From the Screen Options menu at the top right:
Columns: The options you check here will appear as columns in the “terms” table (e.g., Description, Slug, etc.). Unchecked columns will not be shown in the list.
Pagination: From the “Number of items per page” field, you can set how many terms will appear in the list at once (e.g., 5 → Only 5 rows of terms will be listed per page).
Tip After adjusting your screen settings, you must click the “Apply” button to save them.
From the “Help” section, you can also create a support request related to your website.
The “🏳️Activity” icon opens a notification panel that shows what’s happening in your store. This panel works like a live notification box for your store. From new orders to performance reports, you can view important updates here on a single screen.
3.6.4 – Bulk Actions for Terms
Used to manage multiple terms at the same time.
Select the terms you want to apply a bulk action to.
Choose the Delete option and then click the Apply button to complete the process.
3.6.5 – Searching Terms
Using the search field at the top right, you can quickly find the term you want among hundreds of terms.
Type the full or partial name of the term in the search box.
Click the Search X (e.g., Search Color) button to quickly find the desired labels.
The results will be displayed instantly on the list.
3.6.6 – Selecting Attributes Within a Product
Go to the Add New Product page and open a “T-Shirt” product.
From the “Product Data” field → select the Attributes tab.
Add the Color attribute you created here.
In the “Variations” tab, you can now enter a separate price, stock, and image for each color. In our prepared example, only prices have been added to the variations to make the selections visible.
Your customers will now see the “Choose Color” options on the product page.
Later, in the “Product Data” → “Variations” tab, separate prices, stock and images can be defined for each color and size combination.
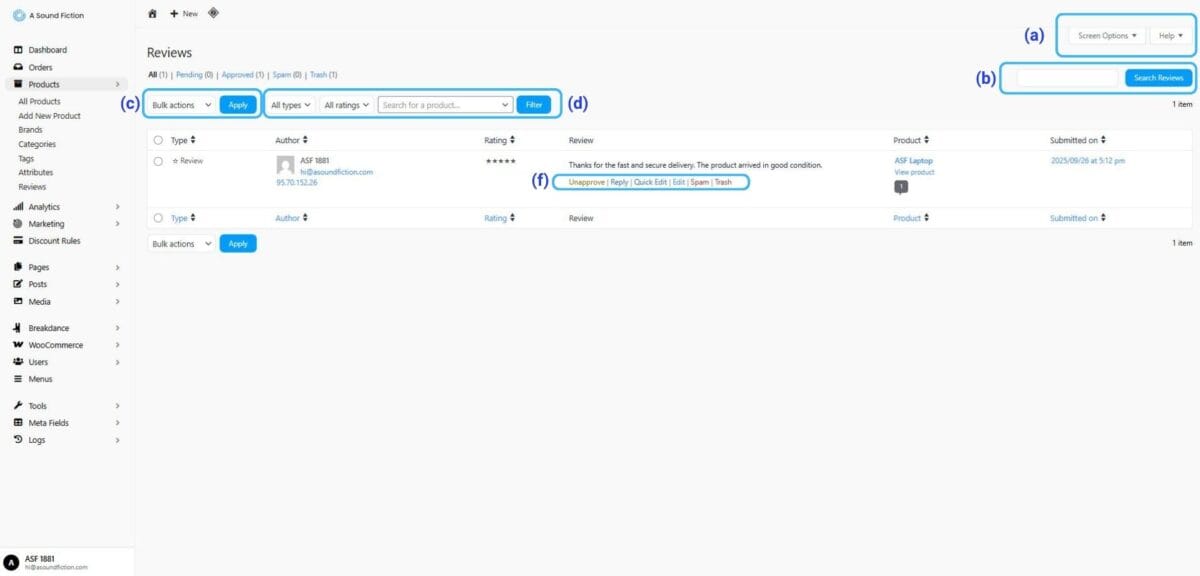
3.7 – Reviews
Customer Reviews allow you to manage the feedback left by users who have shopped for your products. Reviews go through an approval process before being displayed on the product page.
From the left menu, follow Products > Reviews. Here, you will see a list of all reviews submitted by customers.
On the screen that appears, the following information is displayed for each review:
Type: The type of customer evaluation (e.g., Review).
Author: The name of the user who wrote the review.
Product: The product that was reviewed.
Review: The message left by the customer.
Rating: Star rating given between 1 and 5.
Submission on: The date the review was submitted.
What You Can Do on the List:
Screen Options and Help
Search Bar
Bulk Actions
Filtering
Quick Actions
Under Reviews; the “All” tab shows all reviews, the “Pending” tab shows reviews that have not yet been approved, the “Approved” tab shows approved reviews, the “Spam” tab shows unwanted/spam reviews, and the “Trash” tab shows deleted reviews.
Newly submitted reviews will have the status Pending.
3.7.1 – Screen Options and Help
“Screen Options” section located at the top right, you can choose which information will be displayed in the reviews list (Author, Rating, Product, etc.).
From the Screen Options menu located at the top right:
Columns: The options you select here will appear as columns in the “Customer Reviews” table (e.g., Type, Author, Rating, Product, and Submission Date). Columns you do not select will not be displayed in the list.
Pagination: From the “Number of items per page” field, you can adjust how many reviews will be displayed at the same time in the list (e.g., 5 → Only 5 reviews will be listed per page).
You can also create a support request for your website from the “Help” section.
3.7.2 – Search Bar
In the search bar, you can type the full or partial term related to the comment you are looking for and quickly find the desired comment by clicking the “Search Reviews” button.
3.7.3 – Bulk Actions
With “Bulk Actions”, you can collectively select “Move to Trash” and then click “Apply” to delete comments. Similarly, you can collectively “Approve”, “Unapprove”, or “Mark as spam”.
3.7.4 – Filtering
You can filter by comment type, rating, or product name.
3.7.5 – Quick Actions
When you hover over a comment, the following options appear below:
Approve: Publishes the comment and makes it visible on the product page.
Reply: Allows you to reply to the comment.
Edit: Provides the ability to edit and modify the comment in detail.
Quick Edit: Allows you to quickly edit the comment without leaving the “Customer Comments” page.
Spam: Marks the comment as spam and moves it to the “Spam” tab. From the “Spam” tab, you can restore the comment by clicking “Not Spam,” or permanently delete it by clicking “Delete Permanently.”
Trash: Moves the comment to the “Trash” tab. The comment is not permanently deleted. From the “Trash” tab, you can restore it by clicking “Restore,” or permanently delete it by clicking “Delete Permanently.”
You can view the reviewed product by clicking “View Product” under the “Product” column.
Can't find the answers you're looking for? We're here to help.
We Ask for Your Consent for a Better Experience We use cookies to ensure our website functions properly, personalize content and ads, provide social media features, and analyze site traffic. We also share information about your use of the site with our social media, advertising, and analytics partners.
Functional
Always active
Technical storage or access is strictly necessary for a legitimate purpose in order to provide a specific service explicitly requested by the subscriber or user, or to transmit a communication over an electronic communications network.
Tercihler
Teknik depolama veya erişim, abone veya kullanıcı tarafından talep edilmeyen tercihlerin saklanmasının meşru amacı için gereklidir.
Statistics
These cookies help us optimize our website. By allowing us to use these cookies, we can learn which pages our users enjoy browsing the most and which products are the most popular. Some of these cookies are provided by companies located outside the country. If you enable the use of these cookies, your personal data processed through the cookies will be transferred abroad.These cookies help us optimize our website. By allowing us to use these cookies, we can gain insights into which pages our users enjoy visiting the most and which products are the most popular. Some of the providers of these cookies are located abroad. If you enable the use of these cookies, your personal data processed through cookies will be transferred abroad.
Marketing
These cookies are used to help prevent you from seeing irrelevant ads. They are also used to display A Sound Fiction ads based on the products you browse, search for, or purchase when visiting other websites. Some of the providers of these cookies are located outside the country. If you enable the use of these cookies, your personal data processed through the cookies will be transferred abroad.