The Menus section allows you to create and manage your site’s navigation (main menu, sub-menus, footer menus, etc.).
Note The menu is the most important structure that helps visitors easily navigate your site. The “Main Menu” is usually located at the top of the site, while the “Footer Menu” is located at the bottom.
13.1 – Accessing the Menus Page
From the left admin menu, click the “Menus” option.
If you have never created a menu before, you will be directed to the Create a New Menu screen.
13.2 – Creating a New Menu and Adding It to the Header
13.2.1 – Creating a Menu
In the left admin menu, click on the “Menus” option.
If you have not created any menu before or want to create a new one, the “Create a New Menu” screen will appear.
In the “Menu Name” field, enter a name (e.g., “Main Menu”).
On the left-hand side, under “Add Menu Items”, select the items you want to add to your menu (Pages, Posts, Products, Categories, Tags, Product Categories, Product Tags, Brands, etc.).
Tip In e-commerce websites, the general practice is to highlight product categories. Therefore, you may also follow this approach when creating your menu.
Once finished, click the “Create Menu” button in the bottom-left corner to save your menu.
13.2.2 – Adding the Created Menu to the Header
For this process, you must have at least one menu created on your website. Once the “Create Menu” process is completed:
In the left admin menu, click on “Breakdance > Headers”.
Under the “TEMPLATE” column, hover over the “Header” title (in our example “Main Header”), and click the “Edit in Breakdance” button. Here, the previously created “Header” will appear.
If you want to continue adding a menu to an existing Header, proceed to step 3.
In the panel that appears, click the “Add” button located on the left.
You will see a panel with many elements. In this panel, search for the “WP Menu” element and add it.
Here you will need to select a menu. To do this, from the left-hand Menu → Choose a menu section, select the menu you want. After completing all edits, click the “Save” button located at the top right.
13.3 – Adding Menu Items
The main items you can add to menus are:
Pages: Add static pages you’ve created earlier (e.g., About Us, Contact).
Posts: Add a specific blog post to the menu.
Products: Add specific products directly to the menu.
Custom Links: Add links to external sites or custom URLs (e.g., campaign link).
Categories: Add your blog’s category archives to the menu.
Tags: Add blog post tags to the menu for easier access to related content.
Brands: If your site includes brand-based product groups, you can add these to the menu.
Product Categories: One of the most important parts of an e-commerce site; add your products as main and subcategories.
Product Tags: Add product tags to allow filtering in the menu.
Note The most commonly used menu items on e-commerce websites are Product Categories and Brands, while other items are usually added for support.
Steps:
From the left-hand side, open the item type (Pages/Posts/Categories/Custom Links/Products/Tags/Product Categories/Product Tags/Brands).
Select the items you want to add (for Custom Links, enter the URL and Link Text).
Click Add to Menu.
The selected items will appear in the list on the right.
After completing the process, click the “Save Menu” button at the bottom of the page. If you don’t save, the changes won’t take effect.
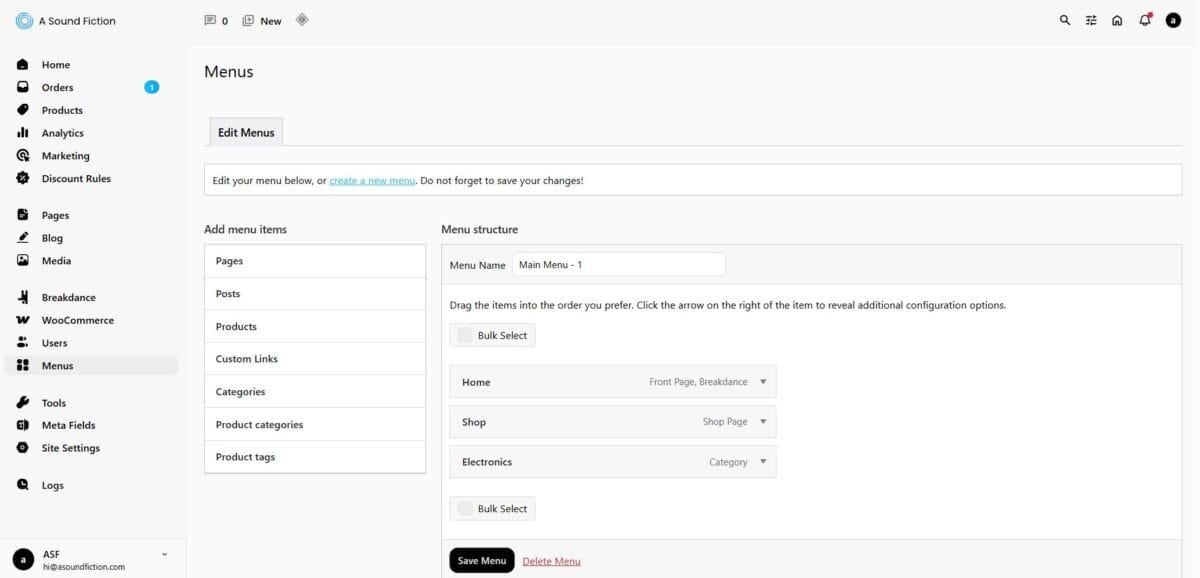
13.4 – Ordering and Hierarchy (Submenu)
A submenu is a menu item that opens under a main menu item, leading to more detailed pages or content.
You can organize the order and hierarchy of the menu items as you wish:
Drag-and-Drop Management: Move items up or down with drag-and-drop. If you leave an item one step to the right of another item, it becomes a submenu. Follow these steps:
From the left-hand side, open the item type (Pages/Posts/Categories/Custom Links/Products/Tags/Product Categories/Product Tags/Brands).
Select the items you want to add (for Custom Links, enter the URL and Link Text).
Click Add to Menu.
Drag and position the item you added (e.g., place “Computers” under the “Electronics” menu).
Click the “Save Menu” button at the bottom of the page. If you do not do this, the changes you made to the menu will not be saved.
Select Parent Item: Alternatively, you can open the arrow next to the item and use the “Parent Item” field to select under which item it will appear. Follow these steps:
From the left-hand side, open the item type (Pages/Posts/Categories/Custom Links/Products/Tags/Product Categories/Product Tags/Brands).
Select the items you want to add (e.g., in “Product Categories,” select the “Laptop” category).
Click Add to Menu.
Open the arrow next to the item you added and select the Parent Item it should appear under (e.g., Electronics).
At the bottom of the page, click the “Save Menu” button. If you don’t save, the changes won’t take effect.
13.5 – Renaming a Menu
From the left admin menu, click the “Menus” option.
At the top of the menu, edit the Menu Name (e.g., “Main Menu” → “Main Menu – 1”).
At the bottom of the page, click the “Save Menu” button. If you do not do this, the changes you made to the menu will not be saved.
13.6 – Deleting an Item from a Menu
From the left admin menu, click the “Menus” option.
Open the dropdown arrow next to the item you want to remove.
Click the “Remove” option.
At the bottom of the page, click the “Save Menu” button. If you do not do this, the changes you made will not be saved
13.7 – Deleting a Menu Entirely
In the left admin menu, click on “Menus”. If you have more than one menu, select the menu you want to delete (e.g., Menu – 2).
At the bottom of the page, click the “Delete Menu” link.
This action will permanently remove the menu (it cannot be undone).
13.8 – Screen Options
At the top right of the Menus page, open the Screen Options tab to enable the following fields:
a)Screen Elements: Here you can choose the content types available for adding to the menu. For example: Pages, Posts, Products, Categories, Tags, Product Categories, Product Tags, Brands. Each option you check will appear in the “Add Menu Items” section.
b)Advanced Menu Properties: This section shows additional settings that can be enabled within each menu item you add:
Link Target: Allows the link to open in a new tab.
Title Attribute: Adds a tooltip (hover text) to the menu item.
CSS Classes: Used to add custom styling to menu items (e.g., button appearance).
Link Relationship (XFN): Defines the relationship between the linked site and your own (for advanced users).
Description: If supported by your theme, displays a short description under the menu item.
Tip For beginners, it’s easier to check only the basic fields (e.g., Pages, Posts) under “Screen Elements” to simplify the menu creation process.
Can't find the answers you're looking for? We're here to help.
We Ask for Your Consent for a Better Experience We use cookies to ensure our website functions properly, personalize content and ads, provide social media features, and analyze site traffic. We also share information about your use of the site with our social media, advertising, and analytics partners.
Functional
Always active
Technical storage or access is strictly necessary for a legitimate purpose in order to provide a specific service explicitly requested by the subscriber or user, or to transmit a communication over an electronic communications network.
Tercihler
Teknik depolama veya erişim, abone veya kullanıcı tarafından talep edilmeyen tercihlerin saklanmasının meşru amacı için gereklidir.
Statistics
These cookies help us optimize our website. By allowing us to use these cookies, we can learn which pages our users enjoy browsing the most and which products are the most popular. Some of these cookies are provided by companies located outside the country. If you enable the use of these cookies, your personal data processed through the cookies will be transferred abroad.These cookies help us optimize our website. By allowing us to use these cookies, we can gain insights into which pages our users enjoy visiting the most and which products are the most popular. Some of the providers of these cookies are located abroad. If you enable the use of these cookies, your personal data processed through cookies will be transferred abroad.
Marketing
These cookies are used to help prevent you from seeing irrelevant ads. They are also used to display A Sound Fiction ads based on the products you browse, search for, or purchase when visiting other websites. Some of the providers of these cookies are located outside the country. If you enable the use of these cookies, your personal data processed through the cookies will be transferred abroad.