In the WooCommerce Settings section, you can easily manage taxes, payments, shipping, and email methods. In this area, you can define the tax rates to be applied to product prices, choose which payment methods will be active, configure shipping options, and customize the email templates that will be sent to customers during the order process.
11.1 – General
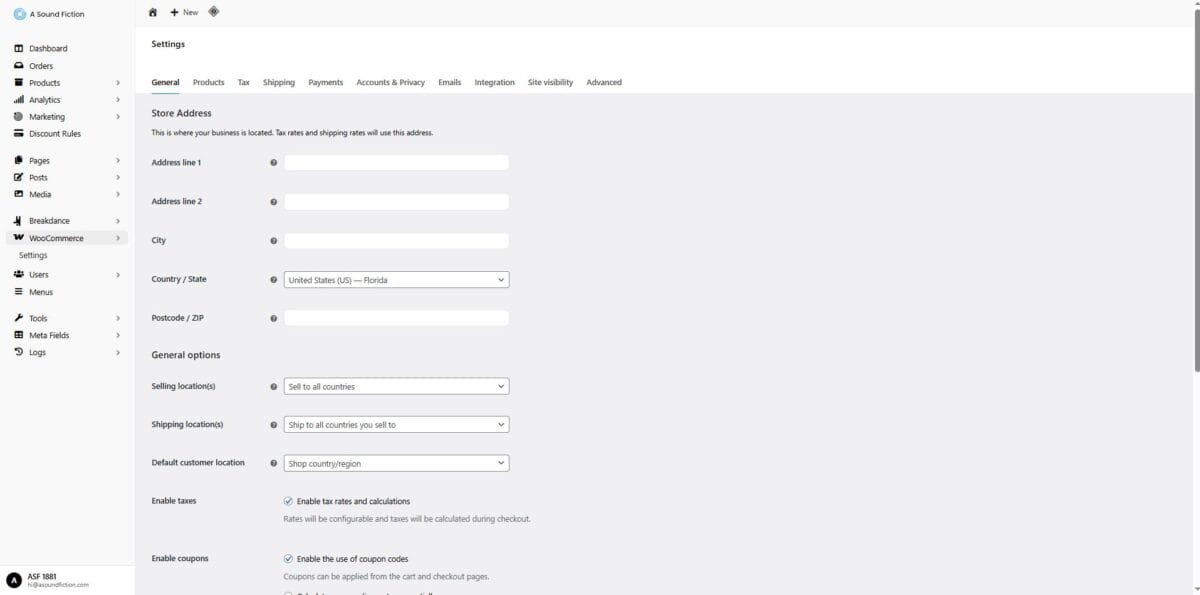
The General section forms the foundation of your store. Here, you can enter your store’s official address details, define the countries you want to sell to, configure your shipping options, and enable the use of taxes and coupons. You can also control how prices are displayed on your site through currency settings.
In short, the settings here determine in which countries your online store will sell, in which currency, and under which rules.
From the admin panel on the left, click “WooCommerce > Settings“.
The “General” tab will automatically appear.
After making changes in this section, click the “Save changes” button.
11.1.1 – Store Address
Address Line 1 & 2: Enter your business address here. (Example: Address Line 1 → “ASF St. No:12”, Address Line 2 → “Apt. 5”).
City/Locality: Enter the city of your business.
Country/State: Select the country and state from the dropdown menu. (Example: United States (US)— Florida).
Postcode/ZIP: Enter the postal code of your store’s location.
11.1.2 – General Options
Selling Location(s): Choose which countries you want to sell your products in.
Sell to all countries: Products can be sold worldwide.
Sell to specific countries: Only sell to the countries you select.
Sell to all countries, except for: Sell to all countries except the ones you exclude. For example, if you exclude Germany, sales will continue in all other countries except Germany.
Sell to specific countries: If you only want to ship to certain countries, select them individually.
Shipping Location(s): Choose which countries you want to ship orders to.
Ship to all countries you sell to: Shipping will automatically match the countries you allow for sales.
Ship to all countries: Ship to every country.
Ship to specific countries only: Only ship to the countries you select.
Disable shipping & shipping calculations: Use this option if you are not selling physical products (e.g., digital downloads only).
Default Customer Location: This option is used to determine a customer’s default location.
No location by default: No location is assigned until the customer provides an address.
Shop country/region: Assumes the customer is in the store’s base location.
Geolocate: Determines the customer’s location via their IP address.
Geolocate (with page caching support): Same as geolocate, but adds support for page caching.
Enable Taxes: Check this box to calculate taxes during checkout. You must also configure tax rates in the Tax tab.
Enable Coupons: Enable this setting to allow customers to use discount codes on the cart and checkout pages.
Enable the use of coupon codes: Displays the coupon code field, allowing customers to enter discount codes.
Calculate coupon discounts sequentially: If multiple coupons are applied, the first coupon is applied first, then subsequent coupons are applied to the already discounted price.
11.1.3 – Currency Options
Here you define how prices are displayed on your site.
Currency: Choose the currency in which prices are displayed (Example: United States (US) dollar ($) — USD).
Currency Position: Choose whether the currency symbol appears to the left or right of the amount.
Right → 100$
Left → $100
Thousand Separator: Defines how thousands are separated (e.g., 1,000 or 1.000).
Decimal Separator: Defines the symbol for decimals (e.g., 10.50 or 10,50).
Number of Decimals: Defines how many decimal places prices should display (Example: 100.00).
11.2 – Products
This section is where you configure how the products in your store will behave. In other words, you can manage all the basic settings here, such as how products are added to the cart, how stock management is handled, and how digital (downloadable) products are delivered.
From the admin panel on the left, click on “WooCommerce > Settings”.
On the screen that appears, select the “Products” tab. You can configure the following settings:
General: Configure how products are displayed on the shop page, cart behavior (e.g., should the page redirect after adding to cart), measurement units (kg, cm, etc.), and whether product reviews are enabled.
Inventory: Used for stock management. You can enable/disable stock tracking, set stock thresholds, and configure notifications when a product’s stock is low or out of stock.
Downloadable Products: If you sell digital products (e.g., PDFs, music, software), you can control how downloadable files are delivered here. Define how customers can download the files and configure security settings. If you are not sure what you are doing, it is recommended not to change this setting.
Approved Download Directories: Ensures the security of your downloadable files. Only allows file downloads from the directories you specify. This way, customers can securely download products, and you can prevent unauthorized downloads. If you are not sure what you are doing, it is recommended not to change this setting.
Advanced: This section contains more technical options. It is used when custom code or additional features are required. Regular users typically do not need to modify these settings. If you are not sure what you are doing, it is recommended not to change this setting.
11.2.1 – General
This section allows you to manage the basic behavior of the products in your store and customer interactions. The settings are as follows:
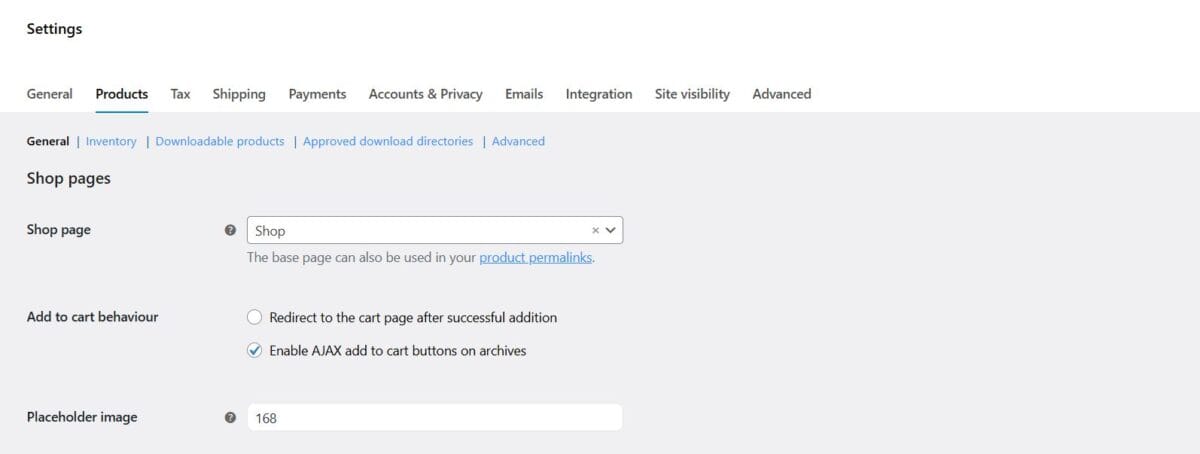
a) Shop Pages
Shop page: You can choose the default page where your products will be listed. Typically, the “Shop” page is selected. (This page displays your products collectively).
Add to cart behavior:
Redirect to the cart page after successful addition: When a product is added to the cart, the customer is taken directly to the cart page.
Enable AJAX add to cart buttons on archives: Allows customers to add products to the cart without reloading the page. For a smoother user experience, it is generally recommended to keep this option enabled.
Placeholder image: This is the default image that will automatically be displayed in product catalogs when no specific product image has been uploaded. This ensures that products without images do not appear empty but instead show a placeholder image (e.g., 168px).
Important Note The settings in this section have been configured by us according to your store. To ensure proper functionality, please do not make any changes to these settings. If you need to make adjustments, we recommend contacting our technical team.
b) Measurements
Weight unit: Choose which unit of measurement to display the product’s weight (kg, g, lbs, etc.).
Dimensions unit: Choose which unit of measurement to display the product’s dimensions (cm, mm, inches, etc.).
Tip Make the desired adjustments and click the “Save Changes” button at the bottom of the page.
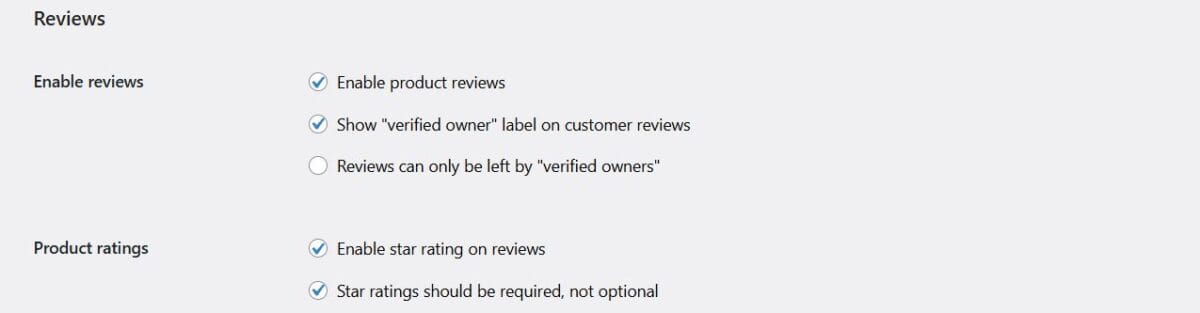
c) Reviews
Enable product reviews: Allows customers to leave reviews on products.
Show “verified owner” label on customer reviews: Displays a label showing that the reviewer actually purchased the product, increasing credibility.
Reviews can only be left by “verified owners”: Ensures that only customers who have purchased the product can leave a review.
Product ratings: Enables star ratings in reviews.
Star ratings should be required, not optional: Forces customers to leave a rating when submitting a review.
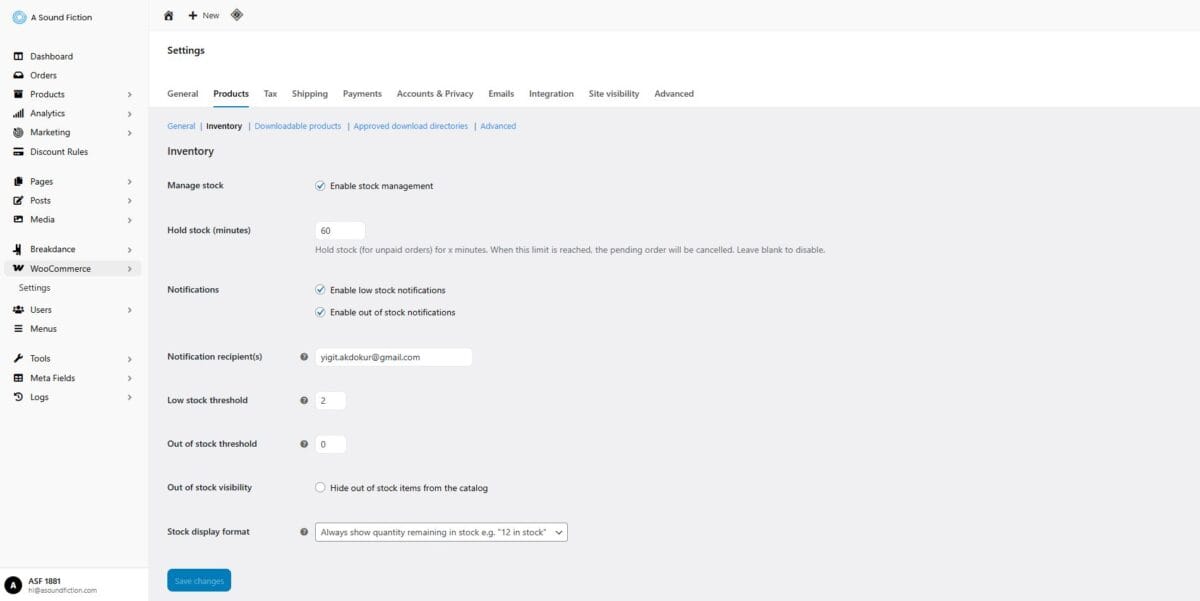
11.2.2 – Inventory
In this section, you can configure detailed settings related to the stock management of your products. The system automatically tracks stock levels and can send notifications to both the administrator and the customer based on the thresholds you define.
Fields and Explanations
Enable stock management: When checked, the system will automatically manage stock. Sold products will automatically reduce stock.
Hold stock (minutes): Holds stock for unpaid orders for the specified time. If no payment is made within this time, the order will be canceled and the stock released. (e.g., 60 minutes).
Notifications:
Enable low stock notifications: Sends an email when stock reaches your defined threshold.
Enable out of stock notifications: Sends an email when a product is out of stock.
Notification recipient(s): Enter the email addresses to receive stock notifications. (e.g., **@***********on.com)
Low stock threshold: When stock reaches this number, a low stock notification will be sent (e.g., warning when 2 items remain).
Out of stock threshold: When stock reaches “0” or your defined threshold, the product is marked as “Out of stock.”
Out of stock visibility: If checked, products that are out of stock will be hidden from the catalog.
Stock display format: Determines how stock levels are shown to customers.
Always show quantity remaining in stock: Example: “12 in stock”
Only show quantity remaining in stock when low: Example: “Only 2 left in stock”
Never show quantity remaining in stock: Stock quantity will not be displayed to customers.
11.3 – Managing Tax Rates and Methods
In this section, you can configure how to apply tax to your product prices, how to define tax rates, and how to display taxes to customers.
From the admin panel on the left, click on “WooCommerce > Settings“.
On the screen that appears, select the “Tax” tab.
At the top of the panel, you will see: Tax Options, Standard Rates, and Additional Rates.
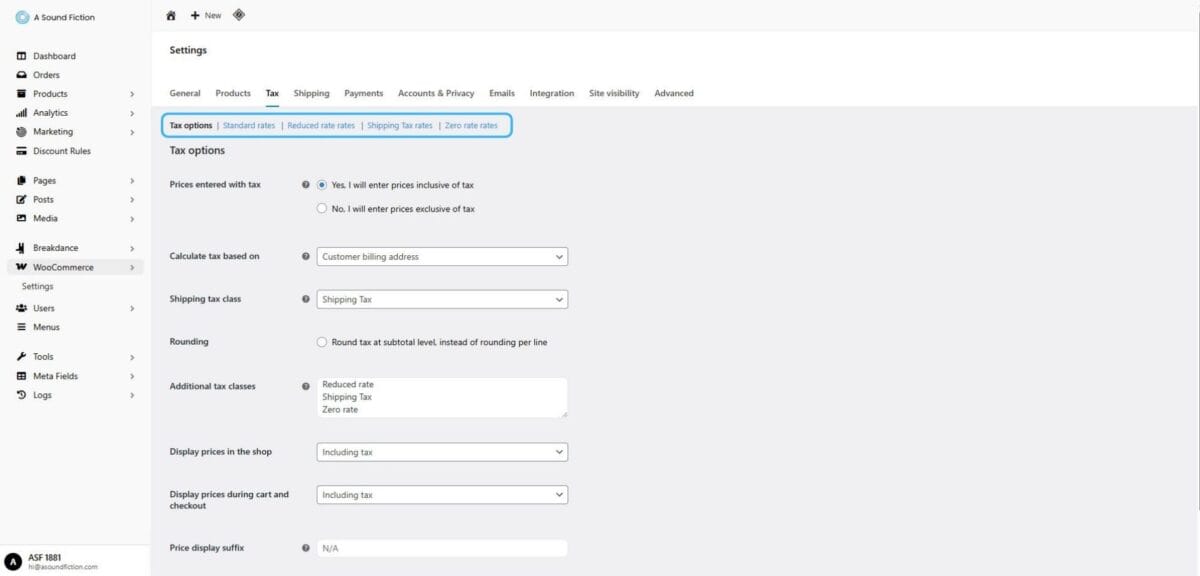
11.3.1 – Tax Options
From the left-hand admin panel, go to “WooCommerce > Settings”.
On the screen that appears, select the “Tax” tab.
The “Tax Options” sub-tab will automatically open.
a) Prices entered with tax
This setting determines whether your product/service prices are entered inclusive or exclusive of tax. Recommended usage is to leave this option set to “Yes”.
Yes: Enter prices inclusive of tax (e.g., VAT). The system will automatically calculate.
No: Enter prices exclusive of tax. The system will automatically add tax at checkout.
Tip Changing this setting will not retroactively update the prices of existing products. Your prices will remain fixed; it will only change how tax is applied to new products when you enter their prices.
b) Calculate tax based on
Choose which address will be used to calculate tax:
Shop base address: Suitable if you sell to only one country, such as United States (US).
Customer shipping address: If you sell to multiple countries, tax is calculated based on the customer’s shipping address.
Customer billing address: If you sell to multiple countries, tax is calculated based on the customer’s billing address.
Tip Which option you should select depends on your business’s tax regulations and the location of your customers. For the platforms we build for you, we already provide consultancy on these matters.
c) Shipping tax class
Determines which tax rate will be applied to the shipping (delivery) cost.
d) Rounding
Choose whether taxes will be rounded per line or at the total level.
e) Additional tax classes
Additional Tax Classes allow you to define different tax rates for your products.
When adding a product, you can select the appropriate class under the Tax Class field.
To add a new tax class:
Go to “WooCommerce > Settings > Tax”.
In the “Additional tax classes” field, enter one class per line (e.g., 5% VAT).
Click the “Save changes” button at the bottom of the page.
Your new tax class will now appear in the list above.
f) Display prices in the shop
Choose whether product prices are displayed including or excluding tax in your shop.
Tip For better user experience, it’s recommended to display prices including tax.
g) Display prices during cart and checkout This setting controls how prices are shown on the cart and checkout pages (tax inclusive or exclusive).
Tip If you show prices excluding tax in the shop but add tax during checkout, customers may see the price increase when they reach the cart, which can be confusing. For this reason, it’s generally recommended to display tax-inclusive prices both in the shop and at checkout.
h) Price display suffix Define a text to display after product prices. For example, to clarify your pricing, you can add “incl. VAT”.
i) Display tax totals You can display tax lines either as a single total or in a detailed breakdown.
Tip If you want transparency, itemized display is better. If you want simplicity, a single line total is sufficient.
Tip If you choose to display prices excluding tax in the shop and only add tax at checkout, customers may see an increase in the total price once they reach the cart, which can be confusing. For this reason, it is generally recommended to display tax-inclusive prices both in the shop and in the cart.
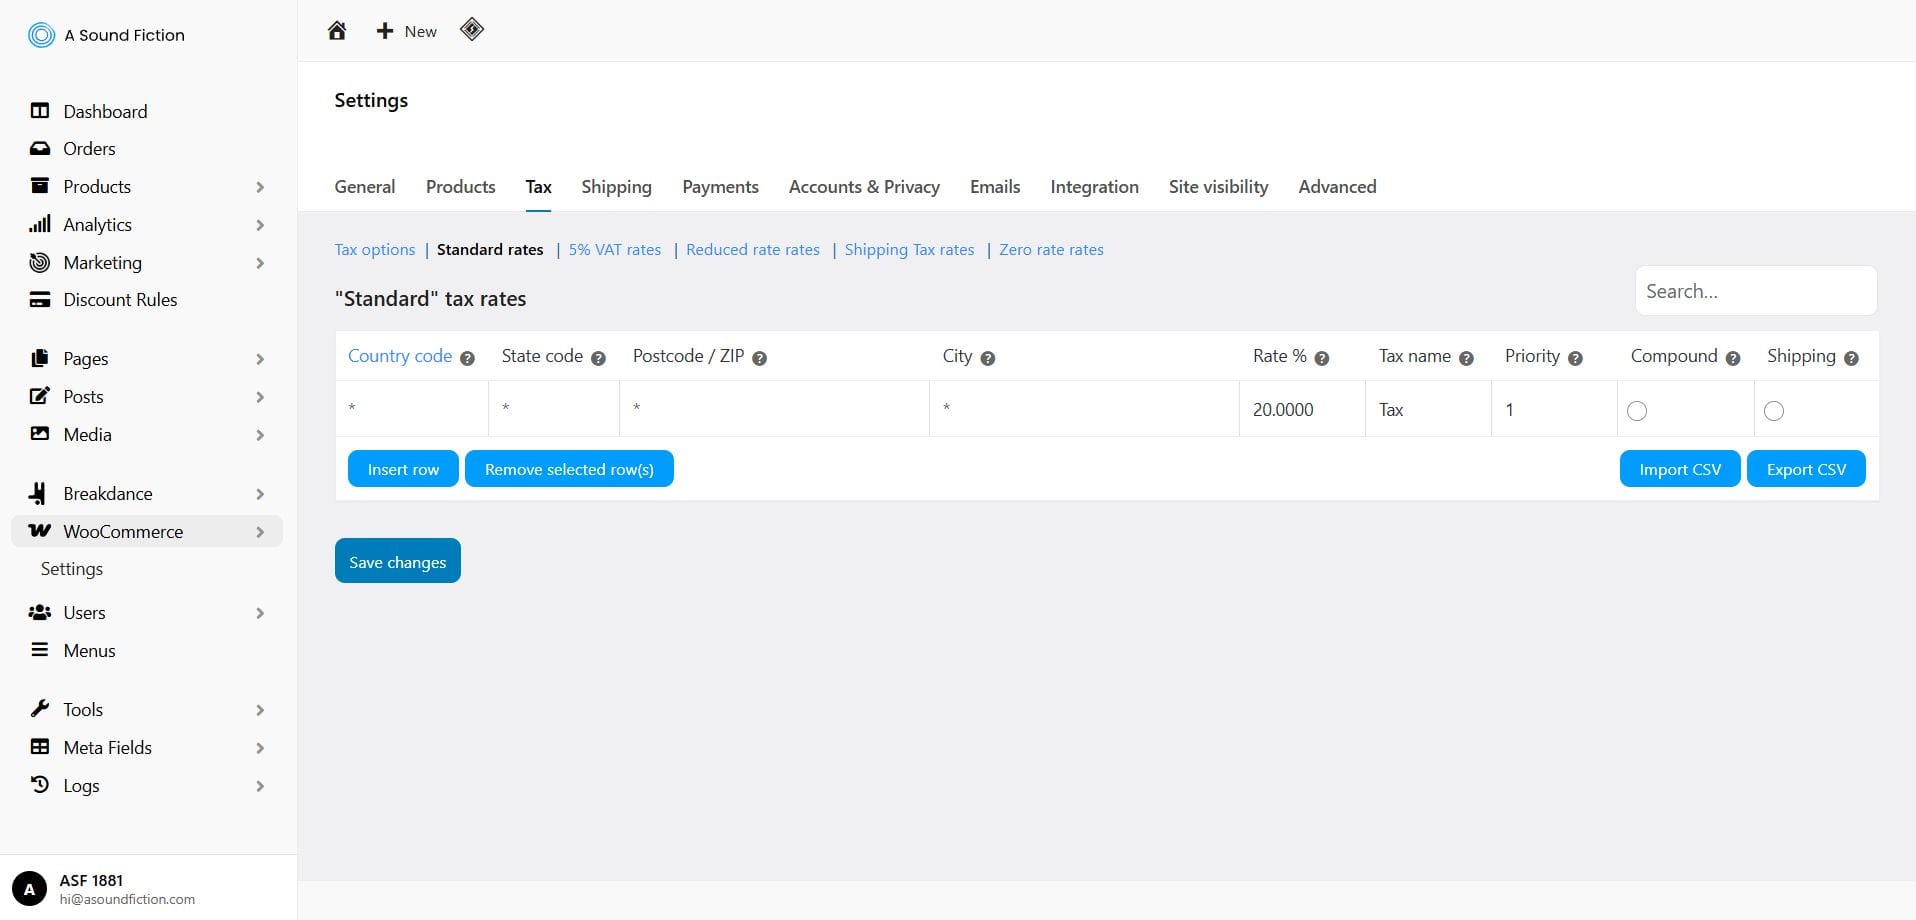
11.3.2 – Rate Settings (Standard Rates and Others)
In this section, you can add, edit, and manage the tax rates that will apply to your store.
From the left-hand admin menu, go to “WooCommerce > Settings“.
On the screen that appears, click the “Tax” tab.
Select the rate you want to configure from the rows listed below (e.g., Standard Rates).
In this list, you will see the following information:
Country Code: Defines the country where the tax rate will be valid. It is a two-letter country code (e.g., TR). Leave blank to make it applicable everywhere.
State Code: If you want the tax rate to apply only to a specific city, enter the two-letter city code here. Leave blank to make it applicable everywhere.
Postcode / ZIP: Used to restrict the tax to a specific postal code. Leave blank to make it applicable everywhere.
City: If you want the tax to apply only to a specific district or suburb, you can enter its name here. Leave blank to make it applicable everywhere.
Rate %: Enter the tax rate as a decimal. (e.g., enter 20 for a 20% VAT).
Tax Name: The name identifying this tax rate (e.g., Tax).
Priority: If there are multiple tax rates, determines which one is applied first. A smaller number means higher priority.
Compound: Defines whether the tax is applied on top of other taxes. Used in cases like VAT + special taxes.
Shipping: Determines whether this tax also applies to shipping costs.
11.3.2.1 – Adding an Additional Tax Class
Go to WooCommerce > Settings > Tax.
In the “Additional tax classes” field, add a new class on its own line (e.g., 5% VAT).
Click the Save Changes button at the bottom of the page.
Your new tax class will be listed in the section above.
11.3.2.2 – Editing an Added Tax Class
You can easily edit the details of the tax class you created by following these steps:
Go to WooCommerce > Settings > Tax.
Click on the tax rate tab you created (e.g., “5% VAT Rates”).
Click the “Insert Row” button below the table.
Fill in the fields in the row that appears:
Country Code: Defines the country where the tax rate will be valid. It is a two-letter country code (e.g., TR). Leave blank to make it applicable everywhere.
State Code: If you want the tax rate to apply only to a specific city, enter the two-letter city code here. Leave blank to make it applicable everywhere.
Postcode / ZIP: Used to restrict the tax to a specific postal code. Leave blank to make it applicable everywhere.
City: If you want the tax to apply only to a specific district or suburb, you can enter its name here. Leave blank to make it applicable everywhere.
Rate %: Enter the tax rate as a decimal. (e.g., enter 20 for a 20% VAT).
Tax Name: The name identifying this tax rate (e.g., Tax).
Priority: If there are multiple tax rates, determines which one is applied first. A smaller number means higher priority.
Compound: Defines whether the tax is applied on top of other taxes. Used in cases like VAT + special taxes.
Shipping: Determines whether this tax also applies to shipping costs.
Click the “Save Changes” button at the bottom of the page.
11.3.2.3 – Additional Actions in Tax Classes
a) Delete Selected Row
Removes an incorrect/outdated tax rate row from the table. The deleted rate will no longer apply!
Go to “WooCommerce > Settings > Tax”.
Select the tax rate tab you want to modify (e.g., “5% VAT Rates”).
Hover over the row you want to delete and click it. You’ll notice the row highlight changes.
Click the “Remove selected row(s)” button below the table.
Click the “Save changes” button at the bottom of the page.
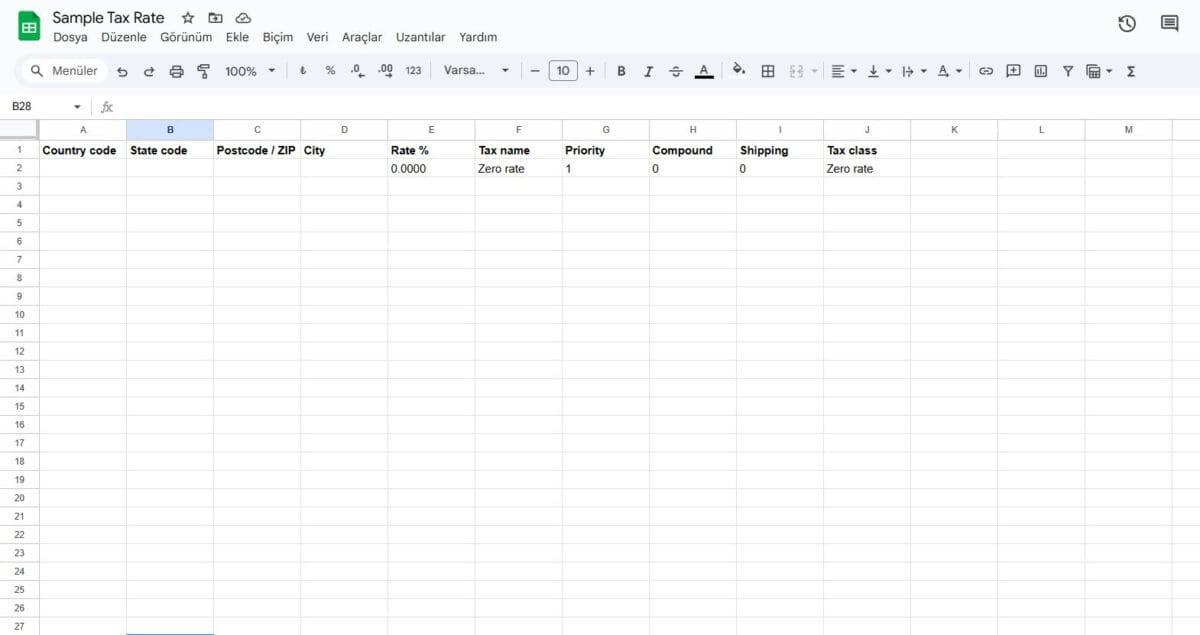
b) Import CSV
Uploads tax rates from a CSV file in one go.
This is the fastest method when you need to add/edit many rows. Prepare the file in advance. Example format for the import file is as follows:
To import a CSV file:
Go to “WooCommerce > Settings > Tax”.
Select the tax rate tab you want to import into (e.g., “5% VAT Rates”).
Click the “Import CSV” button below the table.
A screen appears to upload your file. Click “Choose File” and select your file.
Click the “Upload file and import” button.
Go to the “View tax rates” tab and confirm the changes in the uploaded data.
c) Export as CSV
Download existing tax rate rows as a .csv file. Ideal for making a backup, moving to another site, or bulk editing in Excel/Sheets.
To export as CSV:
Go to “WooCommerce > Settings > Tax”.
Select the tax rate tab you want to export (e.g., “Zero Rate Rates”).
Click the “Export CSV” button below the table and download your file.
11.3.2.4 – Assigning a Tax Class to a Product
To change the tax class for an existing product:
Go to Products > All Products.
Click Edit under the product you want to modify.
On the product page, find the Product data box (where you enter pricing).
In the General tab, configure the following fields:
Tax status = Select Taxable.
Tax class = From the dropdown menu, select the class you created (e.g., 5% VAT).
Click Update in the top right corner.
What happens? The product will automatically apply the tax rate defined in the corresponding tax class (based on country/city/postcode).
11.4 – Managing Shipping Methods
WooCommerce Shipping settings allow you to define how your products are delivered to your customers. From here, you can add custom shipping methods for different regions, set flat rates, free shipping, or local pickup options.
From the admin panel on the left, click on “WooCommerce > Settings”.
On the screen that appears, select the “Shipping” tab.
At the top of the panel, you will see the following tabs: Shipping Zones, Shipping Settings, Classes, and Local Pickup.
Shipping Zones: Define shipping rules based on specific countries, states, cities, or postcodes. You can add different shipping methods for each zone.
Shipping Settings: Manage general shipping settings (e.g., default country, tax application). Set the basic rules for all orders here.
Classes: Allow you to add custom shipping rates to specific products. For example, additional charges for fragile items.
Local Pickup: Lets customers pick up their products directly from your store instead of having them shipped. This option is generally used by businesses with a physical store.
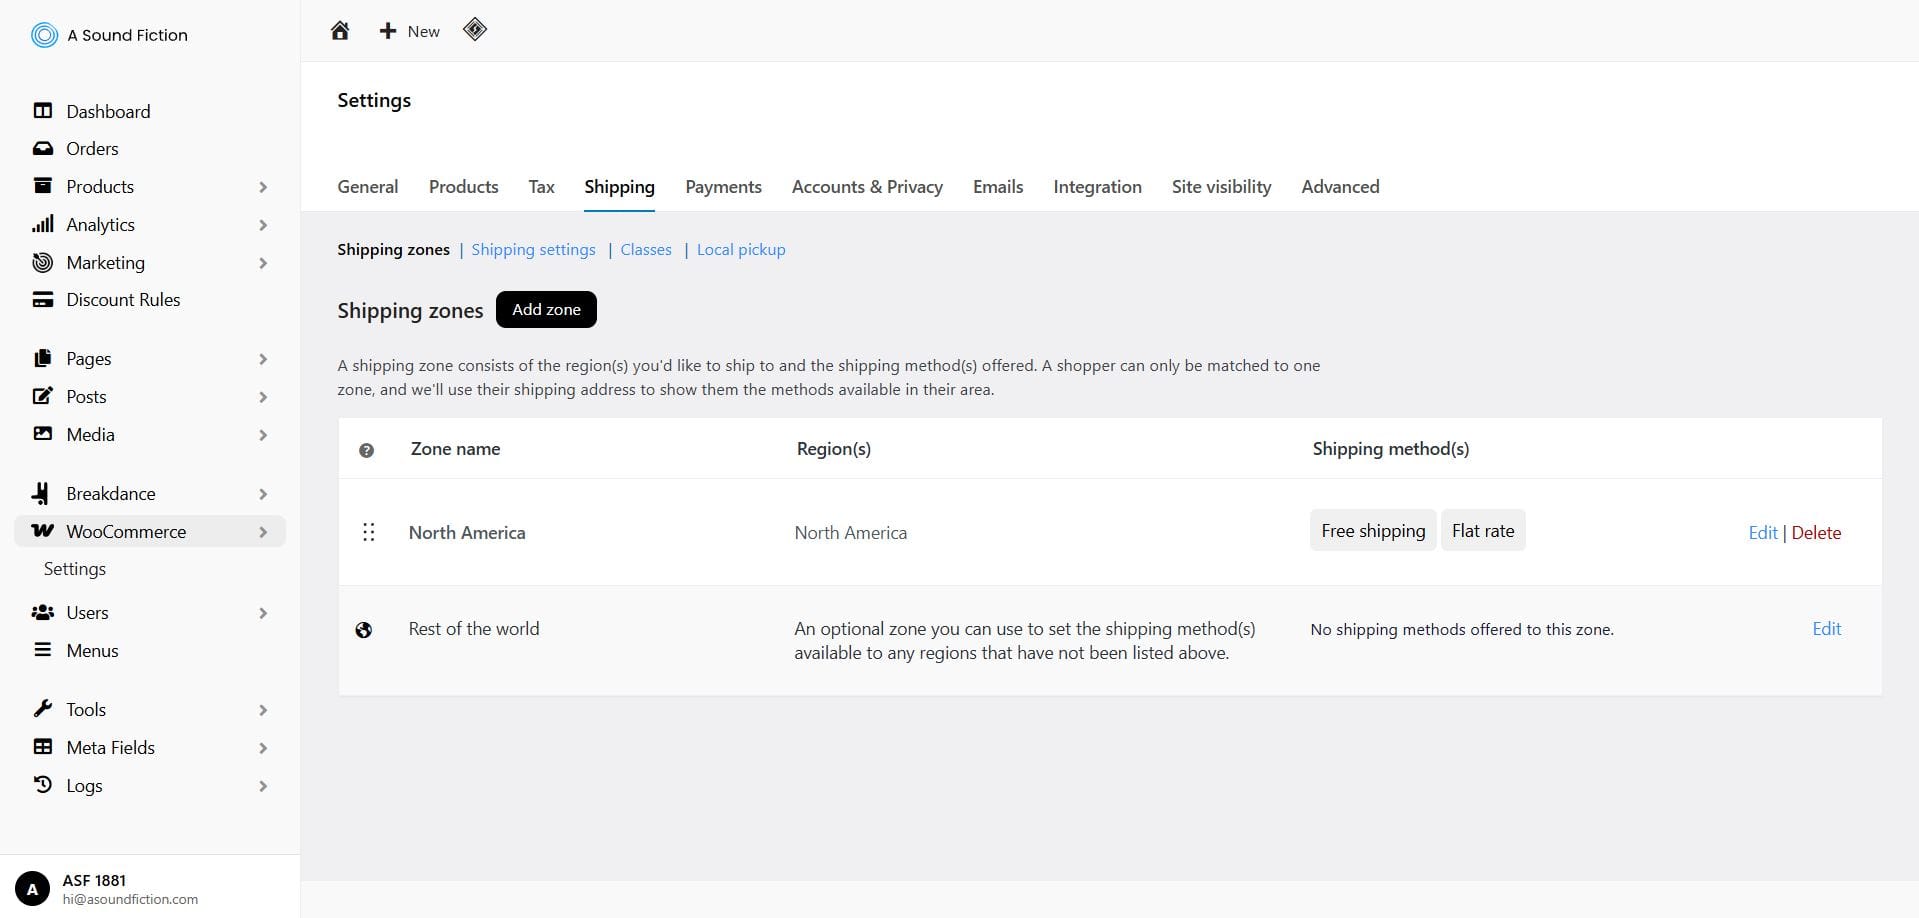
11.4.1 – Shipping Zones
Shipping zones allow you to define which shipping options will be presented to the customer based on the address entered during checkout, and how the costs for these options are calculated.
In the left-hand admin panel, click on “WooCommerce > Settings”.
From the screen that appears, select the “Shipping” tab.
The “Shipping Zones” tab will automatically open.
11.4.1.1 – Adding a New Zone
Shipping zones are used when you need to define specific shipping rules for different cities or countries. For example, if you want to set a different shipping rate for Istanbul and another rate for the rest of Turkey, you will need to create a new shipping zone.
In the left-hand admin panel, click on “WooCommerce > Settings”.
From the screen that appears, select the “Shipping” tab.
The “Shipping Zones” tab will automatically open.
Click the “Add shipping zone” button.
Enter the Zone Name (e.g., North America).
List the regions you want to include in this shipping zone.
Click the “Save changes” button.
Tip You can add Shipping Methods in the next step.
11.4.1.2 – Adding Shipping Methods
For each shipping zone you create, you can add shipping methods such as “Flat Rate” or “Free Shipping“. These methods can be configured individually.
a) Adding Flat Rate
In the left-hand admin panel, click on “WooCommerce > Settings”.
From the screen that appears, go to the “Shipping > Shipping Zones” tab.
Find the zone where you want to add the method (e.g., North America) and click Edit.
At the bottom of the page, click “Add shipping method”.
In the window that opens, select Flat rate and click Continue. A settings panel will appear for price adjustments.
Configure the settings:
Method Title: Enter the text visible to customers (e.g., Standard Shipping or Flat Rate).
Tax Status: Select Taxable if the shipping fee is taxable, otherwise select None.
Cost: Enter the shipping cost. The value entered here should be tax-exclusive. Example: If your shipping fee is $120 including 20% VAT, then enter $100 in the cost field.
Once all settings are complete, click “Create and save”.
b) Adding Free Shipping
From the left panel, click “WooCommerce > Settings”
In the screen that appears, go to the “Shipping > Shipping Zones” tab.
Find the zone where you want to add the method (e.g., North America) and click Edit.
At the bottom of the page, click the “Add shipping method” button.
In the popup window, select Free Shipping and click “Continue”. You will now see the area where you can configure the settings.
Configure the settings:
Title: The text shown to the customer (e.g., Free Shipping).
Free shipping requires…: This is used to define the condition under which free shipping will apply.
N/A (No requirement): Free shipping will apply to all orders (e.g., Free shipping across North America).
A valid free shipping coupon: Customers must use a valid coupon code to receive free shipping (e.g., Free shipping with coupon code SHIPPING100).
A minimum order amount: Free shipping will apply if the order total reaches the specified amount. This is the most common condition (e.g., Free shipping on orders over $500). In this example, the “Minimum order amount” should be entered inclusive of tax.
A minimum order amount OR coupon: Customers qualify for free shipping if either condition is met (e.g., Free shipping on orders over $500 OR with coupon code SHIPPING100).
A minimum order amount AND coupon: Customers must both meet the minimum amount and use a valid coupon (e.g., Free shipping on orders over $500 + with coupon code SHIPPING100).
After completing the settings, click “Create and save”.
c) Local Pickup
From the left panel, click “WooCommerce > Settings”
In the screen that appears, go to the “Shipping > Shipping Zones” tab.
Find the zone where you want to add the method (e.g., North America) and click Edit.
At the bottom of the page, click the “Add shipping method” button.
In the popup window, select Local Pickup and click “Continue”. You will now see the area where you can configure the settings.
Configure the settings:
Title: The text shown to the customer (e.g., Standard Shipping or Local Pickup).
Tax status: Choose Taxable if the cost includes tax, or None if not.
Cost: Enter your shipping cost. The value entered here should be exclusive of tax. Example: If your shipping tax rate is 20% and your total shipping cost is “$12”, then you should enter “$10” in the cost field.
After completing the settings, click “Create and save”.
11.4.1.3 – Editing and Deleting Shipping Methods
After adding shipping methods, you can edit their costs or conditions, or delete methods you no longer want to use. Each method can be enabled or disabled, allowing you to easily control which options appear for customers. You can also drag and drop to reorder the methods.
a) Editing Title, Condition, or Cost
You can edit the title, conditions, or cost of any shipping method depending on the type. To do this:
From the left panel, click “WooCommerce > Settings”
Go to the “Shipping > Shipping Zones” tab.
Click Edit next to the zone you want to modify (e.g., North America).
Click Edit next to the method you want to change (e.g., Free Shipping).
Make the necessary changes (in our example, changing the “Minimum order amount” from $500 to $1000).
Click the “Save” button.
b) Changing the Status of a Shipping Method (Enable / Disable)
You can disable a shipping method by turning its “Enabled” status off, or re-enable a method that has been disabled. To do this:
From the left panel, click on “WooCommerce > Settings”.
In the screen that appears, go to the “Shipping > Shipping Zones” tab.
Click Edit next to the zone you want to modify (e.g., North America).
Use the toggle buttons under the Enabled column to easily turn a method On/Off.
After completing the changes, click the “Save changes” button.
c) Sorting Shipping Methods
The order of shipping methods determines which option customers will see first on the cart and checkout pages. Having the correct order is important both for user experience and for your sales process. However, keep in mind that if “Free Shipping” is enabled, the system will always prioritize it, so customers will see the free option first. To change the order:
From the left panel, click on “WooCommerce > Settings”.
In the screen that appears, go to the “Shipping > Shipping Zones” tab.
Click Edit next to the zone you want to modify (e.g., North America).
Drag and drop the shipping methods into the desired order.
After finishing the sorting, click the “Save changes” button.
d) Deleting a Shipping Method
You can delete a shipping method you no longer use. To do this:
From the left panel, click on “WooCommerce > Settings”.
In the screen that appears, go to the “Shipping > Shipping Zones” tab.
Click Edit next to the zone you want to modify (e.g., North America).
Select the “Delete” option next to the shipping method you want to remove. Confirm the prompt. The shipping method will be automatically deleted.
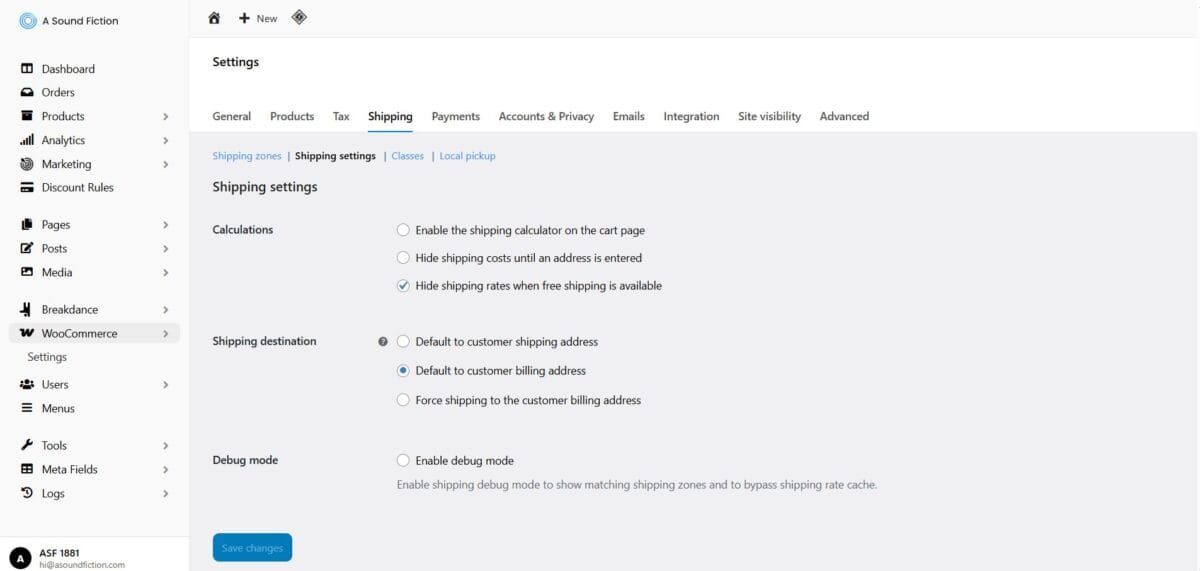
11.4.2 – Shipping Settings
This section allows you to determine how shipping charges will be calculated in your store and how they will be displayed to customers.
a)Calculations
Enable the shipping calculator on the cart page: Customers can enter their addresses on the cart page to calculate shipping costs. This feature cannot be used while Cart and Checkout blocks are in use. Shipping will be calculated once the customer proceeds to checkout.
Hide shipping costs until an address is entered: Shipping costs will not be displayed until the customer enters their address.
Hide shipping costs when free shipping is available: If a free shipping option exists, all other paid shipping methods will automatically be hidden.
b) Shipping Destination
You can choose which address the customer’s shipping destination will be calculated from:
Default to customer shipping address: Shipping cost is calculated based on the shipping address entered by the customer.
Default to customer billing address: Shipping is calculated based on the customer’s billing address (default option).
Force shipping to the customer billing address: The shipping address must always match the billing address.
c) Debug Mode
Enable debug mode: This is used to test matching shipping zones and bypass the shipping cache during calculations. It is recommended to enable this only during technical testing.
11.4.3 – Classes
Shipping classes are used to set specific shipping costs for certain products. For example, you can define higher shipping rates for fragile items and lower rates for smaller items.
11.4.3.1 – Adding a Shipping Class
From the left-hand admin panel, click “WooCommerce > Settings”.
On the screen that appears, select the “Shipping” tab.
In the sub-tab, go to “Classes”.
Next to the “Shipping Classes” heading, click the “Add shipping class” button:
Shipping Class: Enter the name of the class (e.g., Fragile, Heavy Item).
Slug: This will be generated automatically, but you can change it if you wish.
Description: You can optionally add a description here.
After completing all settings, click the “Create” button.
11.4.3.2 – Entering Shipping Costs for a Shipping Class
Once you’ve created a Shipping Class, follow these steps to configure pricing:
From the left-hand panel, click “WooCommerce > Settings”.
On the screen that appears, go to the “Shipping > Shipping Zones” tab.
Click Edit next to the zone you want to configure (e.g., North America).
Under the Flat rate shipping method, click Edit.
In the panel that opens, make the following changes:
Title: Enter your courier company’s name here (e.g., DHL, UPS).
Cost: Enter “0” in this field.
Shipping Class Costs:
Shipping class cost: Define a cost for the created shipping class. This will be the cost applied to products in this class (e.g., 50₺).
If the customer’s cart contains both items from this class and other products, the class cost is added on top of the flat rate (e.g., Fragile Products ($50) + Flat Rate ($100)).
If a particular class is free, enter “0.00”. In this case, customers will only see the “Title” field displayed (e.g., DHL).
No shipping class cost: Enter your general shipping fee here. This cost applies when products not assigned to any class are purchased (e.g., $100). ⚠️ Important: The cost entered here must be added excluding tax.
Calculation Type: Choose the option that best fits your business model:
Per class: Each shipping class in the cart is calculated separately and then added together.
Per order: The most expensive shipping class in the cart is applied as the total shipping cost.
Once all changes are complete, click the “Save” button.
11.4.3.3 – Adding Products to a Shipping Class
After creating a shipping class, you need to determine which products will be assigned to that class. To do this:
From the left menu, click on the Products tab.
Open the product you want to assign to a shipping class.
In the product editing screen, go to the Shipping tab.
From the Shipping class dropdown menu, select the relevant class (e.g., Fragile).
To complete the process, click the Update button in the top right corner of the page.
Tip You can apply this to multiple products belonging to the same class. You can also create new shipping classes and define different rules based on your needs.
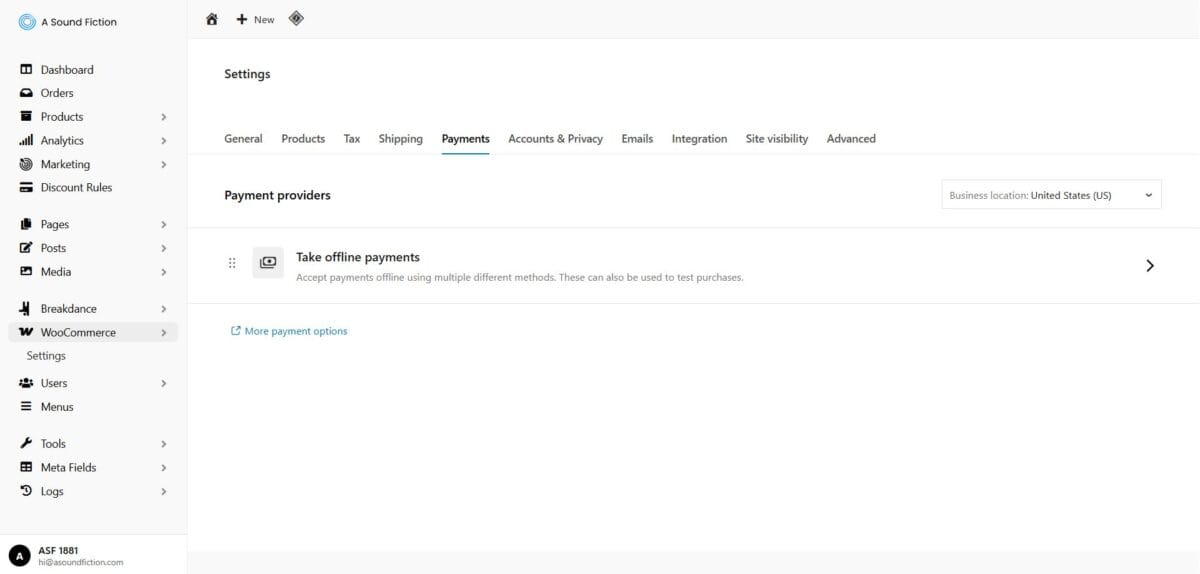
11.5 – Payments
This section allows you to define how your customers will pay for their orders. WooCommerce supports both offline and online payment methods.
From the left menu, click on WooCommerce > Settings.
From the tabs that open, select the Payments tab.
Payment Providers
Take offline payments: This option allows you to accept payments using offline methods such as bank transfer, cash on delivery, or check payments. It is especially useful for test purchases.
Add additional payment methods: By default, WooCommerce only includes basic options. To use online payment methods (such as credit card, PayPal, Amazon Pay, Klarna, Stripe, etc.), you need to install the appropriate extensions from WooCommerce Marketplace. The “WooCommerce Marketplace” link in the interface will direct you to these extensions.
Tip It is recommended to enable only the payment methods necessary for your business. If you need to install an extension and you do not have technical knowledge, do not change these settings without contacting us.
11.5.1 – Accept Offline Payments
Navigate to WooCommerce > Settings > Payments.
Under the “Take offline payments” section, you will see three methods:
Direct bank transfer
Check payments
Cash on delivery
Note On the left of each method, there is a drag handle, and on the right, there is an Enable or Manage button. Click Enable to activate the method; click Manage to adjust its detailed settings.
11.5.1.1 – Direct Bank Transfer
When a customer selects the “Direct Bank Transfer” option, it means that after making a purchase from your store, they will manually transfer the payment to your account using their online banking.
Go to WooCommerce > Settings > Payments.
Click the arrow (“>”) next to “Take offline payments”.
You will now see the Offline Payment Methods section.
In this section, next to “Direct bank transfer”, click “Enable” or “Manage“. The “Enable” button allows you to activate the method, while the “Manage” button lets you access detailed settings.
After making your changes, click the “Save changes” button.
In the detailed settings, you can configure:
Enable box: When you click the “Enable” button, this option will automatically be activated. If you want to disable it, uncheck the “Enable bank transfer” box. This way, the method will no longer be displayed to customers.
Title: Enter the name that the customer will see on the checkout page (e.g., Bank Transfer / EFT).
Description: Add a short note for the customer (e.g., Please send your payment to the bank details below. Don’t forget to include your order number in the payment reference.).
Instructions: Add detailed instructions. This text will appear on the order confirmation page and in the order confirmation email (e.g., Please note that your order will only be processed once we receive the payment.).
Account Details: Enter the bank account information you want to display to your customers. Each line represents one bank account.
Account Name: The account holder’s name or company name (e.g., ASF).
Account Number / IBAN: The account number or IBAN. Customers will use this information to make payments (e.g., 11111111111). If no number is entered in the “Account Number” field, WooCommerce will automatically display the IBAN.
Bank Name: The name of the bank where the account is held (e.g., Test Bank). 💡If you want to add multiple bank accounts, use the + Add Account button.
11.5.1.2 – Cash on Delivery
When a customer selects the “Cash on Delivery” option, it means they will pay in cash when the product is delivered. This is especially suitable for stores that want to accept payment upon delivery.
Go to WooCommerce > Settings > Payments.
Click the arrow (“>”) next to “Take offline payments”.
You will now see the Offline Payment Methods section.
In this section, next to “Cash on Delivery”, click “Enable” or “Manage“. The “Enable” button allows you to activate the method, while the “Manage” button lets you access detailed settings.
After making your changes, click the “Save changes” button.
In the detailed settings, you can configure:
Enable box: When you click the “Enable” button, this option will automatically be activated. If you want to disable it, uncheck the “Enable Cash on Delivery” box. This way, the method will no longer be displayed to customers.
Title: Enter the name that the customer will see on the checkout page (e.g., Cash on Delivery).
Description: Add a short note for the customer (e.g., Pay with cash upon delivery.).
Instructions: Add detailed instructions. This text will appear on the order confirmation page and in the order confirmation email (e.g., Cash on Delivery is only valid for cash payments.).
Enable for shipping methods: If you only want this payment option to be available for certain shipping methods, select them here.
Accept for virtual orders: If this box is checked, the Cash on Delivery option will also be available for virtual/digital products.
11.5.1.3– Check Payments
When a customer selects the “Check Payments” option, it means they want to pay by check. This method is mainly used as a test option inside WooCommerce. Since paying by check is not common in real life, this option is rarely used. However, if your store has special cases (e.g., B2B sales, contracted customers), this method can be activated.
Go to WooCommerce > Settings > Payments.
Click the arrow (“>”) next to “Take offline payments”.
You will now see the Offline Payment Methods section.
In this section, next to “Check Payments”, click “Enable” or “Manage“. The “Enable” button allows you to activate the method, while the “Manage” button lets you access detailed settings.
After making your changes, click the “Save changes” button.
In the detailed settings, you can configure:
Enable box: When you click the “Enable” button, this option will automatically be activated. If you want to disable it, uncheck the “Enable check payments” box. This way, the method will no longer be displayed to customers.
Title: Enter the name the customer will see on the checkout page (e.g., Check Payments).
Description: You can write a short note for the customer (e.g., Please send a check to: Store Name, Store Address, Store Postal Code).
Instructions: You can provide more detailed information. This text will appear on the “Thank You” page after checkout and in the email sent to the customer. Example: Payment upon delivery.
11.6 – Accounts and Privacy
This section allows you to define how customer accounts work on your site and how personal data will be retained. If you are not sure about these settings, do not change them, as incorrect configuration may disrupt the order process.
From the left menu, click WooCommerce > Settings.
In the tabs that open, select the “Accounts & Privacy” tab.
11.6.1 – Checkout
Enable guest checkout: Customers can place an order without creating an account. This setting is generally recommended, as it does not force the user to register and speeds up the checkout process.
Enable log-in during checkout: Allows customers to create an account while placing an order.
Tip If you want purchases to be made only by registered users, you should disable the guest checkout option.
11.6.2 – Account Creation
In this section, you define how customers can create an account during or after checkout.
During checkout: Customers can create an account while purchasing products.
On “My Account” page: Customers can create an account by going to the “My Account” page on their own.
Tip If you want only registered users to shop, you should disable the guest checkout option.
11.6.3 – Account Creation Options
Send password setup link: When a customer registers, a password reset link is sent to their email. This is the recommended method.
Use email address as account login: Customers won’t need to set a separate username when creating an account. If not selected, customers will be required to set a username during registration. This is also the recommended option.
Attention These settings directly affect customer login. Incorrect configuration may cause login issues. If you are unsure of what you are doing, do not touch these fields.
11.6.4 – Account Erasure Requests
In this section, you configure how your customers’ personal data will be deleted from the system.
Remove personal data from orders on request: If a customer requests, the personal data stored in orders (name, email, etc.) will be deleted.
Remove access to downloads on request: If you sell downloadable products, customer access to these files will be revoked on request, and download logs will be cleared.
Allow personal data to be removed in bulk from orders: Lets you remove all personal data from orders in bulk. ⚠️ Warning: This action cannot be undone. Once deleted, the data cannot be recovered.
Important Note If you are not sure what you are doing, it is recommended not to change these settings. An incorrect selection may cause irreversible data loss in your order records.
11.6.5 – Privacy Policy
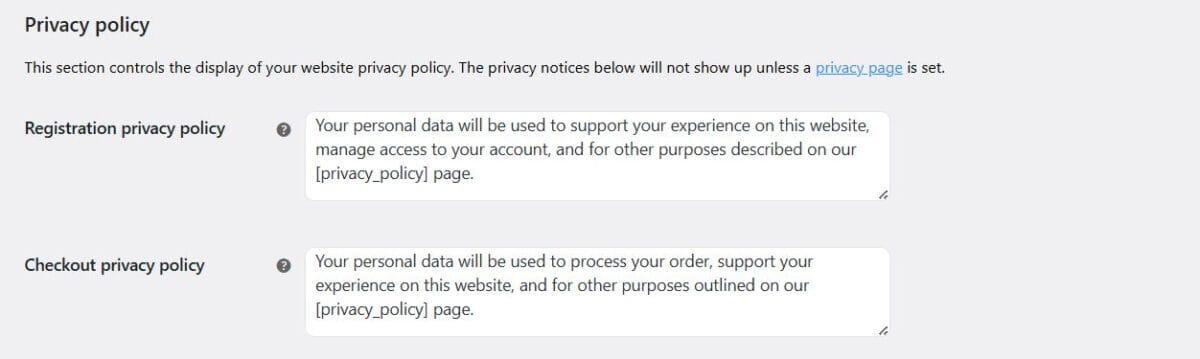
In this section, you configure how your site’s privacy policy will be displayed. These texts are shown to your customers during account creation and checkout. If a privacy policy page is not set, these texts will not be displayed.
Registration privacy policy: The notice displayed to the customer when creating a new account. It explains how personal data will be processed and for what purposes it will be used. For example: “Your personal data will be used to support your experience throughout this website, to manage access to your account, and for other purposes described in our [privacy_policy] page.”
Checkout privacy policy: The notice displayed to the customer during checkout. It explains how order-related data will be used. For example: “Your personal data will be used to process your order, support your experience throughout this website, and for other purposes described in our [privacy_policy] page.”
Note Since the texts you enter here are shown directly to customers, they should be clear, understandable, and legally compliant. By default, we deliver this field pre-configured. If you are not sure what you are doing, it is recommended not to modify these texts.
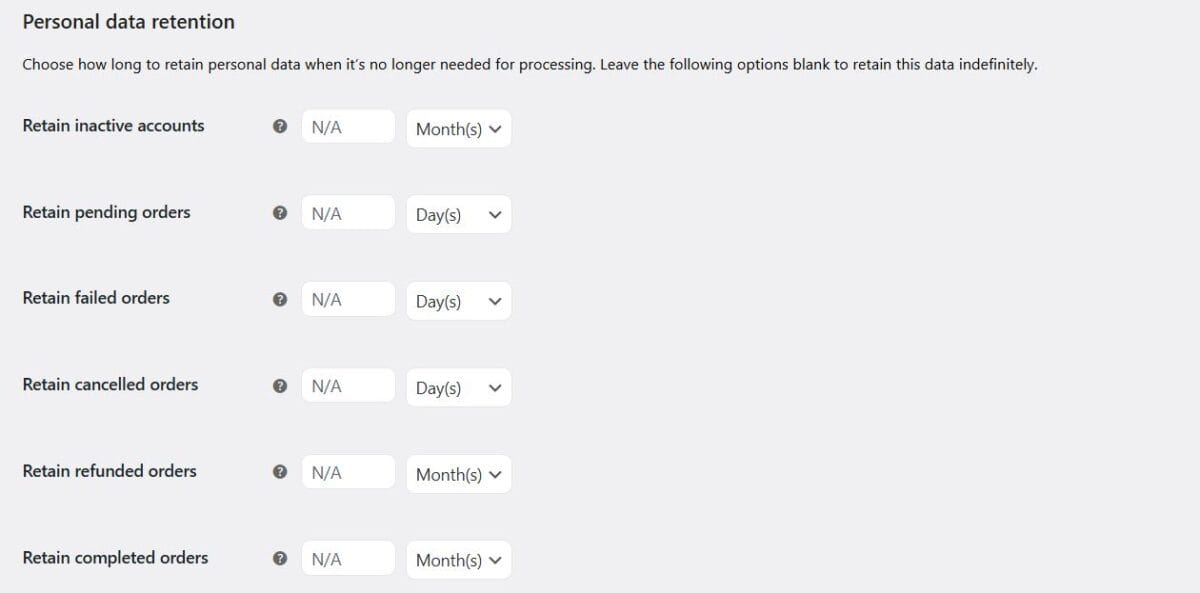
11.6.6 – Personal Data Retention
In this section, you define how long customer personal data and order records will be retained. WooCommerce allows you to set different retention periods for different order statuses. Leave these fields blank to retain the data indefinitely.
Retain inactive accounts: Set how long inactive customer accounts (those who haven’t logged in for a long time) will be kept.
Retain pending orders: Define how many days pending (unpaid) orders will remain in the system.
Retain failed orders: Set the retention period for failed orders.
Retain cancelled orders: Set how long cancelled orders will be kept in the system.
Retain refunded orders: Define how long refunded order data will be retained.
Retain completed orders: It is recommended not to delete completed orders, so these records will be stored indefinitely.
Warning Once the defined retention periods expire, the relevant order records and personal data will be automatically deleted. If incorrect values are entered, customer order data may be lost permanently and cannot be recovered. If you are unsure, do not change these settings.
11.7 – Email Management
The Emails section allows you to configure notification emails that are automatically sent to customers and administrators during the order process. This way, customers are immediately informed about their orders, and you can keep the entire process under control.
From the left menu, click on WooCommerce > Settings.
Select the “Emails” tab from the available tabs.
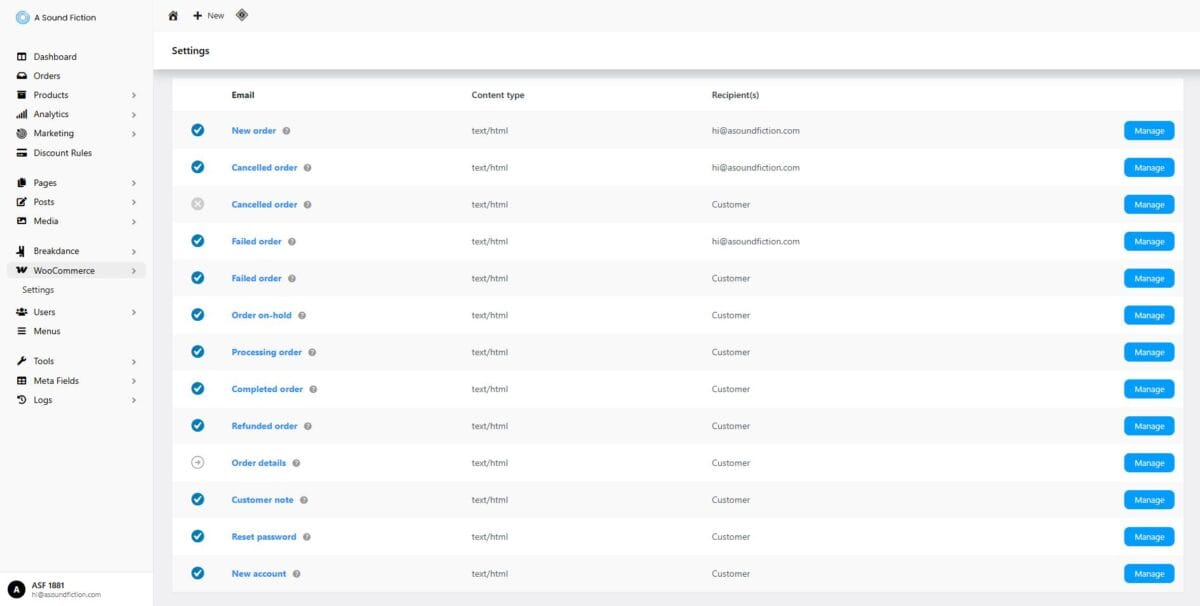
A table listing all email notifications will appear.
This list includes the following information for each email notification:
Status: Shows whether the email is active (enabled) or inactive (disabled).
Email: Defines the type of notification (e.g., New Order, Completed Order, Refunded).
Content Type: Displays the format of the sent email (e.g., text/html).
Recipient(s): Defines who the email is sent to (e.g., Customer or Admin).
Manage: A link to click when you want to configure the email settings.
11.7.1 – Types of Email Notifications
Email notifications are automatically sent during order and customer-related actions to inform both the store administrator and the customer. This section explains which email types are used and how they can be managed.
New Order: Sent to the store administrator. Notifies when a new order is created.
Cancelled Order: Sent to both the store administrator and the customer. Notifies when an order is cancelled.
Failed Order: Sent to both the store administrator and the customer. Notifies when an order payment fails.
Order on-hold: Sent to the customer. Informs that the order has been created but payment is still pending.
Processing Order: Sent to the customer. Informs that the order is now being processed.
Completed Order: Sent to the customer. Confirms that the order has been successfully completed.
Refunded Order: Sent to the customer. Notifies when a refund has been issued.
Order Details: Sent to the customer. Provides detailed information about the order.
Customer Note: Sent to the customer. Informs the customer when a seller adds a note to the order.
ResetPassword: Sent to the customer. Automatically delivered when a password reset is requested.
New Account: Sent to the customer. A welcome email sent when a new account is created.
11.7.2 – Editing Email Notifications
Each email notification listed in the WooCommerce panel can be edited via the Manage button.
From the left admin menu, click WooCommerce > Settings.
From the tabs, select the Emails tab.
A table will appear listing all default WooCommerce email notifications (e.g., New Order, Completed Order, Refunded). Hover over the email you want to edit.
Click the “Manage” button on the right.
An editing screen will appear. Make your changes on this screen and click the “Save Changes” button at the bottom of the page.
11.7.2.1 – Editable Fields
On this screen, you can make changes to the following fields:
a) Enable/Disable
Enable or disable this email notification. When enabled, the system will automatically send the email under the corresponding condition.
Warning If you are not sure what you are doing, please do not change this setting.
b) Recipient(s)
For admin notifications, you can enter the email address to which the notification will be sent. (Example: **@***********on.com). For customer notifications, this field is automatically set as the customer’s email address.
To add multiple recipients, enter the email addresses into the “Recipient(s)” field and separate each address with a comma (,).
c) Subject and Email Heading
Subject: Defines the subject line of the email. If left blank, WooCommerce’s default subject will be used ([{site_title}]: You've got a new order: #{order_number}).
Email Heading: This is the heading that appears inside the email. If left blank, the default heading will be used (New order: #{order_number}).
d) Additional Content
You can add a short note to the email. Example: “Your sale was successful!”
e) Email Type
Choose the format in which the email will be sent:
HTML (recommended, supports visual design),
Plain Text (text only),
Multipart (both HTML and plain text).
f)CC / BCC
Optionally, you can add additional recipients.
Warning Incorrect email addresses may disrupt email delivery. If you are unsure, leave this field blank.
g) Email Preview and Send Test Mail
At the bottom of the page, you can preview the changes you have made and send a test email to yourself.
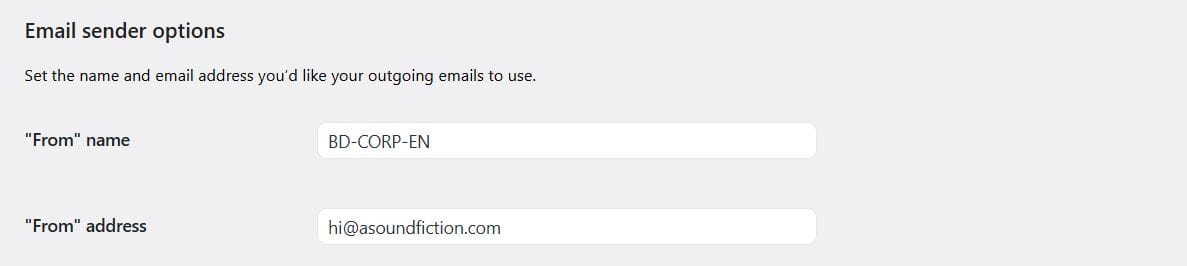
11.7.3 – Email Sender Options and Template
This section allows you to set the name and email address from which emails are sent.
All WooCommerce emails (new orders, canceled orders, customer notes, etc.) are displayed according to the theme settings here. This helps create a consistent visual identity for your brand.
a) Logo
Upload the logo that will appear at the top of all emails here.
Adding your company logo ensures a more professional appearance for your brand.
b) Logo Width (pixels)
Define the width of the uploaded logo in pixels (e.g., 120px).
Use a proportional value to avoid the logo appearing too large or too small.
c) Header Alignment
Select the alignment of the header content in the email:
Left, Center, Right.
d) Font Family
Defines the font to be used in emails.
Example: Web-safe fonts such as Helvetica, Arial can be selected.
e) Footer Text
This is the footer note that appears at the very bottom of all emails.
Typically contains brand slogan, copyright information, or a website link.
Select the color for highlights (buttons, headings, etc.) in the email.
Highlight color should match your brand’s corporate identity.
Tip This section is delivered pre-configured and customized for your brand. The logo, colors, and footer text are already adjusted according to your branding.
Warning If you do not plan to make changes to the visual identity (logo, color palette, font family, etc.), you do not need to modify anything here. If you are not sure what you are doing, please do not change the current settings.
11.8 – Integration
The Integration tab in WooCommerce allows you to perform geolocation validation in your store using the MaxMind Geolocation service. This feature identifies customers’ country-based location based on their IP addresses.
From the left menu, click on WooCommerce > Settings.
From the opened tabs, select the “Integration” tab.
Here you will see the following settings:
MaxMind License Key: To use the MaxMind service, you must enter a license key here. Without this key, the system will not function. To learn how to generate your license key, click on the “MaxMind integration documentation” link. ⚠️ Do not touch this field if you are not sure what you are doing. Entering an incorrect value may cause the system to malfunction.
Database File Path: Shows where the MaxMind database will be saved on your server. By default, the system saves this automatically. In most cases, you do not need to change this.
Finally, don’t forget to click the “Save Changes” button if you make any updates.
11.9 – Site Visibility
The Site Visibility settings allow you to control whether your site can be seen by visitors. This section is especially important when your site is under construction or in a testing phase.
From the left menu, click WooCommerce > Settings.
Select the “Site Visibility” tab.
Here are the available options:
Coming Soon When this option is active, your store will display a “Coming Soon” page to visitors. This way, customers know your site is not yet ready.
Apply to store pages: Adds the “Coming Soon” label only to store pages, while keeping other pages (e.g., blog) visible.
Share your site with a private link: With this setting, you can generate a private link to share your site with specific people who have the link.
Live When this option is active, your site is fully launched and visible to everyone.
Note If your site is still under development, we recommend using the “Coming Soon” option. Once you’re ready to launch, make sure to switch to Live mode.
11.10 – Advanced
The Advanced tab contains the technical settings that run in the background of your store. These settings determine which pages are used during checkout, how your store communicates with other systems, and how you will access future features. In other words, this section controls the “hidden infrastructure” of your store.
During setup, we configure these settings for you. Therefore, making incorrect changes here could disrupt the checkout process, page redirects, or integrations. For this reason, it is strongly recommended that you do not modify these settings “unless you know exactly what you are doing.”
From the left menu, click on WooCommerce > Settings. From the tabs that appear, select the “Advanced” tab.
11.10.1 – Page Setup
For WooCommerce to function properly, some essential pages need to be defined. In this section, you will determine which pages will be used throughout the checkout process, from the cart to payment. Each page is critical to ensuring a smooth customer experience.
Cart Page: The page where customers can view and manage the products they have added to the cart.
Checkout Page: The page where customers enter their address and payment details to complete their order.
Thank You Page: Displayed after an order is completed, showing the customer a summary and a thank-you message.
My Account Page: Customers can view their order history and update their account details here.
Terms and Conditions: The page containing the rules customers must accept during checkout.
Note These pages are pre-configured and delivered to you. Do not modify them unless necessary, as incorrect changes can disrupt the checkout flow.
11.10.1.1 – Checkout Endpoints
“Checkout Endpoints” are special links that define the specific steps of the checkout process on your site. These endpoints are appended to your site’s URLs and help direct the system correctly throughout the payment process.
Each endpoint must be unique. If the same endpoint is used for more than one field, it may cause errors during the checkout process.
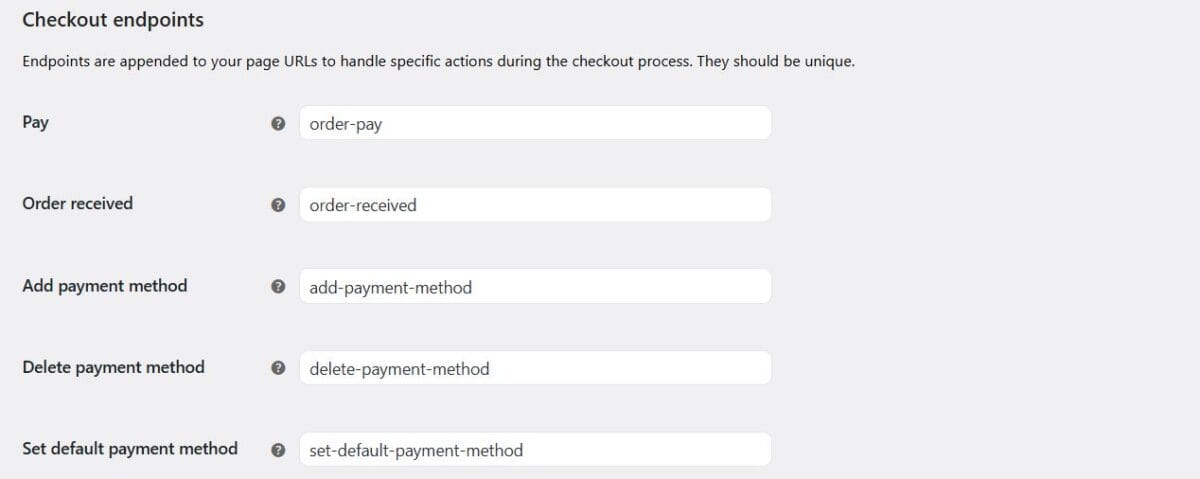
Examples of endpoints in the screenshot:
Pay:/order-pay → Represents the stage where the customer makes the payment.
Order Received:/order-received → Represents the step confirming that the order was successfully placed.
Add Payment Method:/add-payment-method → Allows the customer to add a new payment method.
Delete Payment Method:/delete-payment-method → Allows the removal of a previously added payment method.
Set Default Payment Method:/set-default-payment-method → Ensures a payment method is set as the default.
Note These fields are for technical configuration. Do not change them unless you are certain of what you are doing.
11.10.1.2 – Account Endpoints
Account endpoints are special links that define the actions customers perform on the My Account page. This means that when a customer clicks a link or performs an action, the system knows which page to display thanks to these endpoints.
Each endpoint must be unique. If the same endpoint is assigned to multiple actions, it cannot be used correctly. If you don’t want to use an endpoint, you can leave it blank.
Descriptions of the panel fields:
Orders (orders): Customers can view all their orders via this link.
View Order (view-order): Customers use this link to see the details of a specific order.
Downloads (downloads): If you sell digital products, customers can download purchased files here. (If left blank, this section is disabled.)
Edit Account (edit-account): Customers can update their account details (name, email, password, etc.) here.
Addresses (edit-address): Customers can edit their billing or shipping addresses here.
Payment Methods (payment-methods): Customers can manage their credit cards and other payment methods here.
Lost Password (lost-password): Customers who forgot their password are directed to the password reset page with this link.
Logout (customer-logout): Allows customers to log out securely.
Tip These fields are technical configurations. If you are unsure of what you are doing, do not modify them. Incorrect changes may prevent customers from accessing their accounts or completing orders.
11.10.2 – REST API
WooCommerce allows you to connect to other applications or systems. For example: an external software can fetch orders from your store.
Tip This requires technical knowledge; it is not recommended for users to make changes here.
11.10.3 – Webhooks
Used to automatically send events happening in your store (new orders, refunds, etc.) to other systems.
Tip This section is usually used by developers for integration purposes. If you don’t know what you are doing, do not modify this area.
11.10.4 – Legacy API
These are API settings used in older versions of WooCommerce. They are not used on new sites.
Tip For current usage, the REST API should be preferred.
11.10.5 – Woocommerce.com
This section is used to manage the plugins and services you purchased through WooCommerce.com.
Here you can connect your license keys, perform account matching, and check for updates to your extensions.
When you link this area with your WooCommerce account, all purchased products and support services are synchronized directly with your store.
Tip Since this section usually involves technical configurations, if you are not sure what you are doing, it is recommended not to make any changes.
11.10.6 – Blueprint (beta)
Blueprint is an experimental feature that lets you bulk import or export WooCommerce store settings, plugins, and themes. This way, you can easily move your store configuration to another environment, back it up, or share it with your team members.
Import: Upload a previously created .json file here. Only one Blueprint file can be imported at a time (maximum file size 50 MB).
Export: Select existing WooCommerce settings, plugins, and themes to export them in .json format. This can be used to save your store configuration or transfer it to another site.
Tip This feature is in beta. It may not always work reliably. For this reason, it is recommended not to use it in a live store without testing and to always take a backup before making any changes.
11.10.7 – Features
This section is where you can enable or disable new features introduced experimentally by the WooCommerce development team. The settings here are generally used for technical development and testing processes.
Order data storage: Choose whether orders are stored as WordPress posts or in WooCommerce’s new high-performance order storage (HPOS) system.
Analytics: Option to enable WooCommerce Analytics reporting.
Rate limit checkout: Allows you to use API-based or custom rule-based restrictions on the “checkout/place order” screen in your store.
Order attribution: Can be used to mark products with additional attributes or campaign-related flags.
Site visibility badge: Displays a small indicator in the WordPress admin bar showing the visibility status of your site.
Remote logging: Allows you to send anonymous, sensitive, non-identifying data to the WooCommerce team for debugging or diagnostics.
Email improvements: Ensures more advanced notifications are sent in post-order emails.
Blueprint (beta): A beta feature that allows you to import/export your site settings, plugins, and themes in bulk.
11.10.7.1 – Experimental Features
This section contains experimental features that are not yet fully stable. There is a risk of errors when using them. If you enable these, all risks are your responsibility!
HPOS Full text search indexes
HPOS Data Caching
Block Email Editor (alpha)
Point of Sale
Interactivitiy API powered Mini Cart
Cost of Goods Sold
Warning Only adjust the options in this section if you have technical knowledge or if you have been specifically instructed by our team. Incorrect configuration may cause issues in your site’s order and payment processes.
Can't find the answers you're looking for? We're here to help.
We Ask for Your Consent for a Better Experience We use cookies to ensure our website functions properly, personalize content and ads, provide social media features, and analyze site traffic. We also share information about your use of the site with our social media, advertising, and analytics partners.
Functional
Always active
Technical storage or access is strictly necessary for a legitimate purpose in order to provide a specific service explicitly requested by the subscriber or user, or to transmit a communication over an electronic communications network.
Tercihler
Teknik depolama veya erişim, abone veya kullanıcı tarafından talep edilmeyen tercihlerin saklanmasının meşru amacı için gereklidir.
Statistics
These cookies help us optimize our website. By allowing us to use these cookies, we can learn which pages our users enjoy browsing the most and which products are the most popular. Some of these cookies are provided by companies located outside the country. If you enable the use of these cookies, your personal data processed through the cookies will be transferred abroad.These cookies help us optimize our website. By allowing us to use these cookies, we can gain insights into which pages our users enjoy visiting the most and which products are the most popular. Some of the providers of these cookies are located abroad. If you enable the use of these cookies, your personal data processed through cookies will be transferred abroad.
Marketing
These cookies are used to help prevent you from seeing irrelevant ads. They are also used to display A Sound Fiction ads based on the products you browse, search for, or purchase when visiting other websites. Some of the providers of these cookies are located outside the country. If you enable the use of these cookies, your personal data processed through the cookies will be transferred abroad.