Section 1 – Logging In to the Admin Panel and Overview
1.1 – Accessing the Admin (Management) Panel
The Admin (Management) Panel is a No-Code management panel developed so you can manage your website end to end. You log in to the panel with an authorized username or email address and a password.
Follow the steps below to access your website’s admin panel:
Type your site’s URL into your web browser’s address bar and then append /admin. For example: https://www.yoursiteaddress.com/admin
On the login screen that appears, enter the username or email address and the password provided to you into the relevant fields.
Click the “Log In” button to sign in to the admin panel.
Note For your security, it is recommended to use a strong password and not share your login information with third parties.
Info If you experience any issue with your login details, open a support ticket through our support system.
1.2 – Admin Panel Overview
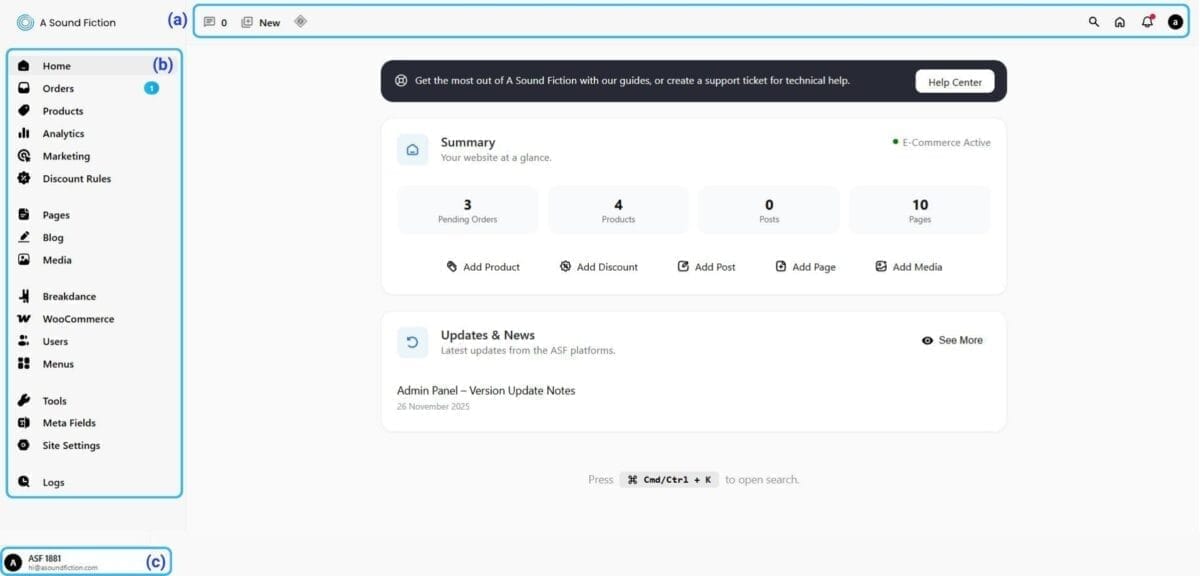
There are three main areas in the Admin Panel:
Top Bar Menu
Left Admin Menu
Profile Menu
1.2.1 – Top Bar Menu
By clicking the 💬 icon, you can quickly access comments submitted on blog posts.
With the “➕ New” button, you can add a page, post,product, order, user, coupon or media.
“Cache” is the caching tool that improves your website’s performance. You can trigger your site’s cache purge from here.
By clicking the “🏠” icon, you can quickly switch to your website’s homepage.
The 🔍 icon allows you to perform a quick search within the admin panel.
The 🔔 icon is used to view the latest system notifications.
1.2.2 – Left Admin Menu
Home: This is the dashboard area that opens by default when you log in to the admin panel. It displays the overall status of the site, content counts, and recent updates.
Orders: View all incoming orders and manage order processes.
Products: Add new products, edit existing ones, or delete them.
Analytics: Access comprehensive data and analytics based on sales.
Marketing: Manage marketing tools such as discount coupons, Meta integration, and more.
Discount Rules: You can create special campaigns here that will be valid during specific periods.
Pages: You can edit existing pages or add new pages.
Blog (Posts): You can manage your posts and add new posts.
Media: You can upload and manage your images and files.
Breakdance: You can customize the site design.
WooCommerce: You can manage your store’s general settings here (currency, tax rate definitions, shipping methods, payment methods, etc.).
Users: You can add or edit users.
Menus: You can create and edit your site menus.
Tools: Allows you to import or export site data, manage personal data, and also set up 301 redirects.
Meta Fields: Allows you to add and manage custom meta fields for content.
Site Settings: This section contains the general settings of your website. You can manage the logo, favicon (site icon), general information, and system-related settings from here.
Logs: Keeps records of actions performed by users; all actions such as user logins, content updates, plugin changes, etc. are listed.
1.2.3 –Profile Menu
It is located at the bottom-left section of the panel. In this area you can edit your profile, configure your profile security settings, or securely sign out of your session..
1.3 – Home (Dashboard) Widgets
After you log in to the admin panel, the “Home” screen is displayed first. The Home area is designed to allow site administrators and content editors to monitor the current status of the website from a single screen. In this area, you can quickly view the overall status of your site, manage your content with ease, and access the most frequently used actions with a single click.
By using the “Help Center” button located at the top of the admin panel, you can access up-to-date documentation. You can also follow the latest system-related updates through the “Updates & News” section.
In addition, the “Summary” area summarizes the most essential information about the store. Each card displayed in this section represents a separate data point:
Pending Orders: Displays the total number of orders that have not yet been processed and require action.
Products: Shows the total number of products currently published on the website.
Posts: Displays the total number of published blog posts.
Pages: Shows the total number of pages created on the website.
Tip These cards not only display information but also provide quick access to the related management screens. This makes it easy to track orders, users, and promotions.
1.4 – Secure Logout from the Admin Panel
After you finish your work in the admin panel, it is recommended to securely sign out of your session. This is especially important for protecting your site’s security on shared computers.
To log out:
Click the “Profile Menu” located at the top-right of the admin panel.
In the menu that opens, click the “Logout” option.
When you click, you securely sign out of your session and are redirected back to the login screen.
Note Especially on shared computers, it is strongly recommended that you do not save your password in the browser.
Can't find the answers you're looking for? We're here to help.
We Ask for Your Consent for a Better Experience We use cookies to ensure our website functions properly, personalize content and ads, provide social media features, and analyze site traffic. We also share information about your use of the site with our social media, advertising, and analytics partners.
Functional
Always active
Technical storage or access is strictly necessary for a legitimate purpose in order to provide a specific service explicitly requested by the subscriber or user, or to transmit a communication over an electronic communications network.
Tercihler
Teknik depolama veya erişim, abone veya kullanıcı tarafından talep edilmeyen tercihlerin saklanmasının meşru amacı için gereklidir.
Statistics
These cookies help us optimize our website. By allowing us to use these cookies, we can learn which pages our users enjoy browsing the most and which products are the most popular. Some of these cookies are provided by companies located outside the country. If you enable the use of these cookies, your personal data processed through the cookies will be transferred abroad.These cookies help us optimize our website. By allowing us to use these cookies, we can gain insights into which pages our users enjoy visiting the most and which products are the most popular. Some of the providers of these cookies are located abroad. If you enable the use of these cookies, your personal data processed through cookies will be transferred abroad.
Marketing
These cookies are used to help prevent you from seeing irrelevant ads. They are also used to display A Sound Fiction ads based on the products you browse, search for, or purchase when visiting other websites. Some of the providers of these cookies are located outside the country. If you enable the use of these cookies, your personal data processed through the cookies will be transferred abroad.