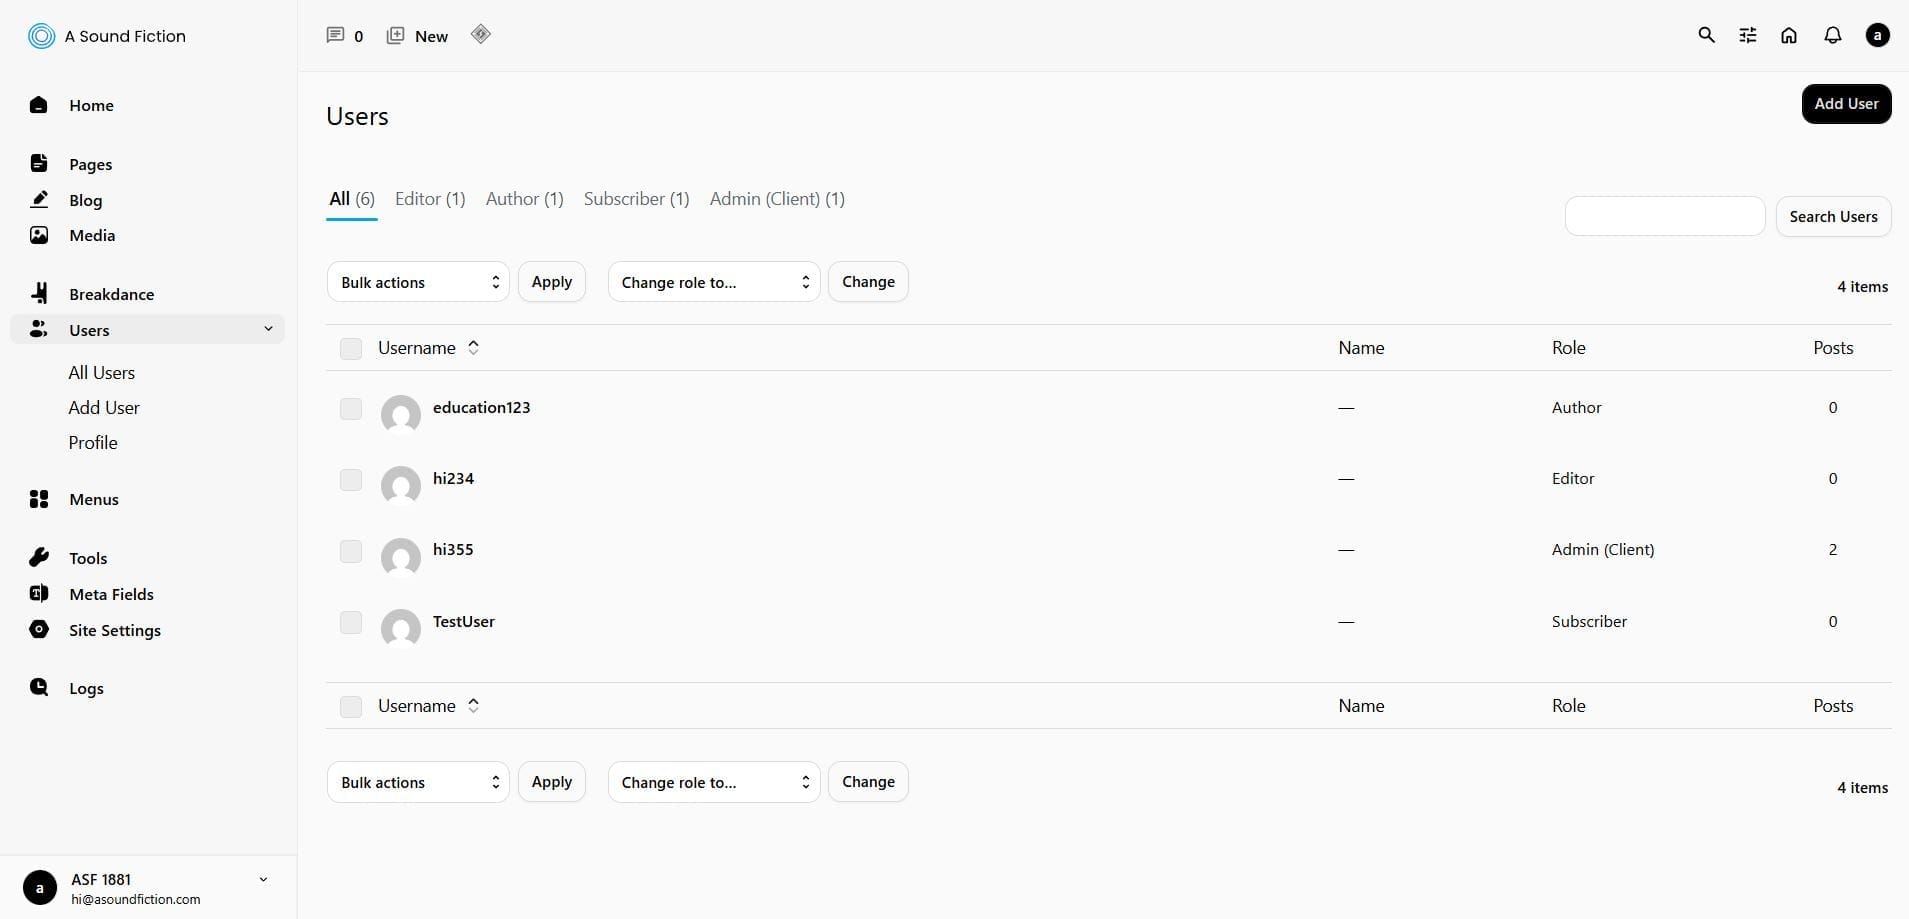
The Users section allows you to view, manage, and add all registered users on your site.
6.1 – All Users
In this section, you can list and manage all registered users.
From the left admin menu, click Users > All Users.
A list of all existing users will appear.
The information displayed in this list includes:
Username: The name the user uses to log into the system.
Name: The user’s real name (profile information).
Email: The registered email address of the user.
Role: The role that defines the user’s permissions on the site (e.g., Administrator, Editor, Author).
Posts: The number of posts created by the user (clicking this shows all posts belonging to that user).
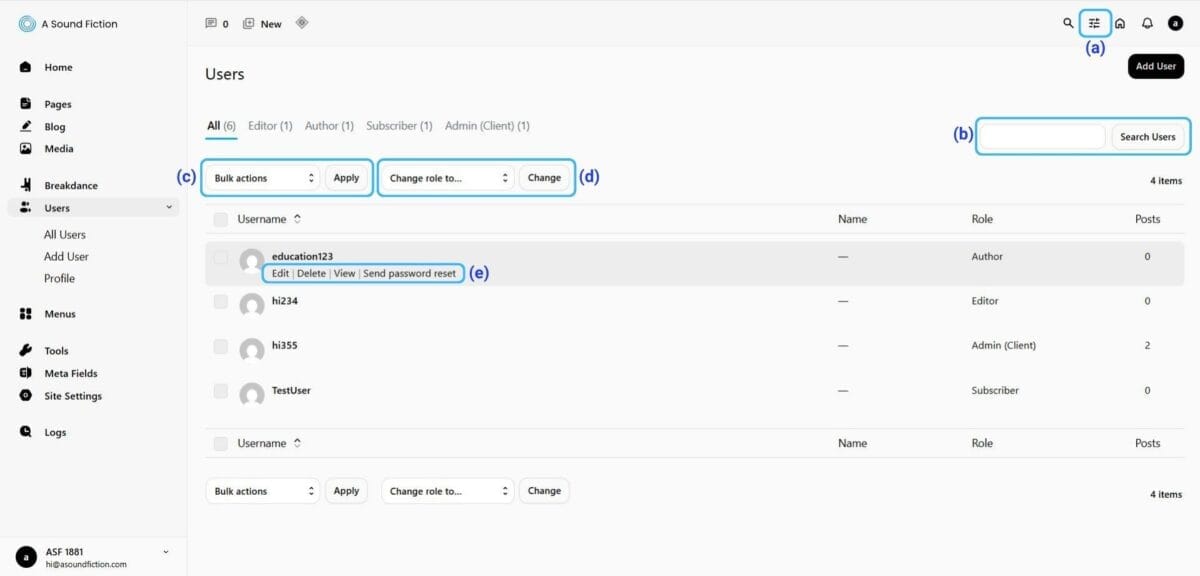
Actions available on the list: a. Screen Options b. Search Bar c. Bulk Actions d. Change Role e. Quick Actions
6.1.1 – Screen Options
The “Screen Options” section allows you to customize what information is displayed in the “All Users” list and how it appears.
Columns: Select which columns to display (Email, Role, Posts).
Pagination: Adjust how many items are shown per page.
Tip After configuring your screen options, click “Apply” to save them.
6.1.2 – Search Bar
Allows you to quickly find a specific user.
6.1.3 – Bulk Actions
With the Bulk Actions area, you can manage multiple users at the same time. For example, you can delete the selected users in bulk or send them a password reset link.
6.1.4 – Change Role
With “Change Role,” after selecting one or more users, you can use it to change their roles.
Select the user(s).
Choose the desired role from the dropdown menu.
Click the “Change” button.
User Roles
Admin (Client): The most powerful role with full access to site management. Can manage pages, posts, users, menus, and design.
Editor: Can create, edit, publish, or delete all posts (including those by others). Can manage comments (approve, delete, reply). Can upload media files.
Author: Can add and edit only their own posts. Cannot create new categories or tags but can use existing ones. Can reply to comments but cannot manage others’ comments. Can access the media library and upload files.
Contributor: Can write and save their own posts as drafts. Requires approval from an Editor or Admin before publishing.
Subscriber: Can only log in and view/edit their profile. Has no other access in the admin panel.
Translator: Has access only to the Dashboard and translation plugins. No other site management permissions.
6.1.5 – Quick Actions
Quick actions appear when you hover your mouse over a user.
Edit: Update the user’s profile details (language, role, etc.), set a new password, or send a password reset link.
Example – To change a user’s role:
Click Users > All Users.
Hover over the user whose profile you want to edit and click the “Edit” option.
On the edit page, select the new role from the “Role” dropdown.
Complete the process by clicking the “Update User” button at the bottom of the page.
Note After every change, always click Update User to save.
Delete: Permanently remove the user from the system.
View: Open and view the posts created by the user.
Send Password Reset: Send the user an email with a password reset link.
6.2 – Add New User
Steps to create a new user:
Step 1 – Access the Add User page
From the admin menu, click Users > All Users > Add User or directly Users > Add User.
Step 2 – Fill in Required Fields
Username(required): Choose a username.
Email (required): Enter the user’s email address.
Step 3 – Fill in Optional Fields
These fields are not mandatory to fill in. However, it is recommended to complete them. Optional fields:
First Name, Last Name
Website
Step 4 – Choose Language
Select a language. This determines the language of the user’s admin panel. (If no language is selected, the site’s default language will be used.)
Step 5 – Create Password
Create a password or generate a strong one using the “Generate Password” button.
You can control its visibility with the Hide/Show option next to the password.
If you don’t want your site’s admin panel to fall into the wrong hands, you must use a strong password.
How to Create a Strong Password: To create a strong password, simply click the Generate Password button mentioned two lines above.
Now you may be wondering how you will remember this password. For that, you should definitely use a secure password manager such as Bitwarden or Apple Passwords. Remember, the password manager offered by Google Chrome or browsers in general is not secure!
If the “Send User Notification” option is active, an email notification will be sent to the added user.
Step 7 – Select User Role
Select the user’s role (e.g., Editor, Author). User roles:
Admin (Client): The most authorized user who can fully manage the site. Can manage pages, posts, users, menus, and design.
Editor: Can create, edit, publish, or delete all posts (including those of others). Can manage comments (approve, delete, reply). Can upload images/videos to the media library.
Author: Can only add and edit their own posts. Cannot create new categories or tags but can select from existing ones. Can reply to comments, but cannot edit others’ comments. Can access the media library and upload files.
Contributor: Can write their own posts and save them as drafts. Posts must be approved by an Editor or Admin before being published.
Subscriber: Can only log in and view/edit their profile information. Cannot perform any other actions in the admin panel.
Translator: Can only access the Dashboard and translation plugins. Has no other authority in site management.
Step 8 – Click The Add UserButton
6.3 – Profile
You can edit your own profile information here.
Update name, email, password, and personal details.
Change your display name.
Can't find the answers you're looking for? We're here to help.
We Ask for Your Consent for a Better Experience We use cookies to ensure our website functions properly, personalize content and ads, provide social media features, and analyze site traffic. We also share information about your use of the site with our social media, advertising, and analytics partners.
Functional
Always active
Technical storage or access is strictly necessary for a legitimate purpose in order to provide a specific service explicitly requested by the subscriber or user, or to transmit a communication over an electronic communications network.
Tercihler
Teknik depolama veya erişim, abone veya kullanıcı tarafından talep edilmeyen tercihlerin saklanmasının meşru amacı için gereklidir.
Statistics
These cookies help us optimize our website. By allowing us to use these cookies, we can learn which pages our users enjoy browsing the most and which products are the most popular. Some of these cookies are provided by companies located outside the country. If you enable the use of these cookies, your personal data processed through the cookies will be transferred abroad.These cookies help us optimize our website. By allowing us to use these cookies, we can gain insights into which pages our users enjoy visiting the most and which products are the most popular. Some of the providers of these cookies are located abroad. If you enable the use of these cookies, your personal data processed through cookies will be transferred abroad.
Marketing
These cookies are used to help prevent you from seeing irrelevant ads. They are also used to display A Sound Fiction ads based on the products you browse, search for, or purchase when visiting other websites. Some of the providers of these cookies are located outside the country. If you enable the use of these cookies, your personal data processed through the cookies will be transferred abroad.