Pages are used to create and manage fixed-content sections of your website such as “Home“, “About Us“, “Contact“, “Our Services”, etc. They should not be confused with Posts.
In the Admin Panel, you can view, edit, or add new pages from the “Pages” menu. Pages form the basic structure of your site, while Posts are for regularly shared current content and news.
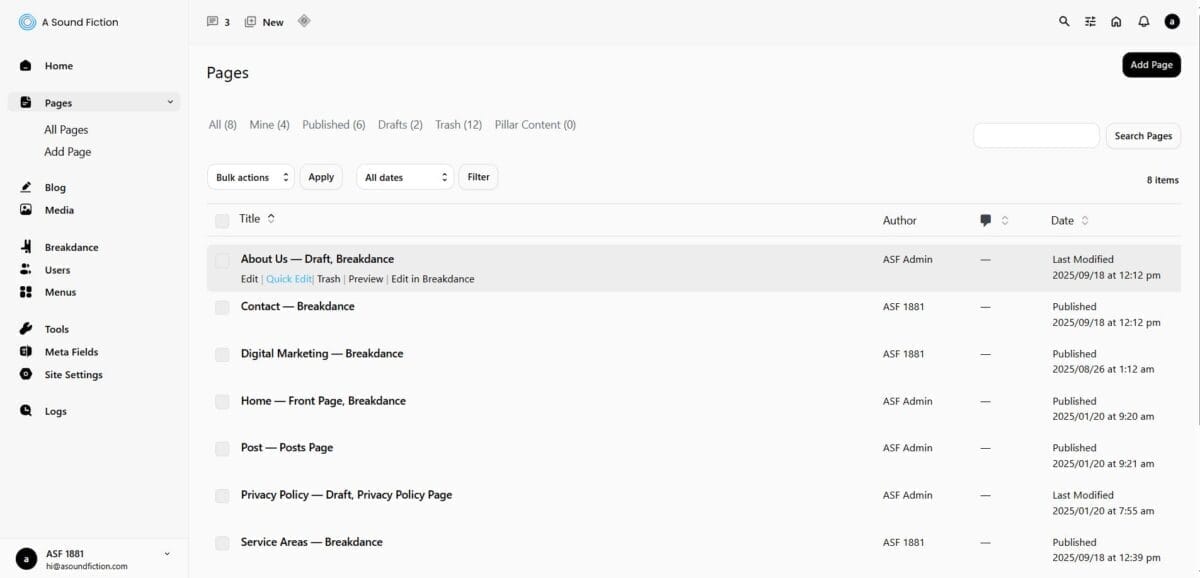
2.1 – All Pages
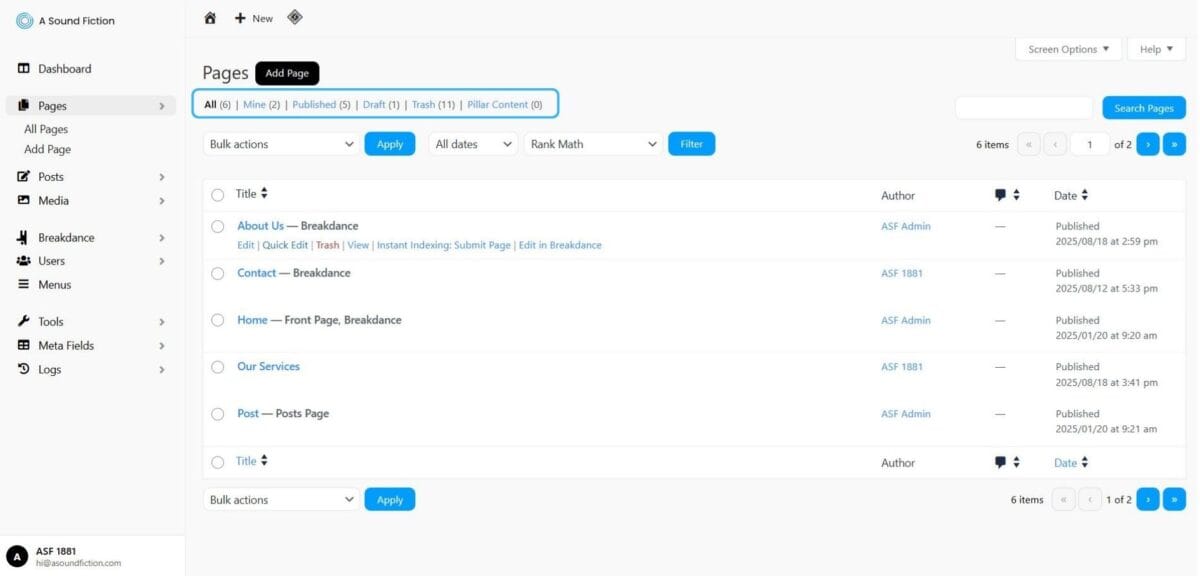
From the left admin menu, click Pages > All Pages.
A list of all existing pages will appear.
Information you will see in this list:
Title: The name of the page (e.g., “Home”).
Author: The person who added or last edited the page.
Comments: Comments made on the page (if enabled).
Date: The publication or last updated date of the page.
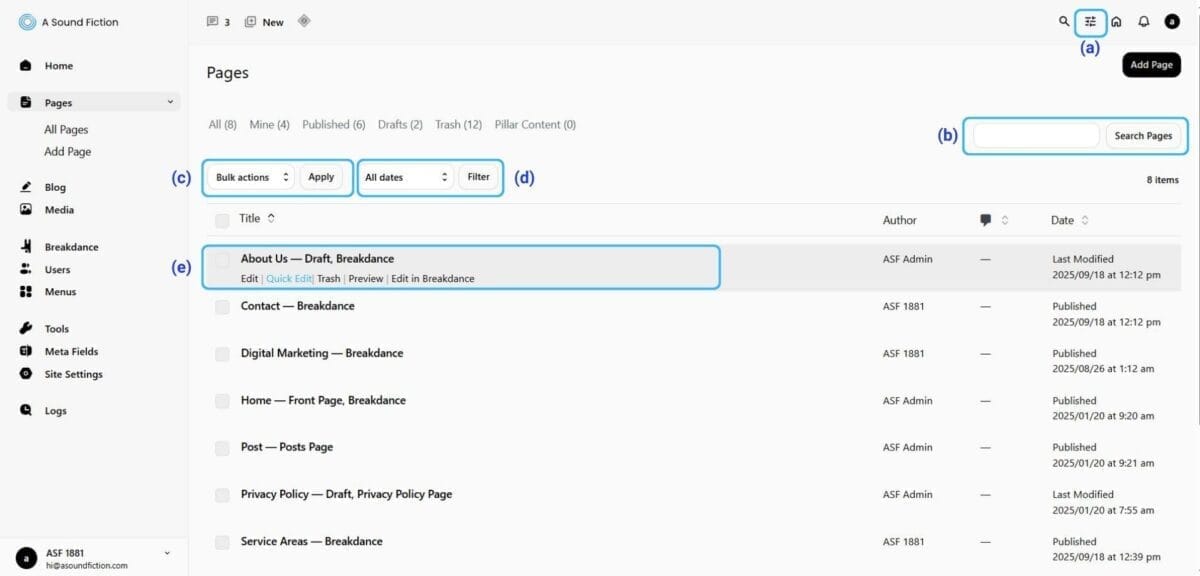
Actions you can perform on the list:
Screen Options
Search Bar
Bulk Actions
Filtering
Quick Actions
2.1.1 – Screen Options
With the “Screen Options” section, you can determine which information will appear in the “All Pages” list and how it will be displayed.
Columns: The options you check here will appear as columns in the “All Pages” table (e.g., Author, Comments, Date, SEO Title, SEO Details). Unchecked columns will not be displayed.
Pagination: In the “Number of items per page” field, you can set how many pages will be displayed at once (e.g., 5 → Only 5 rows (page records) will be listed per page).
View Mode: “Compact View” provides a simpler, condensed list view. “Extended View” shows each row with more details.
Tip After adjusting your screen options, you must click “Apply” to save them.
2.1.2 – Search Bar
Allows you to quickly find a specific page.
2.1.3 – Bulk Actions
With the Bulk Actions area, you can manage multiple pages at the same time. For example, you can collectively delete selected pages or set them to draft.
2.1.4 – Filtering
You can narrow down the list by “Date” status.
2.1.5 – Quick Actions
When you hover your mouse over a page, you can use the options “Edit”, “Quick Edit”, “Trash”, “View”, and “Edit in Breakdance”.
You can manage any page with the “Edit in Breakdance” option in a No-Code way.
2.2 – Adding a New Page
Follow these steps to add a new page to your website:
Step 1 – Go to Add Page Area
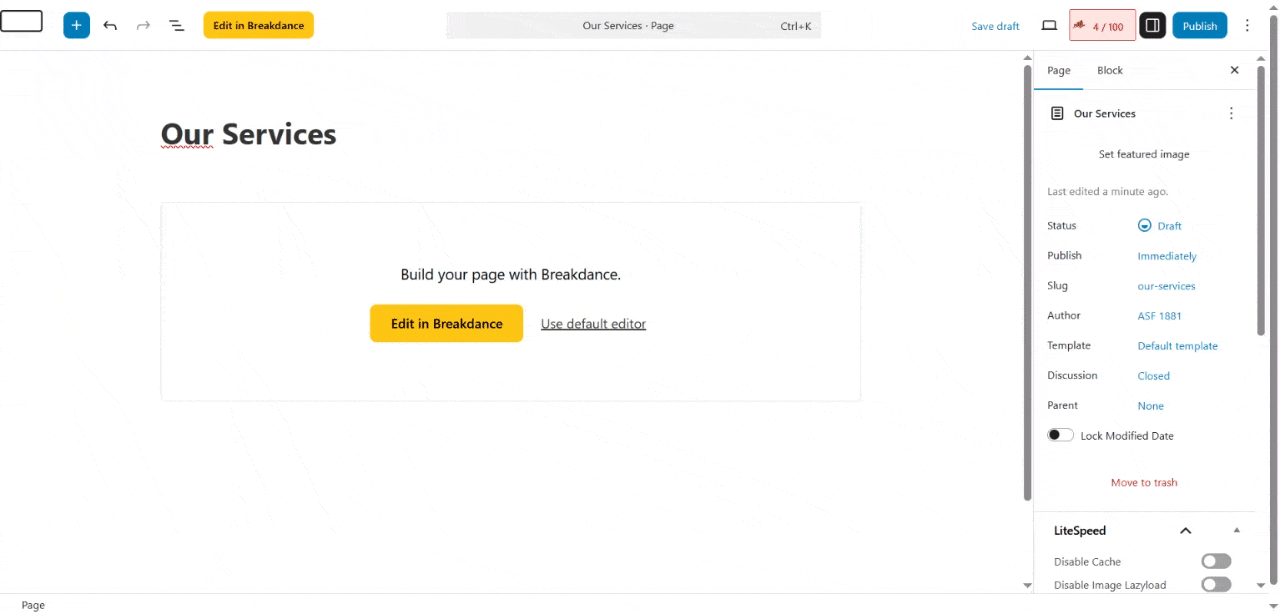
In the admin panel, go to Pages > All Pages > Add Page, or directly click Pages > Add Page.
Step 2 – Add Title
At the top of the screen, there is an “Add Title” field.
Enter the name of the page here (e.g., Our Services, Contact)..
Step 3 – Save Draft
Save Draft: Saves the page so that only you can see it. Always save new pages as drafts first. Content that is not ready should not be presented to visitors.
Step 4 – First Design with Breakdance
To design the new page you created:
Click the “Edit in Breakdance” button.
You will handle all content addition, visual editing, and page design here.
Info For more detailed information on how to perform these actions, please review the Breakdance documentation.
Adım 5 – Publishing
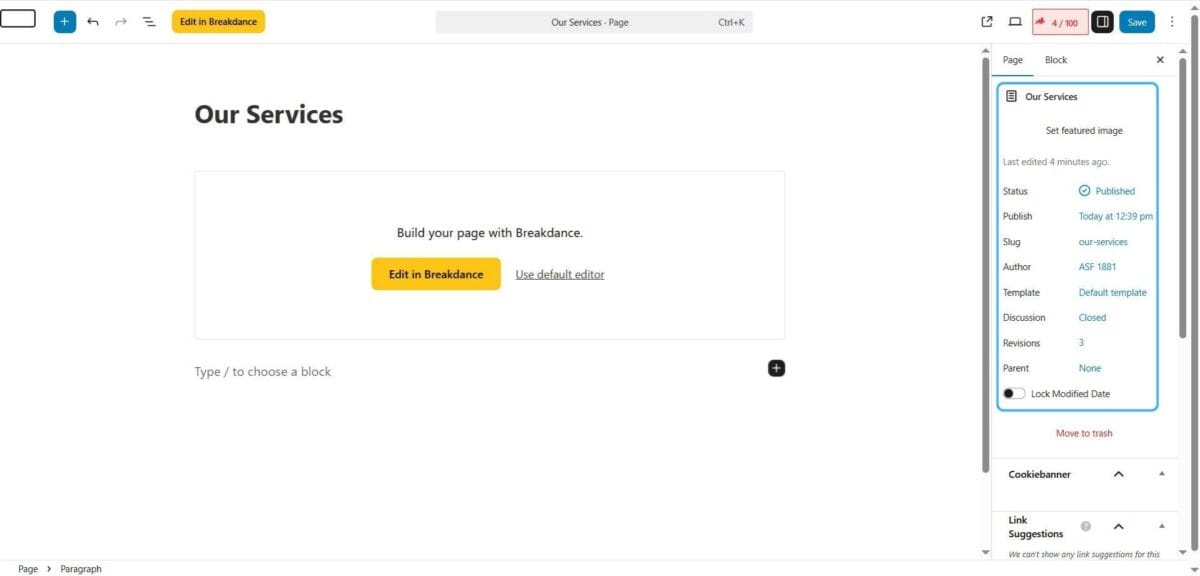
Once your design and edits are complete, click the Publish button to publish your page.
2.2.1 – Right Panel Fields
When adding a page, there are many settings on the right side of the screen. Their functions are:
Set Featured Image: Not necessary since Breakdance Builder will be used.
Publish: Choose the publication date and time (immediately or scheduled).
Slug: Creates a short link for the page. Example: “our-services” → https://www.yoursite.com/our-services – This short link forms the page’s URL structure.
Author: Shows who created/edited the page.
Template: Choose which template the page will use. Usually “Default Template” is used. Do not change unless you know what you are doing.
Discussion: Sets whether comments are open or closed for the page. Unlike Posts, “Pages” are closed to comments by default. Do not change unless you know what you are doing.
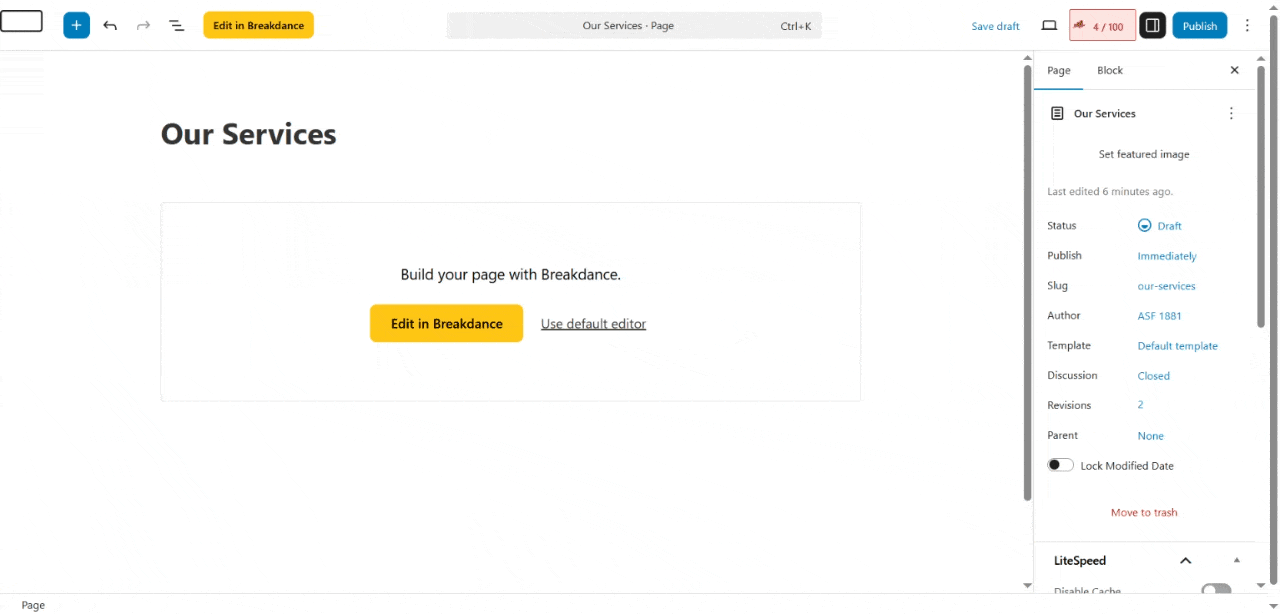
Revisions: Shows previously saved versions of the page. Unless you know what you are doing, do not adjust here. Revision management is strongly recommended to be done within the Breakdance Builder’s History section.
Parent: Determines whether the page will be under another page, allowing you to build a page hierarchy. URL structures are automatically generated based on this hierarchy.
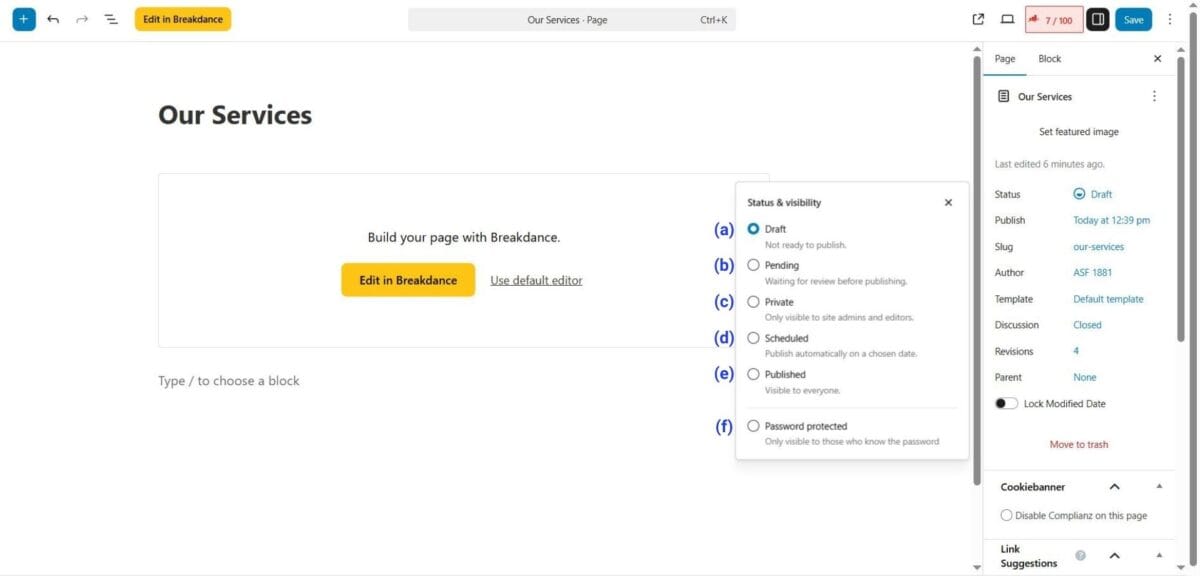
Status: Shows the current status of the page. This controls how and when the page is visible to users.
Draft: Page is not ready for publication; only you can see it. Important Advice: Always save new pages as Draft first, use “Publish” when they are ready.
Pending: Page is complete but awaiting review by an editor/administrator. Common in team projects.
Private: Page can only be viewed by site administrators and editors. Hidden from visitors.
Scheduled: You can select a date and time for publication. The page will automatically go live at the scheduled time.
Published: Page is publicly available to everyone. Warning: Do not use this option unless you are completely sure of your content.
Password Protected: Page can only be viewed by people who know the password you set.
2.3 – Editing a Page
To make changes to an existing page:
In the admin panel, go to Pages > All Pages.
Click the title of the page you want to edit.
On the screen that opens, make the changes you want:
Update your title here. Also adjust settings such as “Status” from the right panel.
If you change the page title, it is recommended to update the Slug (short link) as well. Delete the old slug and save it empty to automatically generate a new one based on the new title.
Example:
Old Title: Our Services
New Title: Service Areas
Old Link: https://www.yoursite.com/our-services
New Link: https://www.yoursite.com/service-areas
🔍 Why important?
For SEO, having the page title and link aligned makes them more consistent.
However, since your old link will still be indexed by search engines like Google, if you switch to a new link you must redirect the old one with a 301 redirect to the new page. Otherwise, visitors following the old link will see a “404 error.”
Info You can quickly learn how to set up a 301 redirect by reviewing our prepared documentation.
Page design should be edited with the Breakdance Editor.
Info Click the “Edit in Breakdance” button to edit your page. For detailed information on how to use it, check the Breakdance documentation.
Don’t forget to save your page when done:
Save: Applies changes to the live page.
2.4 – Deleting a Page
On the All Pages screen, hover over the page you want to delete.
From the options that appear, click the “Trash” link.
The page will be moved to the Trash.
Note If you deleted it by mistake, you can restore it by clicking Restore from the Trash tab at the top. To permanently delete, click Delete Permanently from the Trash tab at the top. After this action, the page cannot be restored; it will be permanently deleted.
2.5 – Page Statuses
All: Lists all pages in the system, regardless of publication status (draft, published, scheduled, trash, etc.).
Mine: Lists only the pages created or assigned to the logged-in user, regardless of publication status.
Published: Active pages that are completed and approved, open to everyone. Visitors will see these when they access your site.
Draft: Pages that are not yet published and still in preparation. Drafts are only visible to logged-in users (admins); visitors will not see them.
Trash: Pages that have been deleted but not permanently removed. From this section, they can be permanently deleted or restored.
Can't find the answers you're looking for? We're here to help.
We Ask for Your Consent for a Better Experience We use cookies to ensure our website functions properly, personalize content and ads, provide social media features, and analyze site traffic. We also share information about your use of the site with our social media, advertising, and analytics partners.
Functional
Always active
Technical storage or access is strictly necessary for a legitimate purpose in order to provide a specific service explicitly requested by the subscriber or user, or to transmit a communication over an electronic communications network.
Tercihler
Teknik depolama veya erişim, abone veya kullanıcı tarafından talep edilmeyen tercihlerin saklanmasının meşru amacı için gereklidir.
Statistics
These cookies help us optimize our website. By allowing us to use these cookies, we can learn which pages our users enjoy browsing the most and which products are the most popular. Some of these cookies are provided by companies located outside the country. If you enable the use of these cookies, your personal data processed through the cookies will be transferred abroad.These cookies help us optimize our website. By allowing us to use these cookies, we can gain insights into which pages our users enjoy visiting the most and which products are the most popular. Some of the providers of these cookies are located abroad. If you enable the use of these cookies, your personal data processed through cookies will be transferred abroad.
Marketing
These cookies are used to help prevent you from seeing irrelevant ads. They are also used to display A Sound Fiction ads based on the products you browse, search for, or purchase when visiting other websites. Some of the providers of these cookies are located outside the country. If you enable the use of these cookies, your personal data processed through the cookies will be transferred abroad.